World’s Worst I/O Dock Doesn’t Deserve Elegant Fix

Even spendy commercial products can end up being lemons. This is something [Mike Buss] is familiar with, as he had the misfortune of being stuck using what he declares is the world’s worst USB hub, and it’s not even a mystery discount device from overseas: it’s an HP Thunderbolt Dock G2. It is a sort of combination I/O dock and USB hub, and it caused him no end of frustration until he “fixed” it with a crude workaround.

The problems with [Mike]’s dock come down to two major issues. The first is that the USB-C connection will, if moved even the slightest amount, instantly trigger a disconnect from the host computer. Frankly, that sounds like a defect, but that’s not all. The other issue is that the whole top of the device is actually a giant, hyper-sensitive button. Even a stern gaze seems to be enough to cause it to activate. What does the button do? It puts the host computer to sleep; something that we all agree should suffer from as few false activations as possible.

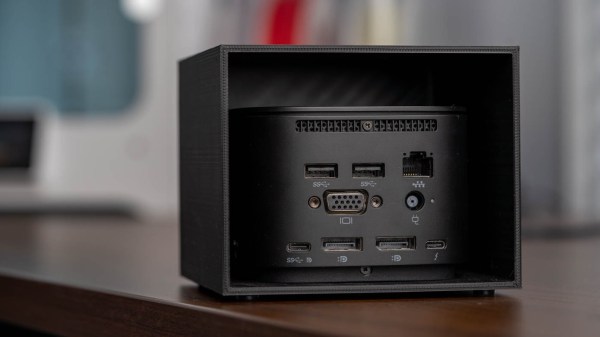
We’ll spoil the surprise by revealing that the “fix” was nothing more than putting a 3D printed enclosure around the troublesome device, as shown in the image above. Keeping the dock covered and perfectly still at least prevents the two aforementioned issues, and that’s good enough for [Mike].

The curious part of all this is just how badly the device’s design affected normal use. We’d suspect a defect or malfunction, but a cursory search of reviews online suggests [Mike]’s experience isn’t unique. It’s certainly not the first poorly-designed product we’ve seen fixed by a new enclosure, but some problems just aren’t worth the effort of a more elegant solution.

Morse Keyboard Communicates With The Blink Of An Eye

Most of us use our hands to interface with computers, but the human body is capable of many types of input other than that of fingers and feet. But what about people who can’t use their extremities and don’t have a voice? For their sake, it’s time to get creative.

[Michael Paul Coder] has made a way to type simply by blinking in Morse code. Those of you with long memories may recall Lucid Scribe, where he was attempting to document lucid dreaming experiments by detecting rapid eye movements with an accelerometer and triggering his computer to play music. This would in turn notify [Michael] that he was in fact dreaming and was safe to tie a cape around his neck and take a flying leap from a tall building.

Whereas [Michael]’s creation needed a commercial EEG device before, he’s now made it work with just an old webcam thanks to the new trans-consciousness messaging protocol, which operates by using facial detection and then interpreting the amount of changed pixels between video frames. Be sure to check it out in action after the break.

You know how much we love assistive technology around here — just two years ago, the Byte took top honors in The Hackaday Prize.

Continue reading “Morse Keyboard Communicates With The Blink Of An Eye”

An input device combining a joystick with several knnobs and buttons

Modular Multi-Input Macro Keypad Integrates Mouse And Joystick

While most computer users make do with just a keyboard and mouse, power users often have multiple additional input devices. Gamers use joysticks or dedicated mice, CAD engineers have specialized gadgets for manipulating 3D objects, while graphic designers might want programmable macro buttons to automate various tasks. [Sascha Nitsch] didn’t fancy cluttering his desk with a whole bunch of input devices and therefore decided to combine as many functions as possible into the CIMDIT: a Completely Insane Multi Device Input Thingy.

The main components making up the CIMDIT are a 3-axis joystick module, which can double as a 3D CAD mouse, and a set of buttons, knobs and sliders to enable various functions. One rotary encoder is used to choose an operating mode, while four others can be used as programmable inputs. A small OLED display shows which mode is currently selected, but can also be used to display notifications from various programs.

An Arduino Pro Micro provides a USB interface to a PC and reads out the various input units. The entire design is modular, so it can be customized to any desired combination of analog and digital inputs. [Sascha] made a neat 3D printed enclosure to hold the 3-axis module along with 26 buttons, five rotary encoders and one analog slider. KiCAD files for the PCBs and the FreeCAD source for the enclosure are available under an open-source license on [Sascha]’s Git repo.

The same thing applies to the software driving the CIMDIT, though adding functionality to it might turn out to be tricky: [Sascha] had to perform some serious code optimization to fit everything into the Arduino’s 32 kB of program flash. The Git repo also includes a convenient tool to create key mappings to be programmed into the controller, saving you from having to compose a binary file by hand.

Love macro keypads? Check out these cool examples with gesture detection, an e-ink display or simply beautiful wooden keys.

A Clear Guide For A Low-Profile Bespoke Keyboard

At the risk of stepping on our fantastic Keebin with Kristina series, a beautiful tutorial by [Ben Vallack] details how to create a custom low-profile keyboard in great detail.

We’ve covered complete guides to building your own and projects making custom rubber dome keyboards. In addition, several subreddits exist around custom keyboard builds and dozens of websites are dedicated to selling parts. So why add not add one more guide, especially on as well done as [Ben’s]?

[Ben] focuses on the high-level tooling and the methodology of laying out a keyboard and how it all comes together. It all starts with determining your specific hand shape and layout with Ergopad. With that shape taken care of, you can move onto Ergogen, which allows you to take the layout you have in mind and generate a KiCAD board layout that just needs to be routed. Flippable boards, various footprints for switches, and connecting up different microcontrollers are all supported.

Once you have your PCB in hand, [Ben] walks you through soldering the sockets on the back and setting up your board firmware in ZMK with Github Actions. It’s a slick guide with a nifty product at the end. Video after the break.

Continue reading “A Clear Guide For A Low-Profile Bespoke Keyboard”

Illustrated Kristina with an IBM Model M keyboard floating between her hands.

Keebin’ With Kristina: The One With The Really Tall Keycaps

About a month ago, [Unexpected Maker] finished their TinyS3, an ESP32-S3 development board. Since the chip supports both true USB and Bluetooth, [deʃhipu] wondered how well it would work in a keyboard.

Thus, the Vegemite Sandwich was made, perhaps while [deʃhipu] was dreaming of traveling in a fried-out Kombi. But really, it was named so because [Unexpected Maker] hails from Australia.

This is [deʃhipu]’s first time using switch sockets, which is (as far as we know) the only choice when it comes to hot-swappable Kailh chocs. We’ll be watching this one with hungry eyes.

Continue reading “Keebin’ With Kristina: The One With The Really Tall Keycaps”

Haptic Smart Knob Does Several Jobs

A knob is a knob, a switch is a switch, and that’s that, right? And what about those knobs that have detents, set in stone at the time of manufacturing? Oh, and those knobs that let you jog left to right and then snap back to center — that can’t be modified…right? Well, you likely know where this is going, and in the video below the break, [scottbez1] shows off a new open source haptic input knob that can be all of these things with just some configuration changes!

The list of possibilities is long: virtual snap points, virtual spring loading, virtual detents, virtual end points. It’s a virtual smörgåsbord of configuration options that make this haptic smart knob a one stop shop for all of your knob needs. This is all possible because the knob contains a high resolution magnetic encoder chip that has a single degree resolution. The sensor is coupled, through software, to a brushless DC motor. The round LCD gives visual feedback as well.

As [Myself] on the Hackaday Discord channel noted, having configurable spacing and strength for detents, springs, and stops, is nothing short of incredible. Being able to reconfigure the knob at-will means that it can become context sensitive. It’s wonderfully unique and it’s open source, so you can make your own with the information available at GitHub.

And according to its creator, the only thing the Haptic Smart Knob can’t do is do your taxes or blend your margarita. Well, it’s open source, so perhaps some of our more enterprising readers can submit just the right pull request.

This isn’t Hackaday’s first Motorized Volume Knob feature, but it might be one of the neatest we have seen so far. Thanks to [mattvenn] on the Hackaday Discord server for the great tip!

Continue reading “Haptic Smart Knob Does Several Jobs”

Top side of the VL670 breakout board, with two USB connectors and the VL670 chip in the center.

A Chip To Bridge The USB 2 – USB 3 Divide

On Twitter, [whitequark] has  found and highlighted an intriguing design – a breakout board for the VL670, accompanied by an extensive yet very easy to digest write-up about its usefulness and inner workings. The VL670 is a chip that addresses a surprising problem – converting USB 2.0 signals into USB 3.0.

If you have a USB 2.0 device and a host with only USB 3.0 signals available, this chip is for you. It might be puzzling – why is this even needed? It’s about the little-known dark secret of USB3, that anyone can deduce if they ever have to deal with a 9-pin USB 3.0 connector where one of the three differential pairs doesn’t quite make contact.

When you see a blue “3.0” port, it’s actually USB 2 and USB 3 — two separate interfaces joined into a single connector. USB 3 uses two single-directional differential pairs, akin to PCI-E, whereas USB 2 uses a single bidirectional one, and the two interfaces on a blue connector operate basically independently of each other. There’s many implications to this that are counterintuitive if you simply take “USB 3.0” for “faster backwards-compatible USB”, and they have painful consequences.

For instance, USB 3 hub ICs have two separate hub entities inside – one for USB 3 and one for USB 2. Even if you have a USB 3 hub plugged into a USB 3 port, multiple USB 2 devices plugged into it still cannot break through the USB 2 uplink limit of 480 MBps. If you ever thought that a faster hub with a faster uplink would fix your USB 2 device speed problems – USB-IF engineers, apparently, thought differently; and you might have to find a workaround for your “many cheap SDRs and Pi 4 in a box” setup. Continue reading “A Chip To Bridge The USB 2 – USB 3 Divide”