It’s A 486 Computer, On A Breadboard

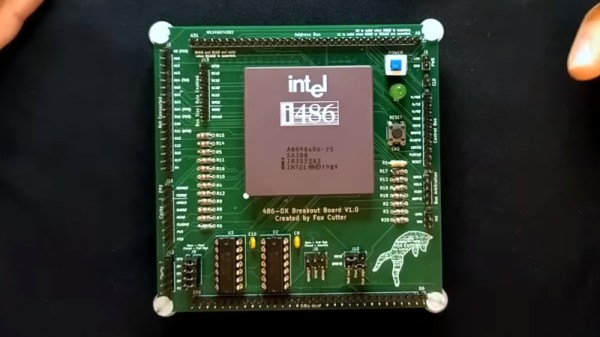
Ever since the 1970s, a frequent project has been to take a microprocessor and construct a computer system on a breadboard or stripboard. Usually these machines feature a familiar 8-bit processor such as a 6502 or a Z80 because of their breadboard-friendly DIP packages, but there is surprisingly little reason why some of the more recent silicon can’t be treated in the same way. [FoxTech] is leading the way on this, by making a breadboard computer using an 80486DX.

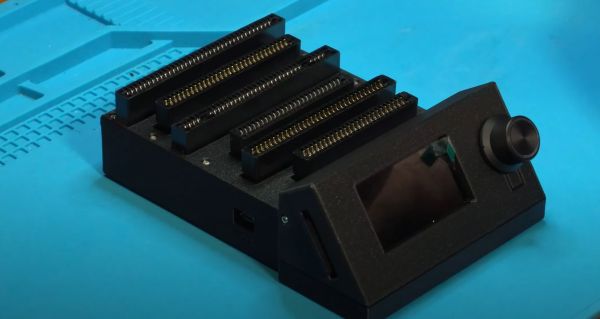
A 1990-era 32-bit desktop CPU seems unpromising territory for this application, but its architecture is surprisingly accessible. It needs a breakout board to gain access to its various lines, but beyond that it can be interfaced to in a very similar way to those earlier chips.

So far there are two videos in the series, which we’ve placed below the break. The first one introduces the project and shows the basic set-up. A 486 running NOPs may produce a pretty light show, but as he starts to show in the second video, it’s capable of more. The eventual aim is to have a simple but fully functional breadboard computer, so he’s starting with logic to decode the 32-bit bus on the 486 into the 8-bit bus he’s going to use.

It’s fascinating to learn about how the 32-bit 486 handles its interfacing and deals with four bytes at once, and we’re very much looking forward to seeing this project play out. The 486 may be on life support here in 2023, but that doesn’t mean it can’t still receive some love.

Continue reading “It’s A 486 Computer, On A Breadboard”

Replacing A Clock IC’s Battery

You can find a lot of strange things inside IC packages. For example, the Dallas DS12885 and DS12887 real time clock “chips” were available in a large package with an internal battery. The problem, of course, is that batteries die. [New Old Computer Show] wanted to restore a machine that used one of these devices and was able to repair the device. You can see two videos below. In the first video, he replaces both the battery and adds an external oscillator which would be necessary for the DS12885. However, he actually had the DS12887, which has an internal oscillator, something the second video explains.

The repair used a PCB he ordered from Tindie. However, the board is only part of the problem. You also need to disconnect the dead battery which requires a Dremel and a steady hand.

Continue reading “Replacing A Clock IC’s Battery”

Retrotechtacular: Military Graphics In The 1960s

While you might think the military doesn’t have a sense of humor with names. Take the AN/MSQ-19 “automated tactical operations central” for example. (Video, embedded below.) But then, when you find out that the truck-sized computer at the heart of it was MOBIDIC — yes, that’s pronounced Moby Dick — you know someone had a good chuckle somewhere. The video below was a promotional video from the early 1960s, and although it shows the unit in operation, it was most likely a mockup and not fully functional.

The MOBIDIC program ran from 1960-1964 and cost a whopping $25 million in 1960-era money. In 1964, testing revealed the system was too unwieldy, requiring at least five tractor-trailers, eight generators, portable buildings, and several large trucks to move around.

Continue reading “Retrotechtacular: Military Graphics In The 1960s”

Classic Gaming With FPGA And ATX

Playing classic games, whether they are games from the golden age of arcades or simply games from consoles that are long out of production, tends to exist on a spectrum. At one end is grabbing a game’s ROM file, finding an emulator, and kludging together some controls on a keyboard and mouse with your average PC. At the other is meticulously restoring classic hardware for the “true” feel of what the game would have felt like when it was new. Towards the latter end is emulating the hardware with an FPGA which the open-source MiSTer project attempts to do. This build, though, adds ATX capabilities for the retrocomputing platform. Continue reading “Classic Gaming With FPGA And ATX”

Building The Sanni Cartridge Reader To Back Up And Restore Games And Saves

Game cartridges are generally seen as a read-only medium with the contents as immutable as text chiseled into a granite slab, and with accompanying save files on the cartridge surviving for generations. The unfortunate truth is that as with any media storage, cartridges can and do fail, and save files are often just ethereal bits in battery-backed SRAM. This makes being able to copy not only the game data but also the save files off these cartridges essential. Projects like the Open Source Cartridge Reader by [sanni] make this something that everyone can do.

Intended to be a kind of Swiss Army knife of game cartridges, many game systems are supported directly, and many others via (user-created) adapters. A how-to-build tutorial is provided on the project wiki, though anyone interested in building such a system would do well to look at the expected price tag on the BOM page, which comes in at $134. A recent video by [Kytor Industries] (also included below) demonstrates how to assemble one of these systems, including some modding of the preassembled components.

The main components are the Arduino Mega 2560 Pro MCU module, a Makerbase assembly with LCD, control knob, and SD card slot, an SI5351-based clock generator, a PIC12F629 MCU (for snesCIC and handling SNES DRM) and a lot of pin headers and card edge connectors for specific cartridge types. The assembly is rounded off with a surface-mounted GBA card reader and an enclosure.

One important gotcha is that some of these cartridges run on 5V, while others use 3.3V.  N64 cartridges require the dedicated voltage switch to be set to 3.3V, lest 5V gets sent into the unsuspecting cartridge. Once everything is configured properly, the firmware is flashed onto the Mega 2560 Pro module. The Sanni reader is then ready to run. You can use it to dump ROMs onto SD cards, along with dumping and restoring save files and loading ROMs onto new cartridges.

(Thanks to [Roman] for the tip)

Continue reading “Building The Sanni Cartridge Reader To Back Up And Restore Games And Saves”

A Retro-Style Trainer For Motorola’s 1-Bit Chip

If you want to program a microcontroller today, you pop open your editor of choice, bang out some code, and flash it over USB. But back in ancient times, when your editor was a piece of paper and you didn’t even have a computer of your own, things were a bit different. In that case, you might have reached for a “trainer”: a PCB that included the chip you wanted to program along with an array of switches, LEDs, and maybe even a hex keypad for good measure. Grab yourself the programming manual (printed on paper, naturally), and you’re good to go.

So when [Nicola Cimmino] became curious about the Motorola MC14500, a 1-bit ICU (Industrial Control Unit) from the 1970s, he could think of no more appropriate way to get up close and personal with the chip than to design an era-appropriate trainer for it. The resulting board, which he’s calling the PLC14500 Nano, is festooned with LEDs that show the status of the system buses and registers. Thanks to the chip’s single-step mode, this gives you valuable insight into what’s happening inside this piece of classic silicon.

An early breadboard version of the trainer.

But just because the board looks like it could have come from the 1970s doesn’t mean you have to live in the past. There’s an Arduino Nano on the backside of the trainer that handles communicating with a modern computer. [Nicola] even provided an assembler that lets you write your code in ASM before shuttling the binary off to the board for execution.

Interested in getting your hands on one? Not a problem. The design is completely open source for anyone who wants to build one at home. In fact, [Nicola] even got his trainer OSHW Certified. He’s also selling kits on Tindie, though at the time of this writing, they’re sold out.

This project has actually been a long time coming. We covered an early breadboard prototype of the concept back in 2015. We’re glad to see that [Nicola] was finally able to bring this one across the finish line. It’s a beautiful piece of hardware, and thanks to its open-source nature, something that the whole community can enjoy and learn from.

A Love Letter To The Sphere Computer

[Ben Z] loves the Sphere computer, a very early entry in the personal computer boom of the mid 1970s. The 6800 CPU was unique in its day that it was a full system — at least in theory. If you could afford the whole system, you got a nice case with a keyboard and a memory-mapped display board. You can see a great video tour of the system below the break.

The Sphere suffered from a few problems, none of which were easily foreseeable by its designer. First, the 6800 didn’t get the traction that the 8080-derived CPUs did. Second, the S-100 bus would prove to be popular but that nearly always meant an 8080-type processor in practice. Third, while an all-in-one system was the right idea, it was pricey at the time, and many people would opt for something less expensive even if it had less capability. People also wanted to leverage hardware they may have already had. It was easier to imagine hooking up a surplus TeleType, for example, to a more conventional computer than to a Sphere that expected its own display hardware and keyboard.

Continue reading “A Love Letter To The Sphere Computer”