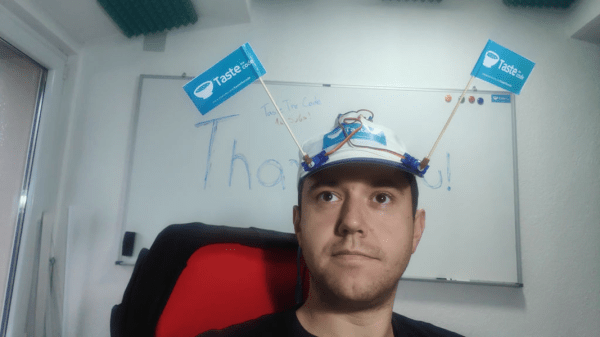
Levitating Starship Model Comes In For A Landing

If everything goes according to plan, Elon Musk says the first generation of SpaceX’s massive Starship will make an orbital flight before the end of 2020. That’s a pretty bold claim, but when you’ve made landing rockets on their tails as in the old science fiction pulp magazines seem routine, we suppose you’ve earned the right to a bit of bravado. We’re excited to see the vehicle evolve over the next several months, but even if the real one stays grounded, we’ll gladly take this “flying” Starship model from [Chris Chimienti] as a consolation prize.

A magnetic levitation module, we’re officially in the future.

Feeling a bit let down by the 3D printable models of the Starship he found online, [Chris] set out to build his own. But it wasn’t enough to just make his bigger, stronger, and more accurate to Starship’s current design; he also wanted to make it a bit more exciting. Some RGB LEDs an Arduino embedded in the “cloud” stand the rocket sits on was a good start, and the landing pad inspired by SpaceX’s real autonomous spaceport drone ship Just Read the Instructions looks great all lit up.

But this is Starship we’re talking about, a vehicle that could literally push humanity towards being a multi-planet species. To do it justice, you’ve really got to knock it out of the park. So [Chris] found a magnetic levitation module online that could support a few hundred grams, and set to work on making his plastic Starship actually hover over the landing pad.

As you might imagine, it was a bit tricky. The first versions of the rocket looked great but came out too heavy, so he switched over to printing the model in so-called “spiral vase mode” which made it entirely hollow. Now far lighter and with a magnetic plate fit into the bottom, it was stable enough to float on its own. For the final touch, [Chris] added some red LEDs and a coin cell battery to the base of the Starship so it looks like the sleek craft is performing a last-second landing burn with its “impossible” full-flow staged combustion engines.

This isn’t the first time we’ve seen a model rocket with an electronic glowing cloud under it, but it’s certainly the first one we’ve seen that could levitate in mid-air. While this little rocket might not make it all the way to Mars, we wouldn’t be surprised to see it touching down on the desks of other hackers and makers in the near future.

Continue reading “Levitating Starship Model Comes In For A Landing”

Stomp Switches Let You Skip Tracks Hands-Free

You’ve (probably) got four limbs, so why are you only using half of them when you’re working on the computer? Just because your toes don’t have the dexterity to type (again, probably) doesn’t mean your feet should get to just sit there doing nothing all day. In a recent project, [MacCraiger] shows you just how easy it can be to put some functionality under foot by building a pair of media control stomp switches.

Crimp pin connectors grant +50 professionalism.

If the devices pictured above look a lot like guitar effects, that’s because they share a lot of parts. [MacCraiger] used the same sort of switch and aluminum case that you might see on a pedal board, as he figured they’d be better suited to a lifetime of being stepped on than something he 3D printed.

Up on the desk, and this time in a printed case, is the Arduino Leonardo that they connect to. The wiring for this project is very straightforward, with the switches connected directly to the GPIO pins. From there, the Arduino firmware emulates a USB Human Interface Device and fires off the appropriate media control keystrokes to skip to the next track or pause playback depending on which switch has been engaged.

This hardware isn’t exactly breaking any new ground here, but we did like how [MacCraiger] used standard 3.5 mm audio cable and the associated jacks to connect everything up. It’s obviously on-theme for what’s essentially a music project, but more importantly, gives the whole thing a very professional look. Definitely a tip to mentally file away for the future.

For the more accomplished toe-tapper, our very own [Kristina Panos] recently recently took us through the construction of her macro slinging footstool. Between these two examples of bespoke peripherals, you should have everything you need to create your own custom input devices. We suppose you could even make one that’s hand operated if you’re into that sort of thing.

Continue reading “Stomp Switches Let You Skip Tracks Hands-Free”

Espresso Machine Now Powers Plants

This thing has what plants crave! No, not electrolytes exactly — just water, light, and moisture polling every 30 minutes. We think it’s fitting to take something that once manufactured liquid liveliness for humans and turn it into a smart garden that does the same thing for plants.

So let’s just get this out of the way: the espresso machine was abandoned because it was leaking water from a gasket. [The Plant Bot] cleaned it up, replaced the gasket, and got it brewing, and then it started leaking hot water again from the same gasket. We might have gone Office Space on this beautiful machine at that point, but not [The Plant Bot].

Down in the dirt, there’s a soil moisture sensor that’s polling every 30 minutes. If the moisture level falls below the threshold set appropriately at a life-sustaining 42%, the Arduino is triggered to water the plant through a relay board using the espresso machine’s original pump. If the plant is dry, the machine will pump water for two seconds every minute until the threshold is met. [The Plant Bot] tied it all together with a nice web interface that shows plant data and allows for changes over Bluetooth.

[The Plant Bot] started by disconnecting the heating element, because plants don’t tend to like hot steam. But if the cup warming tray along the top has a separate heating element, it might be neat to reuse it for something like growing mushrooms, or maintaining a sourdough starter if the temperature is right.

Via r/duino

Bluetooth Intervalometer Makes Time Lapses Easy

Taking timelapses is a fun pastime of many a photographer. While most modern cameras have some features to pull this off, if you want to get really into it, you’ll want an intervalometer to run the show. Chasing just that, [Zach] decided that rather than buying off-the-shelf, a DIY build was in order.

The build relies on an Arduino Nano to run the show, in combination with the popular HC-05 Bluetooth module. The Bluetooth module allows the device to communicate with a smartphone app which [Zach] created using RoboRemo. This is a platform that makes creating custom USB, WiFI and Bluetooth apps easy for beginners. The app sends instructions to the intervalometer regarding the number of photos to take, and the time to wait between each shot. Then, it triggers the time lapse, and the Arduino triggers the camera by shorting the relevant pins on a TRS plug inserted into the camera.

It’s a straightforward build that most hackers could probably complete with parts from the junk box. Plus, building your own offers the possibility of customising it exactly to your needs. Of course, you can eschew modernity and do things mechanically instead. Video after the break.

Continue reading “Bluetooth Intervalometer Makes Time Lapses Easy”

Insecure Surveillance Cameras Provide Dystopian Peep Show

It probably doesn’t surprise you to hear there are tens of thousands of web-connected cameras all over the world that are set to take the default credentials. Actually, there are probably more than that out there, but we can assure you that at least 70,000 or so are only a click away. With this project, [carolinebuttet] proves that it’s quite possible to make art from our rickety, ridiculous surveillance state — and it begins with a peephole perspective.

The peephole in your own front door grants you the inalienable right to police your porch, stoop, or patch of carpet in the apartment building’s hallway while going mostly undetected. In Virtual Peephole, the peephole becomes a voyeuristic virtual view of various corners of the world.

Slide aside the cover, and an LDR connected to an Arduino Micro detects the change in light level. This change makes the Micro send a key press to a Raspberry Pi, which fetches a new camera at random and displays it on a screen inside the box. You can peep a brief demo after the break, followed by a couple of short build/walk-through videos.

If you’re a peephole people watcher, put a camera in there and watch from anywhere.

Continue reading “Insecure Surveillance Cameras Provide Dystopian Peep Show”

Nixie Clock Claims To Be Simplest Design

[Engineer2you] built a nixie tube clock and claims it is the simplest design. We felt like that was a challenge. In this design, the tubes are set up as a matrix with optoisolators on each row and column. With 60 segments, the matrix allows you to control it all with 16 bits. There are six columns, each corresponding to a digit. That means each row has 10 lines.

The Arduino code reads the clock and produces the output to the tubes fast enough that your eye perceives each digit as being always on, even though it isn’t.

Continue reading “Nixie Clock Claims To Be Simplest Design”

RF Shield Turns Arduino (And PC) Into Shortwave Radio

Microcontrollers tend to consume other kinds of electronics. A project you might once have done with a 555 now probably has a cheap microcontroller in it. Music synthesizers? RC controllers? Most likely, all microcontroller-based now. We always thought RF electronics would be immune to that, but the last decade or two has proven us wrong. Software-defined radio or SDR means you get the RF signal to digital as soon as possible and do everything else in software. If you want an introduction to SDR, Elektor now has an inexpensive RF shield for the Arduino. The Si5351-based board uses that oscillator IC to shift RF signals down to audio frequencies and then makes it available to the PC to do more processing.

The board is available alone or as part of a kit that includes a book. There’s also a series of Elektor articles about it. There’s also a review video from Elektor about the board in the video, below.

Continue reading “RF Shield Turns Arduino (And PC) Into Shortwave Radio”