An RTL-SDR Spectrum Analyzer

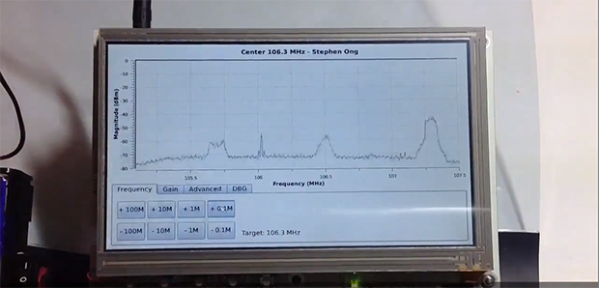
With the combination of small, powerful, and pocketable computers and cheap, off-the-shelf software defined radio receivers, it was only a matter of time before someone built a homebrew spectrum analyzer with these ingredients. This great build is the project of [Stephen Ong] and he’s even released all the softwares for you to build this on your own.

The two main components of this build are a BeagleBone Black and its 7″ Touchscreen cape. The BeagleBone is running Angstrom Linux, a blazingly fast Linux distro for small embedded devices. The radio hardware consists of only a USB TV tuner supported by RTL-SDR. In his demo video, [Stephen] shows off his project and by all accounts it is remarkable, with a UI better than most desktop-oriented SDR software suites.

You can grab the BeagleBone image [Stephen] is using over on his blog, but for more enterprising reader, he’s also put up the source of his ViewRF software up on GitHub.

The JavaScript Of Things

Espruino

There are a ton of people out there that can program in JavaScript, but give them an embedded device, and they’re up the creek without a paddle. Not anymore, that is, thanks to [Gordon]’s wonderful Espruino, a JavaScript interpreter for ARM microcontrollers. Oh, it’s also a very capable dev board that has more than enough power to turn just about any project you can imagine into reality.

On board the Espruino is an ARM Cortex M3 in the form of an STM32 chip, 256kB Flash, 48kB of RAM, and a ton of PWM and ADC pins to go along with 2 SPI ports, 2 I2C ports, and 2 DACs. It’s a very capable piece of hardware, and if you’re looking to build anything, it would be hard to pick a better general purpose dev board.

[Gordon] has put his board up on Kickstarter, and since it’s already been successfully funded, he’ll be releasing the hardware and software sources under an Open Source license. If you’ve ever wanted to run JavaScript on an ARM board, it looks like Espruino is just the ticket.

Evalbot As A JTAG Programmer

evalbot-as-jtag-programmer

[Adarsh] needed a JTAG programmer to push code to a CPLD dev board he was working with. He knew he didn’t have a dedicated programmer but figured he could come up with something. Pictured above is his hack to use a Stellaris Evalbot as a programmer.

Long time readers will remember the Evalbot coupon code debacle of 2010. The kits were being offered with a $125 discount as part of a conference. We were tipped off about the code not know its restrictions, and the rest is history. We figure there’s a number of readers who have one collecting dust (except for people like [Adam] that used it as a webserver). Here’s your chance to pull it out again and have some fun.

A bit of soldering to test points on the board is all it takes. The connections are made on the J4 footprint which is an unpopulated ICDI header. On the software side [Adarsh] used OpenOCD with stock configuration and board files (specifics in his writeup) to connect to the white CPLD board using JTAG.

Controlling A Railroad With An Mbed

rr

The word hacking got its start with model railway clubs, and the state of the art belies the current advancements in computer control and very, very small microcontrollers. [Jim] put together a great tutorial for driving model locomotives with a microcontroller, in this case an ARM-powered mbed.

Low-end model locomotives are controlled with DC, so an H-bridge and a PWM out on the mbed makes sense to drive these trains. [Jim] wired up a Pololu H-bridge driver, connected it to his mbed, and everything ran great.

Rail switches are another matter entirely. These allow trains to move from one track to another, but having them go to the left or right requires powering a fairly high current solenoid with 15 to 24 volts. For this, [Jim] used a MOSFET power control board to switch the rails and came up with a pretty neat demo that shows a small locomotive going back and forth over a single rail switch.

There is another class of model locomotive – ones with Digital Command Control. This setup is just a small decoder chip that fits inside an engine and tells the locomotive to turn on a lamp or run a motor digitally, allowing the conductor to control multiple trains on the same track.

[Jim] goes through the basics of DCC using the mbed, allowing two trains to switch positions in a rail yard using computer control. It’s really cool stuff that leaves us wanting a little more room in the basement to start building a huge computer controlled model railway.

Continue reading “Controlling A Railroad With An Mbed”

Wireless Marble Labyrinth Uses TI Dev Hardware

wireless-marble-labrinth-using-ti-dev-hardware

There’s so much affordable dev hardware out there these days that you can do a lot without even touching a soldering iron. This is a prime example. Texas Instruments software Engineer [Jordan Wills] recently completed this wirelessly controlled marble labyrinth.

Marble mazes like this are a popular targets for electronic tinkering. We’ve seen smartphones used as the controller, and others that dispense chocolate candy. This time around [Jordan] stuck with the store-bought game to simplify the build. A coworker helped by swapping the two control knobs with servo motors. These interface with a Stellaris Launchpad that has a SensorHub booster pack (shield) and CC2533 radio transceiver module. The same hardware makes up the remote unit as well. This turns the remote into an air mouse by reading the gyroscope, accelerometer, and magnetometer from the booster pack.

He doesn’t specifically mention it in his project log, but we think the magnetometer is used to sync orientation between the base unit and the user remote. Even though the board for the base unit is mounted at 90 degrees compared to how you hold the remote, you should still be able to adjust for the readings in code, right?

Continue reading “Wireless Marble Labyrinth Uses TI Dev Hardware”

How To Use The Kenetis KL25Z Freedom Board As An HID Mouse

[Eric] is interested in turning this Freedom development board into an air mouse by using the onboard accelerometer. But he had to work through the particulars of the USB HID mouse class before he could get that done.

This Freescale FRDM-KL25Z is one of the awesome ARM boards we looked at a year ago. Can you believe you can get this thing for like thirteen bucks? We suppose the gotcha is that the CodeWarrior IDE meant for use with them is not entirely free. But there is a free trial, and [Eric] shows how much easier it is to tailor the USB stack for your needs with it.

Don’t worry though. If you’re like us and use Open Source For The Win he’s got you covered as well. When you’re done reading his HID mouse writeup head on over to his six-part tutorial for building a free toolchain for the Kenetis boards.

LED Strip Cape Drives Kilometers Worth Of LEDs

led-strip-cape

[Hudson] is looking to drive a lot of LEDs. A driver that effectively addresses kilometers worth of LED strips isn’t an easy thing to come by. So he’s in the process of designing his own BeagleBone Cape to do the work. Above you can see the board layout he’s working with. Notice the set of repeating red footprints in the center? Those are pads for 32 RS485 connectors!

Of course this is all in preparation for Burning Man where the mantra seems to be: he who has the most LEDs wins. Well, unless you’re the sort that likes to work with flames. But we digress. The scaling problem that [Hudson] is dealing with hinges around his desire not to include ridiculous numbers microcontrollers and the need to beef up the 3.3V logic levels of the BeagleBone to travel further on the data bus of the strips. By leveraging the RS485 protocol — which is designed to carry data over long distances — he can get away with a single processing unit by adding an RS485 translator at each remote strip connector. He plans to use the BeagleBone’s Programmable Realtime Units feature to address the eight drivers on the cape. But first he has to solve what looks like a doozy of a trace routing problem