While it might not be as exciting as the Saturn V rocket itself, the Apollo Guidance Computer (AGC) was one of the most important developments of the entire Apollo program. While comically underwhelming compared to modern hardware, the AGC was nothing short of revolutionary when it was developed in the 1960’s. Before the AGC, the smallest computers were about the size of a refrigerator and consumed hundreds of watts; both big problems if you’re trying to pack them into a relatively tiny space capsule with limited resources. Not only did the AGC get humanity to the Moon and back, but it also redefined the state of the art for microcomputers, paving the way for the desktop systems of the 1970’s.
That said, the design and operation of the AGC is downright bizarre to modern eyes; it comes from a time of limitations we can hardly fathom. With this in mind, [Michael Steil] and [Christian Hessmann] put together “The Ultimate Apollo Guidance Computer Talk” for 34C3.
This hour-long presentation walks viewers through every aspect of not only the AGC itself, but how it interacted with the Saturn V rocket and the overall lunar mission. Even if you aren’t enough of a vintage computing aficionado to appreciate the complexities of core rope memory, the presentation gives a fascinating look at the gritty details of one of humanity’s greatest achievements.
 Though very slick and easy to understand graphics, [Michael] and [Christian] break down the alien world of the AGC. Even if a lot of this part of the presentation goes over your head, just listen for the sounds of laughter or applause from the audience: that’s when you’re looking at something really off-the-wall.
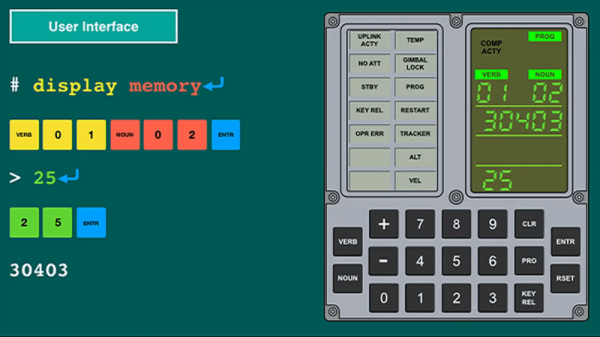
Of particular note during this presentation is the explanation of how the astronauts actually interacted with the AGC. The AGC’s display and keyboard (referred to as DSKY) may seem rather obtuse even to those who used to hack on a VT100, but [Michael] and [Christian] explain how it’s not quite as complex as it seems. Comparing the input and output of the DSKY with what we would see on a more contemporary command line interface, the presentation makes the case that it’s actually a very straightforward way of talking to the computer.
There’s also a complete breakdown of the different phases of the Apollo mission from launch to landing, explaining what the AGC would be doing at any given time. The DSKY is overlaid on actual footage from the Apollo missions, giving a unique perspective as to what the astronauts would see on their computer during iconic moments such as stage separation or lunar touchdown.
If this presentation has you hungry for more Apollo-era computer technology, we’ve covered plenty of projects to keep you occupied. From building a replica DSKY to leisurely paging through the printed version of the AGC’s source code.