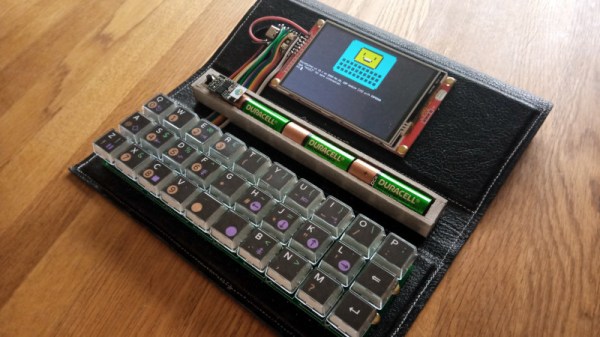
The humble desktop serial terminal may have long disappeared from the world of corporate IT, but there are still plenty of moments when professionals and enthusiasts alike need to hook up to a serial port. Many of us use a serial port on our laptops or other mobile devices, but [Neil Crawforth] has gone one better than that with the VT2040. It’s an old-style serial terminal in a super-handy portable format, and as one might guess from the name, it has an RP2040 microcontroller at its heart.
Attached to the chip is a rather nice keyboard, and an ILI9488 480×320 LCD display. The software is modular, providing a handy set of re-usable libraries for the different functions including a PIO-based serial port. His main application seems to be talking to an ESP8266, but we’re guessing with a MAX232 or other level shifter chip it could drive a more traditional port. Everything can be found in the project’s GitHub repository, allowing anyone to join the fun.
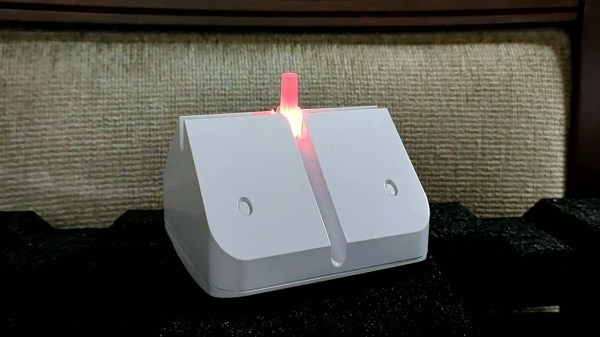
It might seem antiquated, but Morse code still has a number of advantages compared to other modes of communication, especially over radio waves. It’s low bandwidth compared to voice or even text, and can be discerned against background noise even at extremely low signal strengths. Not every regulatory agency requires amateur operators to learn Morse any more, but for those that do it can be a challenge, so [Cristiano Monteiro] built this clock to help get some practice.
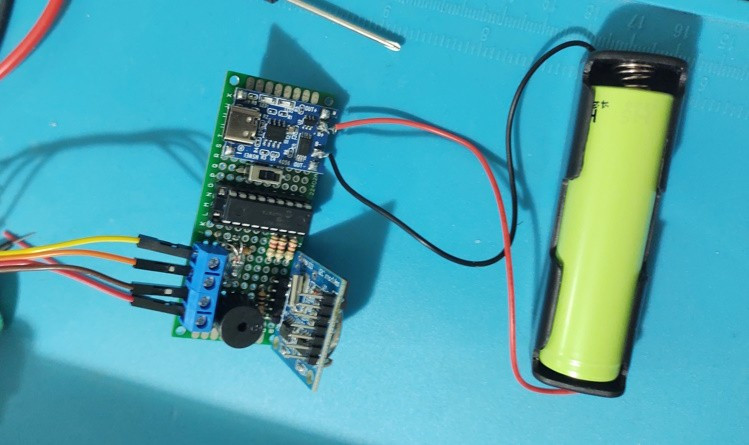
The project is based around his favorite microcontroller, the PIC16F1827, and uses a DS1307 to keep track of time. A single RGB LED at the top of the project enclosure flashes the codes for hours in blue and minutes in red at the beginning of every minute, and in between flashes green for each second.
Another design goal of this build was to have it operate with as little power as possible, so with a TP4056 control board, single lithium 18650 battery, and some code optimization, [Cristiano] believes he can get around 60 days of operation between charges.
For a project to help an aspiring radio operator learn Morse, a simple build like this can go a long way. For anyone else looking to build something similar we’d note that the DS1307 has a tendency to drift fairly quickly, and something like a DS3231 or even this similar Morse code clock which uses NTP would go a long way to keeping more accurate time.
Periscope Film owners [Doug] and [Nick] just released a mini-documentary about the rescue of a large collection of old 35 and 16 mm celluloid films from the landfill. The video shows the process of the films being collected from the donor and then being sorted and organized in a temporary storage warehouse. There is a dizzying variety of films in this haul, from different countries, in both color and black and white.
We can see in the video that their rented 8 meter (26 foot) cargo truck wasn’t enough to contain the trove, so they dragged along a 1.8 x 3.6 m (6 x 12 ft) double-axle trailer as well. That makes a grand total of 49 cubic meters of space. Our back-of-the-envelope calculations says that filled to the brim, that would be over 30,000 canisters of 600 m (2,000 ft) 35 mm movie reels.
When it comes to preserving these old films, one big problem is physical deterioration of the film stock itself. You will know something is wrong when you get a strong acetic or vinegary odor when opening the can. [Nick] shows some examples where the film has even become solidified, taken on a hexagonal shape. It will take months to just assess and catalog the contents of this collection, with damaged films that are still salvageable jumping to the head of the queue to be digitized.
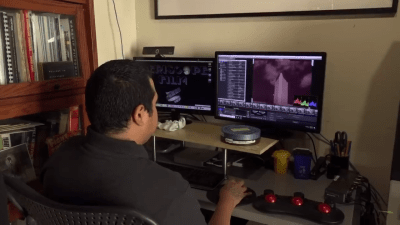
Film Scanning Artist [Esteban] Performing Color CorrectionFilms are digitized at 4K resolution using a Lasergraphics ScanStation archival quality film scanning system, and then the restoration fun begins. One issue demonstrated in this video is color deterioration. In the Eastmancolor film technology introduced in the 1950s, the blue dyes deteriorate over time. This, and a plethora of other issues, are corrected in the restoration process.
We’re particularly jealous of film scanning artist [Esteban]’s triple-headed trackball. We learned from a quick Google search this beast is merely the entry level control panel from UK company Tangent — they make even larger flavors.
If you’re interested in doing this with 8 mm home movies, we covered a project way back in 2011 of a DIY home movie scanning project. We also covered one of Periscope Film’s restored training films about NASA soldering techniques from 1958. Kudos to organizations who focus on keeping these types of interesting and historical films from being dumped in the landfill and lost forever.
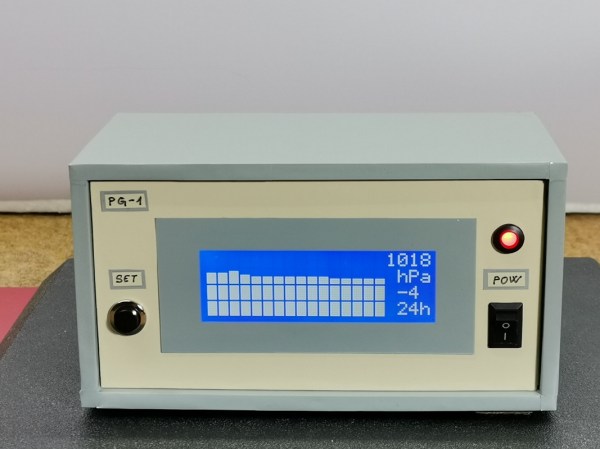
Computers and digital sensors have allowed for the collection and aggregation of data barely possible to imagine to anyone in the instrumentation scene even sixty years ago. Before that, things like weather stations, seismometers, level sensors, and basically any other way of gathering real data about the world would have been performed with an analog device recording the information on some sort of spool of paper. This was much more tedious but the one thing going for these types of devices was their aesthetic. [mircemk] is back to bring some of that design inspiration to a digital barometric display.
The barometer is based around an Arduino Arduino Nano and a relatively large I2C display to display the captured data. It also uses a BME 280 pressure sensor board, but the technical details of this project are not the focal point here. Instead, [mircemk] has put his effort in recreating the old analog barographs, which display barometric data on a spool of paper over time, on the I2C display. As the device measures atmospheric pressure, it adds a bar to the graph, displaying the data over time much as the old analog device would have.
We’ve discussed plenty of times around here that old analog meters and instrumentation like this recreation of a VU meter are an excellent way of getting a more antique aesthetic than is typically offered by digital replacements. Adding in a little bit of style to a project like this can go a long way, or you can simply restore the original antique instead.
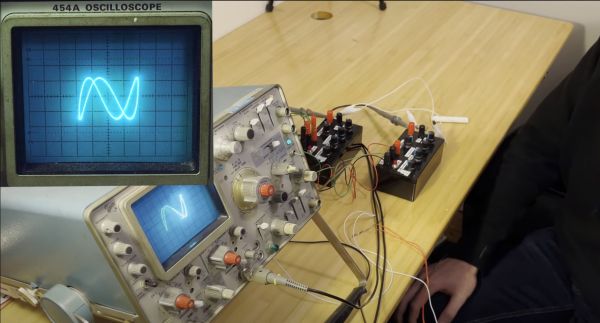
Generating interesting imagery on an analog oscilloscope is a fun activity enjoyed by many, with an excellent demonstration by [Henry Segerman] provided in a recent video which covers [Matthias Goerner]’s demonstration. Using the electron beam, shapes can be drawn onto the phosphor of the oscilloscope’s CRT — all without touching any digital circuitry. At the core are analog components like an operational amplifier integrator, multipliers and other elements.
With just a number of these simple components in a circuit, it’s possible to draw a wide variety of shapes, all by applying the appropriate trigonometric parameters. In addition to the drawing of shapes, it is also demonstrated how these analog signals can be used for an analog audio synthesizer, and finally the image displayed on the oscilloscope is captured on Kodak (Polaroid) instant film, making the entire generating, processing and capturing chain fully analog.
While we’d be the last to campaign against digital electronics, it is fascinating to consider just how much can be done with analog electronics and a bit of mathematics. We assume that everyone did pay attention during math classes, making this a perfect chance to use all that knowledge of trigonometry.
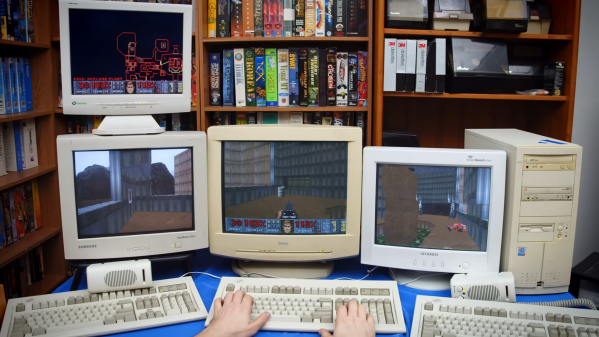
We have a thing for DOOM, and we admit it. The source was released, and clever hackers have ported the engine to every system imaginable. It’s a right of passage, when hacking a machine, to run DOOM on it — be it a VoIP phone, or tractor. But the original 1993 release does have a few notable tricks, and there’s something to be said for recreating that experience on period hardware. And that’s what we’re covering today: [Tech Tangents] discovered DOOM’s multi-monitor support, and built a 4-computer cluster to show it off.
There is a catch, of course. DOOM 1.1 has the multi-monitor support, and under-the-hood, it works by running a copy of the game on individual computers, and controlling the drones over the network. As the game’s network code was updated for version 1.2, the multi-monitor feature was axed to make the network code easier to maintain. So, find a 1.1 shareware release, install it on a DOS machine with IPX drivers, and start each iteration with a -net flag. Use -left and -right to set the drones to the appropriate view. And that view is ninety degrees left and right.
Maybe not ideal, but at the time it was one of the first games to have any sort of multi-monitor support at all. Likely inspired by a commercial flight simulator setup. Either way, it’s a neat feature, and kudos to [Tech Tangents] for showing off this obscure feature of a beloved classic!
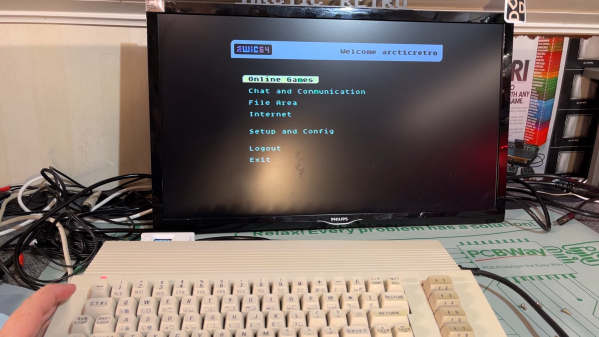
A computing platform is never really dead unless people stop developing new software for it. By that measure, the Commodore 64 is alive and well: new games, demos, and utilities are still being released on a regular basis. Getting those new programs onto an old computer was always a bit of a hassle though, requiring either an SD card adapter for the Commodore or a direct cable connection from an internet-connected PC. Luckily, there’s now a simpler way to get your latest software updates thanks to a WiFi adapter called WiC64. This adapter plugs into the expansion port of a classic Commodore and lets you download programs directly into memory. [Tommy Ovesen] over at [Arctic Retro] bought one and explored its many features.
The basic design of the WiC64 is straightforward: an ESP32 mounted on an adapter board that connects its data bus to that of the Commodore 64, 128 or VIC-20. A simple program, which you still need to transfer the old way, lets you configure the device and connect to a WiFi network. Once that’s done, an interactive BBS-style program is launched that allows you to access a range of online services. The WiC64 developers provide these, but since the system is fully open-source there’s nothing stopping you from running your own servers as well.
Services currently available include an RSS reader, several multiplayer online games, and even a radio station that plays non-stop SID tunes. There’s also a direct link to CSDB, an online database of Commodore 64 programs and demos which you can now simply download and run directly on your C64 – in effect, a modern app store for a classic computer.
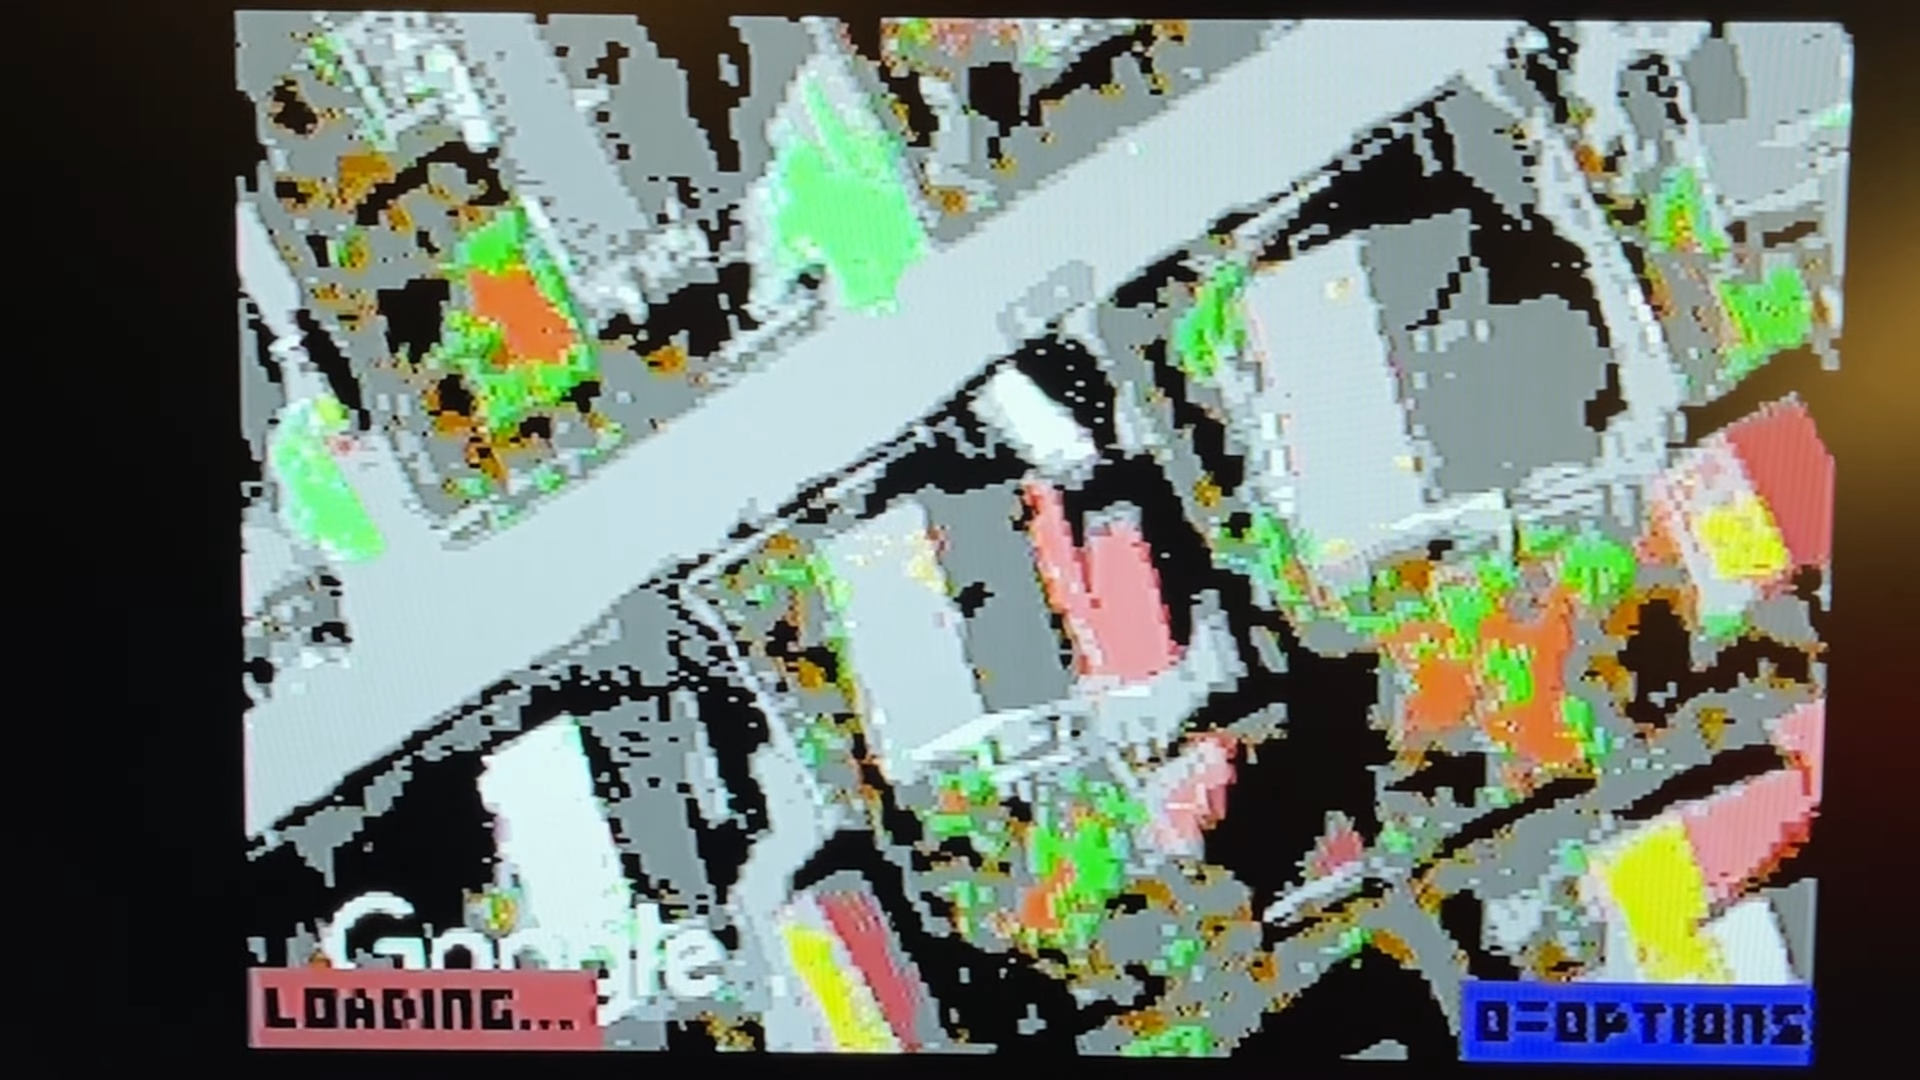
One feature that really seems to defy the C64’s hardware limitations is a fully functional version of Google Maps. Even with the Commodore’s limited resolution and color depth, it does a pretty decent job of showing maps, satellite photos, and even Street View images.
Using the WiC64 requires no hardware modifications to the Commodore 64, but a custom ROM is available that enables a few convenient features such as LOADing programs directly from a web address. There have been several attempts at getting classic Commodores online, but none so far that managed to get complex apps like Google Maps running. We have seen YouTube videos being played on a Commodore PET though.