3D-Printed Extension For Extreme Macro Photography Includes Lens Electronic Control

Macro photography — the art of taking pictures of tiny things — can be an expensive pastime. Good lenses aren’t cheap, and greater magnification inflates the price even further. One way to release a bit more performance from your optics comes in the form of an extension tube, which mounts your lens further from the camera to zoom in a little on the image. Back in the day with a film SLR you could make a rough and ready tube with cardboard and tape, but in the age of the digital camera the lens has become as much a computer peripheral as an optical device. [Nicholas Sherlock] has solved this problem by creating a 3D-printed extension tube for his Canon that preserves connections between camera and lens.

More details of this 300mm monster’s construction go so far beyond a plastic tub formed of two threaded sections with adapter plates at the ends. He’s using off-the-shelf metal rings to fit camera and lens just right, but making the electronic contacts is where it gets interesting. On end uses pogo pins, the other provides a contact block made of nail heads. In both cases the 3D-printed parts are designed to provide mounting points for the pins and nails. The assembly technique is worth a look both because of the design and as an example of how to document all the juicy details we’re constantly looking for in a great hack.

The results speak for themselves, in that the photography provides an impressive level of close-up detail. If you would like to build your own tube, it is available on Thingiverse.

Macro extensions seem far between here, but we’ve brought you a few lens repairs in our time.

[via /r/photography]

Expensive Sony Lens Repair Reveals Shims & Shifts

The photographic hire company Lensrentals had a $2k Sony FE 135mm f1.8 GM camera lens returned with a problem: it was having issues focusing. So, they decided to do the obvious thing and take it apart. It’s a fascinating insight into some of the engineering that goes into a high-end camera lens.

That is perhaps a rather scary thing to do, because this is a very new lens that doesn’t even have a service manual yet. That’s akin to rechipping a Ferrari when you’ve never even opened the hood before.

One of the interesting things inside is the presence of a number of shims that adjust the placement between the groups of lens elements. It seems that however good their manufacturing tolerances are, sometimes you just have to put a shim or two in there to align things.

Continue reading “Expensive Sony Lens Repair Reveals Shims & Shifts”

High Performance Stereo Computer Vision For The Raspberry Pi

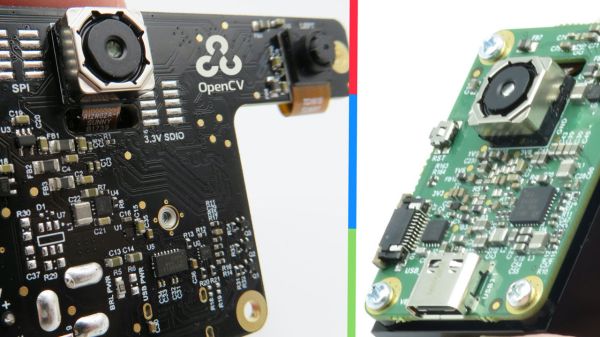
Up until now, running any kind of computer vision system on the Raspberry Pi has been rather underwhelming, even with the addition of products such as the Movidius Neural Compute Stick. Looking to improve on the performance situation while still enjoying the benefits of the Raspberry Pi community, [Brandon] and his team have been working on Luxonis DepthAI. The project uses a carrier board to mate a Myriad X VPU and a suite of cameras to the Raspberry Pi Compute Module, and the performance gains so far have been very promising.

So how does it work? Twin grayscale cameras allow the system to perceive depth, or distance, which is used to produce a “heat map”; ideal for tasks such as obstacle avoidance. At the same time, the high-resolution color camera can be used for object detection and tracking. According to [Brandon], bypassing the Pi’s CPU and sending all processed data via USB gives a roughly 5x performance boost, enabling the full potential of the main Intel Myriad X chip to be unleashed.

For detecting standard objects like people or faces, it will be fairly easy to get up and running with software such as OpenVino, which is already quite mature on the Raspberry Pi. We’re curious about how the system will handle custom models, but no doubt [Brandon’s] team will help improve this situation for the future.

The project is very much in an active state of development, which is exactly what we’d expect for an entry into the 2019 Hackaday Prize. Right now the cameras aren’t necessarily ideal, for example the depth sensors are a bit too close together to be very effective, but the team is still fine tuning their hardware selection. Ultimately the goal is to make a device that helps bikers avoid dangerous collisions, and we’ve very interested to watch the project evolve.

The video after the break shows the stereoscopic heat map in action. The hand is displayed as a warm yellow as it’s relatively close compared to the blue background. We’ve covered the combination Raspberry Pi and the Movidius USB stick in the past, but the stereo vision performance improvements Luxonis DepthAI really takes it to another level.

Continue reading “High Performance Stereo Computer Vision For The Raspberry Pi”

Take Control Of Your DSLR With PiXPi

If you’ve ever tried to take a picture of a fast moving object, you know how important timing is. You might only have one chance, and if you hit the shutter a bit too early or too late, the shot could be ruined. Past a certain point, no human camera operator can react quickly enough. Which is exactly why [Krzysztof Krześlak] created PiXPi.

In the past we’ve seen high-speed flashes designed to “freeze time” by illuminating the scene at the precise moment, and while PiXPi can technically do that, it also offers a few alternate methods of capturing that perfect moment. The idea here is to give the photographer the best chance of getting the shot they’re after by offering them as many tools as possible.

Essentially, PiXPi is a microcontroller that allows you to orchestrate your DSLR’s trigger, external flashes, and various other sensors and devices using an easy to use graphical programming interface from your smartphone. So for example, you could program the PiXPi to trigger your camera when it detected a loud enough noise.

But the device also allows you to be a bit more proactive. Rather than sitting back and waiting for a signal to fire off the camera, the PiXPi can directly take control of the action. As an example, [Krzysztof] has created an electronically triggered valve which can release a drop of liquid on command. Using PiXPi, the photographer can quickly put together a routine that triggers a drop, waits the few milliseconds it takes for it to hit the target, and then snaps a picture.

The goal of the 2019 Hackaday Prize is to develop a product fit for production, and naturally a huge part of that is having a well thought-out design. But if you’re ultimately looking to sell said product, it’s also very important to keep the needs of the end user in mind. To that end, we think [Krzysztof] has done a great job by not only making the system very flexible, but keeping it easy to use.

Continue reading “Take Control Of Your DSLR With PiXPi”

Art Meets Science In The Cold Wastelands Of Iceland

Although Iceland is now a popular destination for the day-tripping selfie-seeking Instagrammer who rents a 4×4, drives it off road onto delicate ecosystems and then videos the ensuing rescue when the cops arrive, there are still some genuine photographers prepared to put a huge amount of time and effort into their art. [Dheera Venkatraman] is one of the latter and produces composite photos using a relatively low resolution thermal camera and DIY pan and tilt rig.

Whilst we don’t have the exact details, we think that, since the Seek Reveal Pro camera used has a resolution of 320 x 240, [Dheera] would have had to take at least 20 photos for each panoramic shot. In post processing, the shots were meticulously recombined into stunning landscape photos which are a real inspiration to anybody interested in photography.

If you do go to Iceland you might find the traditional food a little challenging to those not raised upon it, nor would you go there for a stag night as beer is eyewateringly expensive. But if you enjoy uninhabitable, desolate, dramatic landscapes there is a huge range of possibilities for the photographer from rugged, frozen lava flows to extra terrestrial ‘Martian’ crater-scapes, if you know where to find them.

[Dheera’s] blog contains some more information about his Iceland photography and there’s a Github repsoitory too. And if you cant afford a $699 Seek Reveal Pro, maybe try building one yourself.

New Contest: Beautiful Hardware

We all have awesome hardware projects to show off. Great photos of them are how you unlock the excitement others see in your work. Whether you’re using a DSLR or the camera in your smartphone, it’s not difficult to capture an amazing picture of the project you pour so much effort into. We want you to unleash your photography skills for the Beautiful Hardware contest. Show us your epic hardware photos and win prizes.

The Skeleton Watch by Mile is a great example of superb photography. Excellent framing, focus, and color make it great.

The only real barrier between us and superb hardware photos is having an eye for framing your shots, and a few simple tricks to get everything else right. Think about good lighting, shooting with an interesting background, framing off to the side and at an angle (as just one example) for more interest, and spending a few moments with an image editor to complement what the camera captured. With this contest, we want you to take those tricks for a spin on your own workbench.

Lee Wilkins put together a simple guide to get you going with spectacular hardware photography. From the basics of photography and the tricks used for making product hype photos, to capturing great images of LEDs and getting the colors just right, this is a comprehensive quickstart. There’s even a collection of great examples to strive for.

There are three top prizes of $100 cash waiting for you. Just start a new project on Hackaday.io and upload the finest photos you can take of some fun hardware. In the left sidebar of that project use the “Submit project to…” menu to enter it in the Beautiful Hardware contest.

The Digital Polaroid SX-70

What do you do if you own an iconic and unusual camera from decades past? Do you love it and cherish it, buy small quantities of its expensive remanufactured film and take arty photographs? Or do you rip it apart and remake it as a modern-day digital camera in a retro enclosure? If you’re [Joshua Gross], you do the latter.

The Polaroid SX-70 is an iconic emblem of 1970s consumer technology chic. A true design classic, it’s a single-lens reflex design using a Polaroid instant film cartridge, and its party trick is that it’s a folding camera which collapses down to roughly the size of a pack of 1970s cigars. It was an expensive luxury camera when it was launched in 1972, and today it commands high prices as a collector’s item.

[Joshua]’s build is therefore likely to cause weeping and wailing and gnashing of teeth among vintage camera enthusiasts, but what exactly has he done? In the first instance, he’s performed a teardown of the SX-70 which should be of interest to many readers in itself. He’s removed the mirror and lens, mounted a Raspberry Pi camera behind the lens mount, and a small LCD monitor where the mirror would be.

A new plastic lens in the original lens housing completes the optics, and the electronics come courtesy of a Pi Zero, battery, and USB hub in the space where the Polaroid film cartridge would otherwise be. Some new graphics and a fresh leather cover complete the  build, giving what we’d say is a very tidy electronic Polaroid. On the software side there is a filter to correct for fisheye distortion, and the final photos have a slightly Lomographic quality from the plastic lens.

We like what he’s created with his SX-70 even if we can’t help wincing that he did it to an SX-70 in the first place. Maybe it’s less controversial when someone gives the Pi treatment to a more mundane Polaroid camera.