Taking pictures in the 21st century is incredibly easy. So easy in fact that most people don’t even own a dedicated camera; from smartphones to door bells there are cameras built into nearly electronic device we own. So in this era of ubiquitous photography, you might think that a very slow and extremely low resolution camera wouldn’t be of interest. Under normal circumstances that’s probably true, but this single pixel camera built by [Tucker Shannon] is anything but normal.
We are all familiar with the idea of a hologram, either from the monochromatic laser holographic images you’ll find on your bank card or from fictional depictions such as Princes Leia’s distress message from Star Wars. And we’ve probably read about how the laser holograms work with a split beam of coherent light recombined to fall upon a photographic plate. They require no special glasses or headsets and possess both stereoscopic and spatial 3D rendering, in that you can view both the 3D Princess Leia and your bank’s logo or whatever is on your card as 3D objects from multiple angles. So we’re all familar with that holographic end product, but what we probably aren’t so familiar with is what they represent: the capture of a light field.
In his Hackaday Superconference talk, co-founder and CTO of holographic display startup Looking Glass Factory Alex Hornstein introduced us to the idea of the light field, and how its capture is key to the understanding of the mechanics of a hologram.
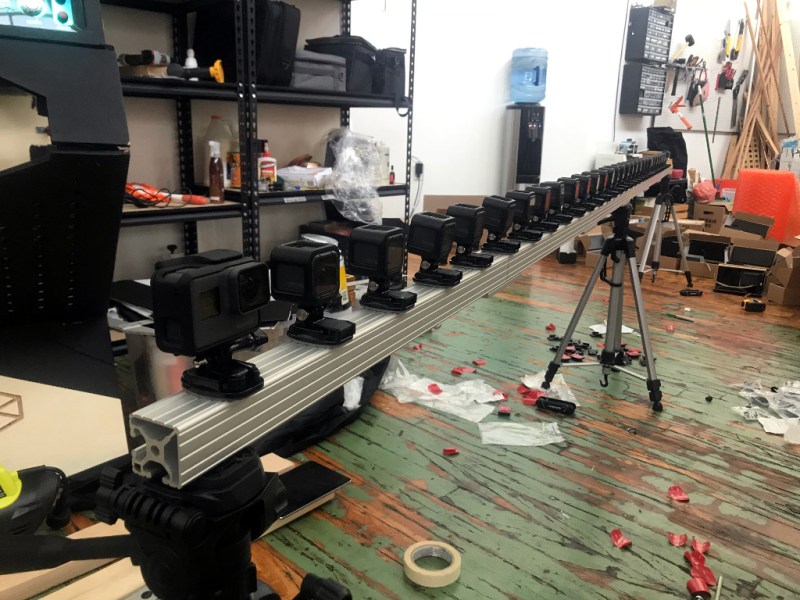
Capturing the light field with a row of GoPro cameras.
His first point is an important one, he expands the definition of a hologram from its conventional form as one of those monochromatic laser-interference photographic images into any technology that captures a light field. This is, he concedes, a contentious barrier to overcome. To do that he first has to explain what a light field is.
When we take a 2D photograph, we capture all the rays of light that are incident upon something that is a good approximation to a single point, the lens of the camera involved. The scene before us has of course countless other rays that are incident upon other points or that are reflected from surfaces invisible from the single point position of the 2D camera. It is this complex array of light rays which makes up the light field of the image, and capturing it in its entirety is key to manipulating the result. This is true no matter the technology used to bring it to the viewer. A light field capture can be used to generate variable focus 2D images after the fact as is the case with the Lytro cameras, or it can be used to generate a hologram in the way that he describes.
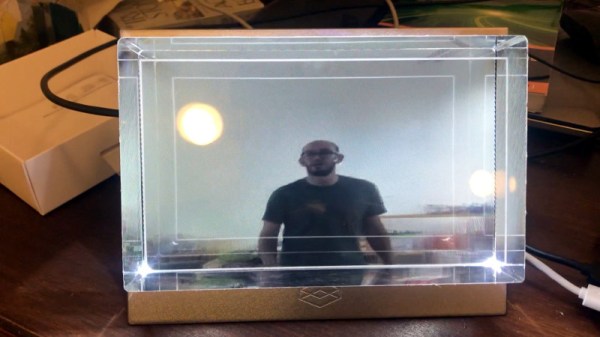
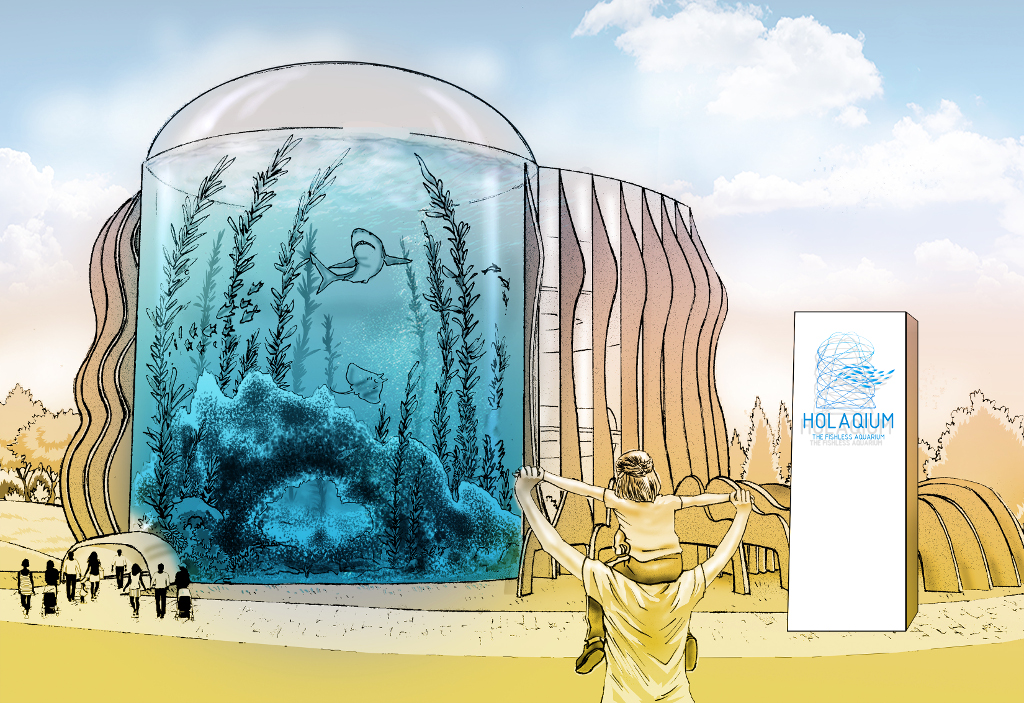
One possible future use of the technology, a virtual holographic aquarium.
The point of his talk is that complex sorcery isn’t required to capture a light field, something he demonstrates in front of the audience with a volunteer and a standard webcam on a sliding rail. Multiple 2D images are taken at different points, which can be combined to form a light field. The fact that not every component of the light field has been captured doesn’t matter as much as that there is enough to create the holographic image from the point of view of the display. And since he happens to be head honcho at a holographic display company he can show us the result. Looking Glass Factory’s display panel uses a lenticular lens to combine the multiple images into a hologram, and is probably one of the most inexpensive ways to practically display this type of image.
Since the arrival of the Lytro cameras a year or two ago the concept of a light field is one that has been in the air, but has more often been surrounded by an air of proprietary marketing woo. This talk breaks through that to deliver a clear explanation of the subject, and is a fascinating watch. Alex leaves us with news of some of the first light field derived video content being put online and with some decidedly science-fiction possible futures for the technology. Even if you aren’t planning to work in this field, you will almost certainly encounter it over the next few years.
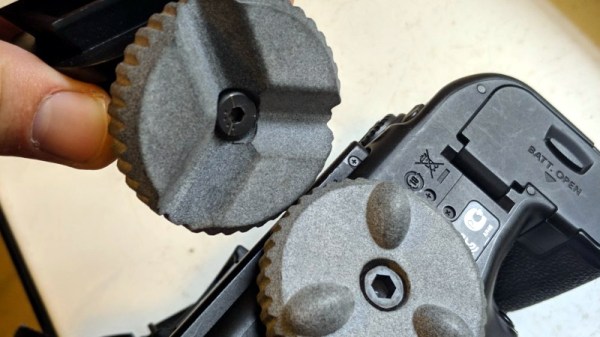
[Enginoor] is on a quest. He wants to get into the world of 3D printing, but isn’t content to run off little toys and trinkets. If he’s going to print something, he wants it to be something practical and ideally be something he couldn’t have made quickly and easily with more traditional methods. Accordingly, he’s come out the gate with a fairly strong showing: a magnetic Maxwell kinematic coupling camera mount.
If you only recognized some of those terms, don’t feel bad. Named for its creator James Clerk Maxwell who came up with the design in 1871, the Maxwell kinematic coupling is self-orienting connection that lends itself to applications that need a positive connection while still being quick and easy to remove. Certainly that sounds like a good way to stick a camera on a tripod to us.
But the Maxwell design, which consists of three groves and matching hemispheres, is only half of the equation. It allows [enginoor] to accurately and repeatably line the camera up, but it doesn’t have any holding power of its own. That’s where the magnets come in. By designing pockets into both parts, he was able to install strong magnets in the mating faces. This gives the mount a satisfying “snap” when attaching that he trusts it enough to hold his Canon EOS 70D and lens.
[enginoor] says he could have made the holes a bit tighter for the magnets (thereby skipping the glue he’s using currently), but otherwise his first 3D printed design was a complete success. He sent this one off to Shapeways to be printed, but in the future he’s considering taking the reins himself if he can keep coming up with ideas worth committing to plastic.
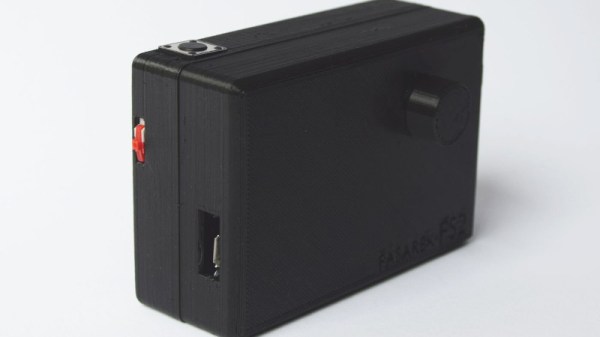
If a camera that combines the immediate gratification of a Polaroid with cloud hosting sounds like something that tickles your fancy, look no farther than this ESP-powered point and shoot camera created by [Martin Fasani]. There’s no screen or complicated configuration on this camera; just press the button and the raw picture pops up on the online gallery. Somehow it’s simultaneously one of the most simplistic and complex implementations of the classic “instant camera” concept, and we love it.
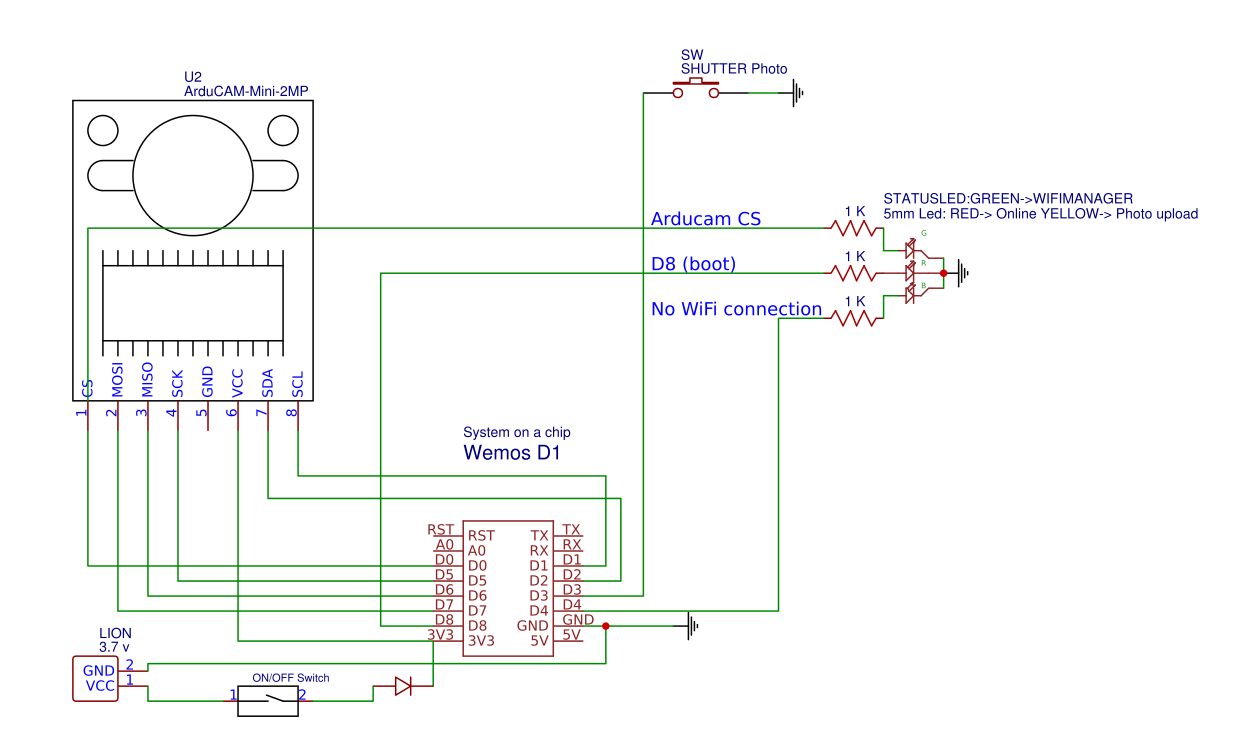
The electronics in the camera itself, which [Martin] calls the FS2, is quite simple. At the core, it’s nothing more than the ESP board, an ArduCAM camera module, and a momentary button for the shutter. To make it portable he added a 2000 mAh Li-ion battery and an Adafruit Micro Micro USB charger. [Martin] added support for an optional 128×64 OLED display for user feedback. Everything is housed in a relatively spacious 3D printed enclosure, leaving some room for possible future hardware.
There are firmware versions for both the ESP8266 and ESP32, so fans of either generation of the popular microcontroller are invited to the party. Processing images is obviously a bit faster if you go with the more powerful 32-bit chip, but on the flip side the ESP8266 uses 3MB of SPI flash as a local buffer for the images during upload, which helps prevent lost images if there’s a problem pushing them to the cloud. The camera is intended to be as simple as possible so right now the only option other than taking still images is a time-lapse mode. [Martin] hopes to implement some additional filters and effects in the future. He’s also hoping others might lend a hand with his firmware. He’s specifically looking for assistance getting autofocus working and implementing more robust error correction for image uploads.
We’ve seen some impressive DIY camera builds using everything from a salvaged thermal sensor to film and molten aluminum. But the quaint simplicity of what [Martin] has put together here really puts his project in a whole new category.
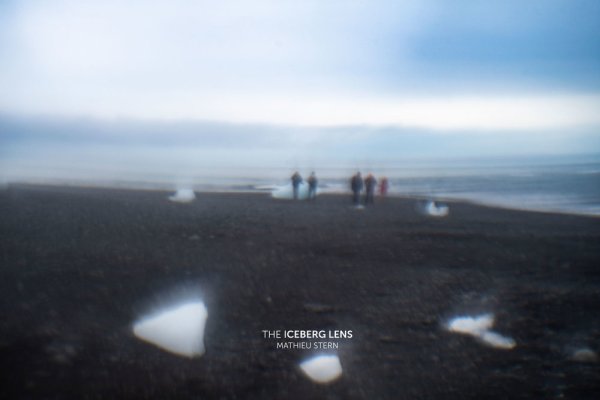
The first photograph was taken sometime in the early 1800s, and through almost two centuries of development we’ve advanced through black-and-white, the video camera, and even high-speed cameras that can take thousands of frames per second. [Mathieu Stern] took a step back from all of the technological progress of the past two hundred years, though, and found a lens for his camera hidden in the glacial ice of Iceland.
Ice in this part of the world has been purified over the course of 10,000 years, and [Mathieu] realized that with this purity the ice could be formed into a workable camera lens. The first step was to get something that could actually form the ice into the proper shape, and for that he used a modified ice ball maker that was shaped to make a lens rather than a sphere. Next, he needed an enclosure to hold the lens and attach it to his camera, which he made using a 3D printer.
For this build, the hardest part probably wasn’t making the actual equipment, but rather getting to the right place in Iceland and actually making the lenses. At room temperature the lenses could be made in around five minutes, but in Iceland it took almost 45 minutes and the first four attempts broke. The fifth one was a charm though, so after over five hours on the beach he was finally able to make some striking images with the 10,000-year-old ice lens which melted after only a minute of use. If that seems like too much work, though, you can always outfit your camera with no lens at all.
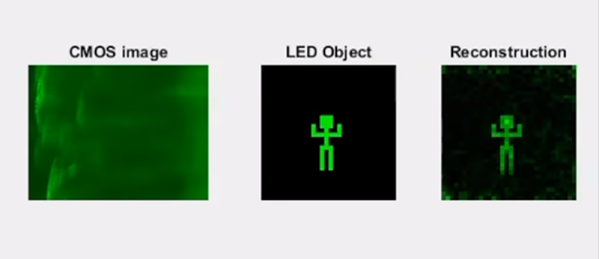
A normal camera uses a lens to bend light so that it hits a sensor. A pinhole camera doesn’t have a lens, but the tiny hole serves the same function. Now two researchers from the University of Utah. have used software to recreate images from scattered unfocused light. The quality isn’t great, but there’s no lens — not even a pinhole — involved. You can see a video, below.
The camera has a sensor on the edge of a piece of a transparent window. The images could resolve .1 line-pairs/mm at a distance of 150 mm and had a depth of field of about 10 mm. This may seem like a solution that needs a problem, but think about the applications where a camera could see through a windshield or a pair of glasses without having a conventional camera in the way.