[Daqq] is back at it again with the linear algebra, and he’s now come up with a method for determining the resistance of lots of resistors using little of wires and loads of math.
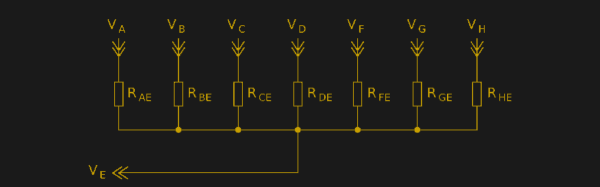
Like any reasonable person, [daqq] decided it would be fun to “solve one of those nasty [electrical engineering] puzzles/exercises where you start out with a horrible mess of wires and resistors and you are supposed to calculate the resistance between two nodes.” You know, just an average Saturday night. At the time, he was also fascinated by Charlieplexing – an awesome technique that either allows one to control multiple polarized components, such as LEDs, simply by connecting them in a specific way. After toying with the idea for a while, [daqq] found that using just Charlieplexing would be“a horrible mess” but he didn’t stop there. Drawing inspiration from Charlieplexing, he came up with the idea to connect things in such a way that every node is connected by one connection to every other node – a complete graph from a topological view point (this makes so much more sense visually). From here, he was able to set pins to HIGH, LOW, or INPUT and gather all the data needed to solve his linear system of equations.
Now, there is a balance to everything, and while this system can determine the resistance of .5*N(N-1) resistors using just N wires, it also a memory and computation hungry method. Oh well, can’t have it all. But, while it’s computationally hungry, [daqq] got it working on an ATMega32, so it’s not an unmanageable feat. And, let’s not forget to mention [daqq’s] wonderful writing. Even if you don’t know linear algebra (or would rather forget), it’s a good read from a theory perspective. So good, in fact, that [daqq] is getting published in Circuit Cellar!
We love to see theory in the hacker world, so keep it coming! But, while we wait (wink wink), there’s always time to review the basic Hacker Calculus and check out our past math-related articles.