Custom Arcade Control Panel

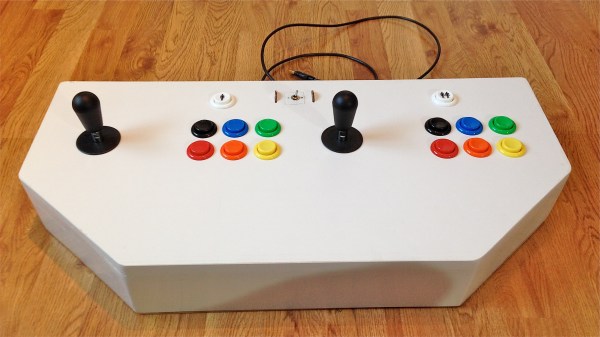
Anybody can fire up an emulator and play arcade games of yesteryear, but if you want to capture more of the nostalgia, you should build a custom arcade control panel. [Quinn] started her build by narrowing down which games she was most interested in playing, and decided on a straightforward 2-player setup. The biggest challenge was finding joysticks that would allow for switchable 4-way or 8-way control: some games such as Ms. Pac Man were made for 4-way joystick input, and the added positions on a 8-way can lead to confused inputs and frustrated players.

[Quinn] found the solution with a pair of Ultimarc Servo Stik joysticks, which use a servo motor to swap between 4 and 8-way mode. The output from both the joysticks and the buttons feed into an iPac encoder, which converts the signal to emulate a USB keyboard. The panel was first mocked up on butcher paper, with dimensions borrowed from various games: the panel itself resembles Mortal Kombat 2, while the buttons are spaced to match X-Men vs Street Fighter 2. [Quinn] chose some spare melamine—plywood with a plastic coating—to construct the panel, drilled some holes and used a router to carve out space for the joysticks. A USB hub was added to power the servos and to make room for future additions, which [Quinn] will have no difficulty implementing considering that her electrical layout is enviably clean. To cap it all off, she fit two “coin slot” buttons: a quarter placed into a slot serves as a start button when pressed.

Be sure to see the videos after the break that demonstrate the coin buttons and the servos, then check out a different retro joystick hack for a tripod controller, or look to the future with the Steam Controller.

Continue reading “Custom Arcade Control Panel”

Raspberry Pi Media Center On An Apple TV

You may tend to think of the AppleTV as a sort of walled garden, and you would mostly be right. Apple keeps tight control over what runs on their devices. That said, [David] decided to look closer at how the various ‘applications’ work. It turns out, the applications are nothing more than glorified web plugins. Using XML and Javascript, the apps simply define library function calls, giving them a consistent interface. So using fairly simply methods, the options really open up. Unfortunately, the method for adding new sites isn’t enabled by default.

Using a jailbroken AppleTV, [David] was able to do a fair bit of detective work and found a way to enable the ‘Add Site’ option, which allowed him to use his Raspberry Pi as a media server. The good news: you don’t need to jailbreak if you’re running 5.2 or 5.3… you should be able to recreate his success fairly easily. The bad news: things seem to have changed in 6.0. [David] isn’t sure if this was Apple intentionally closing a hole, or just not dotting all of their i’s.

[David] put all of his research up on Github, including the rough code. If you haven’t updated your AppleTV yet, and you have a Raspberry Pi to use as a media server, give it a try and let us know how it goes in the comments.

Learn To Translate IR Codes And Retransmit Using Arduino

[Dave Jones] from EEVBlog.com takes “Arduino fan boys” off the garden path getting down and dirty with different methods to capture, evaluate and retransmit IR remote control codes. Capturing and reproducing IR remote control codes is nothing new, however, [Dave] carves his own roads and steers us around some “traps for young players” along the way.

[Dave] needed a countdown timer that could remotely start and stop recording on his Cannon video camera, which he did with simplicity in a previous EEVBlog post using a commercial learning remote control unit. The fans demanded better so he delivered with this excellent tutorial capturing IR codes on his oscilloscope from an IR decoder (yellow trace) as well as using an IR photo transistor (blue trace) which showed the code inclusive of 38 KHz carrier frequency. Either capture method could easily be used to examine the transmitted code. The second lesson learned from the captured waveforms was the type of code modulation being used. [Dave’s] remote transmitted NEC (Japanese) pulse length encoding — which can be assertaind by referencing the Infrared Remote Control Techniques (PDF). Knowing the encoding methodology it was trivial to manually translate the bits for later use in an Arduino transmitter sketch. We find it amazing how simple [Dave] makes the process seem, even choosing to write his own sketch to reproduce and transmit the IR codes and carrier instead of taking the easy road looking for existing libraries.

A real gem of knowledge in the video was when it didn’t work! We get to follow along as [Dave] stumbles before using a Saleae Logic analyzer to see that his transmitter was off frequency even though the math in his sketch seemed correct. Realizing the digital write routine was causing a slowdown he fudged his math to make the needed frequency correction. Sure, he could have removed the performance glitch by writing some custom port control but logic dictates using the fastest and simplest solution when hacking a one-off solution.

[Dave’s] video and links to source code after the break.

Continue reading “Learn To Translate IR Codes And Retransmit Using Arduino”

VCR Centrifuge

VCR’s practically scream “tear me open!” with all those shiny, moving parts and a minimal risk that you’re going to damage a piece of equipment that someone actually cares about. Once you’ve broken in, why not hack it into a centrifuge like [Kymyst]? Separating water from the denser stuff doesn’t require lab-grade equipment. As [Kymyst] explains: you can get a force of 10 G just spinning something around your head. By harvesting some belt drives from a few VCR’s, however, he built this safer, arm-preserving motor-driven device.

[Kymst] dissected the video head rotor and cassette motor drive down to a bare minimum of parts which were reassembled in a stack. A bored-out old CD was attached beneath the rotor while a large plastic bowl was bolted onto the CD. The bowl–here a microwave cooking cover–acts as a protective barrier against the tubes spinning inside. The tube carriers consist of plastic irrigation tubing fitted with a homemade trunnion, which [Kymyst] fashioned from some self-tapping screws and a piece of PVC. At 250 rpm, this centrifuge reaches around 6 G and best of all, gives a VCR something to do again. Take a look at his guide and make your own, particularly if your hackerspace has a bio lab.

The Bitbox Console: An Open Source Gaming Rig

Bitbox Console

A simple resistive DAC is all you need to drive a VGA display. Combining that with an on-chip DAC for audio, the STM32F405RGT6 looks like a good choice for a DIY game console. [Makapuf’s] Bitbox console is a single chip gaming machine based on the STM32 ARM processor.

We’ve seen some DIY consoles in the past. The Uzebox is a popular 8 bit open source game system, and [makapuf] was inspired by its design. His console’s use of a more powerful 32 bit processor will allow for more complex games. It will also provide more colors and higher quality audio.

One of the keys of the Uzebox’s success is the development tools around it. There’s a full emulator which allows for debugging with GDB. [Makapuf] has already built an SDL based emulator, and can debug the target remotely using GDB. This will certainly speed up game development.

After the break, check out a demo of the first game for the Bitbox: JUMP. Also be sure to read through [makapuf]’s blog for detailed information on the build.

Continue reading “The Bitbox Console: An Open Source Gaming Rig”

Getting Boxeebox Root And Making It Useful Again

When it was released just three years ago, the Boxee Box – a set-top box designed to run the Boxee HTPC environment – was a pretty cool little device. Even though it was somewhat crippled from the get-go, the Boxee Box had a lot of neat features including a remote with a QWERTY keyboard, the ability to stream media over a home network, and automatic scraping of IMDB for proper info for all your torrented media. Team Boxee recently left for Samsung, and the severs have been shut down, but that doesn’t mean your Boxee Box has outlived its usefulness. Here’s a few hacks to get your Boxee Box up and running again, sent in by [Ryan].

Last year at DEFCON 20, [GTVHacker] demonstrated two ways to get root on the original Boxee Box. The first is a software root method that runs a shell script on every boot. The second is a far more elegant hardware modification that involves cutting two traces and soldering wires to a UART adapter.

Root is fine, but what the Boxee Box really needs is an update to its media player. Boxeehack does just this and only requires a USB stick for installation. Boxeehack puts back some of the default XMBC functions that were removed from the Boxee Box, and gives anyone running this media center root.

It may be old and unsupported, but there’s still plenty of life left in the Boxee Box. They’re also pretty cheap, so if you’re looking for a small media player for your TV, you might want to think about picking one of these boxes up.