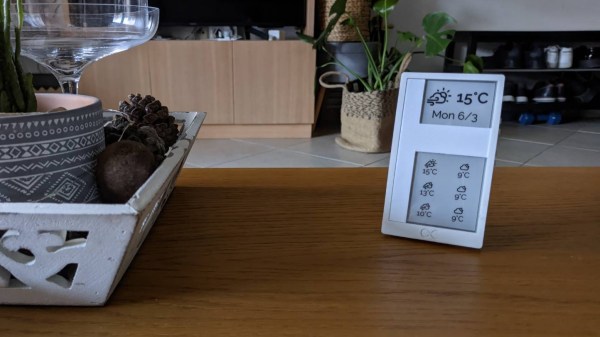
Using GitHub Actions To Brew Coffee

It’s getting harder and harder to think of a modern premium-level appliance that doesn’t come with some level of Internet connectivity. These days it seems all but the cheapest refrigerators, air purifiers, and microwaves include wireless capabilities — unfortunately they’re often poorly implemented or behind a proprietary system. [Matt] recently purchased a high-end coffee maker with Bluetooth functionality which turned out to be nearly useless, and set to work reverse-engineering his coffee maker and adapting it to work by sending commands from GitHub.

Since the wireless connectivity and app for this coffee maker was so buggy and unreliable, [Matt] first needed to get deep into the weeds on Bluetooth Low Energy (BTLE). After sniffing traffic and identifying the coffee maker, he set about building an interface for it in Rust. Once he is able to send commands to it, the next step was to integrate it with GitHub, so that filing issues on the GitHub interface sends the commands from a nearby computer over Bluetooth to the coffee maker, with much more reliability than the coffee maker came with originally.

Using [Matt]’s methods, anyone stuck with one of these coffee makers, a Delonghi Dinamica Plus, should be able to reactivate the use of its wireless functionality. While we’d hope that anyone selling a premium product like this would take a tiny amount of time and make sure that the extra features actually work, this low bar seems to be oddly common for companies to surmount. But it’s not required to pick up an expensive machine like this just to remotely brew a cup of coffee. You can do that pretty easily with a non-luxury coffee maker and some basic wireless hardware.

Standing Desk With A Clever Flair

Standing desks (also known as sit-stand desks) are somewhat polarizing. The height is adjustable, but the idea is that you move between sitting and standing while you work. Hundreds of manufacturers are out there, but they’re all the same. Two metal legs that extend and one or more motors to move the legs up and down. [JAR Made] tried to make something slightly different for their standing desk with an extending curved surface.

The build started with some gorgeous alder that was milled into square with a track saw and a planer — no jointer was required. However, he wanted long boards and was debating how to butt join the pieces together and decided on pocket holes with dowels to try and clamp the boards together while the glue dried. The resulting product was one that [JAR Made] was unhappy with. He pivoted on his feet by switching Baltic birch plywood for the main desk surface. Which was bent using a kerf-cutting technique (though just using a track saw rather than a CNC bit).

Here is where you can see him learn from his earlier mistakes. He routed a half lap in the plywood for the butt joint to give it more strength and devised a clever clamping mechanism using CA glue and painter’s tape to get good clamping pressure. The alder from earlier came in use to serve as a front edge for the plywood and a groove to hold the sliding piece of plywood that extends and retracts as the desk goes up and down.

Regular old standing desk legs screw into the underside of the desk and allow it to move up and down. Overall, it’s a wonderful build of a gorgeous desk. We love seeing people make mistakes and then pivot and learn from them. Perhaps the next step is to automate the desk to move on its own.

Continue reading “Standing Desk With A Clever Flair”

Turn Your Furniture Into A Light Show With Hyelicht

There’s something about the regimented square shapes of the IKEA Kallax shelf that convinced [Eike Hein] it could benefit from some RGB LED lighting, and while he could have simply used a commercial solution, he decided instead to develop Hyelicht: an incredibly well documented open source lighting system featuring multiple control interfaces and APIs. We’d say it was overkill, but truth be told, we dream of a world where everyone takes their personal projects to this level.

Hyelicht’s default touch UI

In the boilerplate configuration, [Eike] shows off controlling the LEDs using a graphical user interface running on a Waveshare 7″ touch screen mounted to the side of the shelf. That’s the most direct way of controlling the LEDs, as the touch screen is plugged into the Raspberry Pi 4B that’s actually running the software. But the same interface can also be remotely accessed by your smartphone or desktop.

You can also skip the GUI entirely and control the LEDs with a command line interface, or maybe poke Hyelicht’s HTTP REST interface instead. The system can even integrate with the Philips Hue ecosystem, if you prefer going that route.

The 5×5 Kallax shelf is the project’s official reference hardware, but of course it will work with anything else you might wish to cover with controllable LEDs. We’ve seen similar setups used to light storage bins in the past, but nothing that can even come close to the documentation and customization possibilities offered by Hyelicht. This is definitely a project to keep a close eye on if you’ve got the urge to add a little color to your world.

Simple Plywood Lamp Has Neat Hidden Switch

Shortly after the development of the electric light came the light switch, presumably. Of course, obvious switches are old-hat, and this neat lamp build from [Giovanni Aggiustatutto] goes with a design that’s altogether more coy.

The lamp itself is a minimalist modern design, with a cube-like body constructed out of plywood. It was easily constructed by simply stacking up several layers of plywood to create the form. Inside the housing, a bulb holder was installed hooked up to a Shelly smart relay to enable the lamp to be used as a smart device. The relay also has a switch input for direct control. This is hooked up to a micro-switch that is tucked into the base. Tilting the lamp to one side triggers the micro-switch and turns the lamp on and off as desired.

Overall, it’s a simple build that is elegant and functional. It eschews switches on the lamp cord and other fussy details, while featuring both smart control and a direct switch as well. We’ve featured some other great lamps before, too. Video after the break.

Continue reading “Simple Plywood Lamp Has Neat Hidden Switch”

RFID Sticker On Bike Helmet Grants Garage Access

[Glen] might describe his project of opening his garage door by way of an RFID sticker on his bike helmet as simple, but some of the interfacing he needed to do was quite complex. He walks through the project from beginning to end, and there’s plenty to learn from.

When designing an RFID access control system, one has to decide what kind of reader and what kind of tags one wishes to use. They all function more or less the same way, but there are a lot of practical considerations to take into account such as cost, range, ease of use, and security options. After a lot of research, [Glen] decided on inexpensive sticker-style tags and a compatible reader supporting credentials with an ISO14443 UID that could be suitably mounted on a building’s exterior.

The actual opening of the door was the simple part, done by interfacing to a spare remote.

Breakout boards with ready-to-use code libraries exist for some RFID readers, but that wasn’t the case for the reader [Glen] had. He ended up rolling his own code to handle communication with the reader, with a Microchip PIC18F45K50 doing all the work of reading tags and performing access control. His code is on the project’s GitHub repository, and if you also find yourself needing to interface to a reader that uses the Wiegand protocol, you might want to give it a look.

Controlling the actual garage door was the easy part. All that took was soldering two wires across the switch contacts of a spare garage door opener remote, and using a relay to close the contacts. Simple and effective. You can see it in action in the short video, embedded below the break.

Overhead door access control might be a simple concept, but it comes in all shapes and sizes when enterprising hackers start looking for solutions. We’ve seen garage doors given the DIY IoT treatment, and even seen access controlled by a car’s headlamp flashes, which actually turned out to be more secure than it sounds.

Continue reading “RFID Sticker On Bike Helmet Grants Garage Access”

Trigger Your Home Automation Routines With Home Buttons

Home automation systems are all well and good, so long as the person who built it all is around to drive it. Let’s face it, they’re quite often a complex web of interconnected systems, all tied to the specifics of one’s home — and someone less familiar with it all could get a little irritated if, on a chilly day, the interface to the boiler is via a Python script, and something won’t work. Just saying. Home Buttons by [Matej Planinšek] over on Hackaday.IO is a nicely polished project, which aims to take some of the hackiness out of such automation by providing a sleek front end to those automation routines, enabling anyone to rock on over and set one in action without hassle.

Internal PCB shown in the foreground, with the complete unit behind.The PCB is based around the ESP32-S2-mini which deals with WiFi connectivity and integration with Home Assistant using the usual MQTT protocol. We expect integration with other flavors of home automation would not be difficult to achieve. The center of the unit holds a simple E-Ink display, for that low-standby power. Specifically, the unit chosen is a Good Display GDEY029T94 2.9″ which this scribe can confirm is easy to interface and pretty cheap to purchase from the usual Chinese online vendors. This was matched up with six clicky Alps SKRB-series low-profile tact switches, which sit on either side of the display, and corresponds to a flexure-type affair on the 3D printed front casing. Neat and simple.

The PCB design was provided in Altium format, which you can find on the project GitHub page. This shows a straightforward design, with a few nice little details here and there. The internally mounted 18650 cell is reportedly good for at least a year of operation, but when time, it can be charged via USB. A Xysemi XB8608AF (PDF) protection chip provides appropriate limiting for the 18650 cell, shielding it from the perils of overcharging, discharging, and whatnot. Not that that is likely in this current setup. A Sensiron SHTC3 humidity and temperature sensor is also in there, hanging off the I2C bus, which makes sense for this application.

Home Automation hacks are plenty on these pages, like this scroll-wheel interface, for instance. If all this stuff is looking quite overbearingly complicated to get into, how about starting with a Pico W?

Several shelf boxes of various widths are held together by brightly-colored plus-sign-shaped connectors.

3D Printed Shelf Connector

Sometimes, you really need a custom shelf. Whether you have a weird-shaped space, weird-shaped stuff, or just want something different, making your own shelving can make your place more like home. The Plus Shelf by [shurly] aims to make building your own shelves a little easier with a 3D printed bracket.

These connectors aren’t just sitting flush against the wood of the shelf. Each end of the + sign actually sits in a 3/8″ drilled recess, giving a more secure fit. The pieces were printed on an Objet and then dyed in various bright shades to really make the shelving pop. The cubbies were assembled with biscuits after cutting down a sheet of plywood to the appropriate sizes. The 45˚ angles around the edges of the cubbies make the whole shelf system that much nicer.

The final shelf has a little wobble, but that’s probably because dying the shelf connectors made them “bendy.” Because of the instability with the friction fit, the shelf connectors were super glued into the shelf boxes. [shurly] hopes that a metal version of the connectors might be able to eliminate these problems in the future.

This shelving system not your cup of tea? Maybe you’d prefer this Vintage Adjustable Shelving Method or this MP3 Player Shelf.