High Pressure Air Compressor Using A Pair Of Refrigeration Compressors

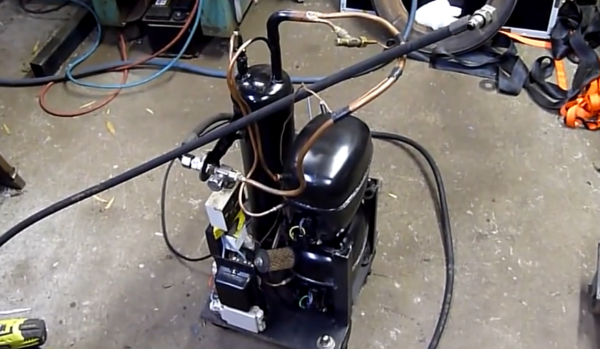
[Ed] from Ed’s Systems, aka [Aussie50] took some time to demo his high pressure Frankenstein air compressor he stitched together from two refrigeration compressors. The two Danfoss SC15 compressors can produce upwards of 400psi and can run all day at the 300 psi range without overheating. The dual units may get up to pressure quickly considering the small accumulator “tank”, but high CFM isn’t the goal with this build. [Ed] uses the system to massacre some LCD panels with lead, ball bearings, and other high speed projectiles shot from a modified sandblasting gun. Just a bit of air at 400 psi is all you need for this terminator toy.

Don’t think the destruction is wasteful either; [Ed] strives to repair, rebuild, reuse, repurpose and a few other R’s before carefully separating and sorting all the bits for recycling. This modification included lots of salvaged hardware from older teardowns such as high pressure hoses, connectors, accumulator and pressure cutoff switches.

At first it seems strange to see something engineered for R22 refrigerant working so well compressing air. Morphing refrigeration systems into air compressor service is something [Ed] has been doing for a long time. In older videos, “fail and succeed”,  [Ed] shows the ins and outs of building silent air compressors using higher capacity storage tanks. Being no stranger to all variations of domestic and commercial refrigeration systems, [Ed] keeps home built air compressors running safe and problem free for years.

Don’t think this is the only afterlife for old refrigeration compressors, we’ve seen them suck too. You’ll get a few more tidbits, and can watch [Ed’s] video overview of his home built compressor after the break.

Continue reading “High Pressure Air Compressor Using A Pair Of Refrigeration Compressors”

Repurposing A Ceiling Fan Into A Pottery Wheel

The wheel goes round and round as does [Lou Wozniak]. He’s come back to us, this time hacking together a pottery wheel from a cheap ceiling fan. This is a great use for a discarded or inexpensive fan and the build should cost less than $50. As you watch the video you learn that repurposing the ceiling fan was no simple feat. Lucky for us [Lou] spins through detailed construction procedures and doesn’t fail to cover every tip and trick. He really does think outside the box or should we say inside the bucket and peanut butter jar. The fan gets dismantled as well as rewired inside a 5 gallon bucket which is used as the pottery wheel housing and stand. A plastic peanut butter jar was used as a makeshift electrical junction box inside the bucket. He remounted the motor’s string operated speed switch on the side of the jar and routed the pull string out the side of the bucket. The fan motor should have three or four switch speed settings which might be enough control. If continuous variable speed control is desired he could add in a controller similar to [Ben Krasnow’s] AC controller using one pin on a microcontrollerUPDATE: [AKA the A] tells us in a comment below that this controller won’t work with a ceiling fan, but we still really like [Ben’s] project so we’re leaving this link here.

Most potters use significant amounts of water to wet the clay while they throw, so we have reservations about having the high voltages and open motor design directly under the wheel with no shielding. We know [Lou] could easily hack in a splash pan and of course always plug into a ground fault protected receptacle when using electrical appliances around water.

We do get to see the wheel in operation at the end of the video, which you can watch after the break. However, [Lou] makes no claims at being a pottery artisan.

Continue reading “Repurposing A Ceiling Fan Into A Pottery Wheel”

DIY Heatsinking PCBs

pcb heatsink

We have covered many do it yourself PCBs before, but this video guide adds an easy way to sink heat from high power devices, which we think you might find handy.

It is a very simple process that [CNLohr] uses to keep his small RGB LED projects from overheating. It starts by using a readily available silicone thermal sheet as the substrate by applying it to copper foil. He then applies a toner-transfer circuit pattern to the copper by running the pair through a modified laminator a few times. He makes note that you have to apply the plastic backing side of the silicone sheet to the copper foil to prevent the laminator from chewing it up.

After the typical ferric chloride etching process is complete, he then uses 220 grit sandpaper to remove the toner pattern. Often steel wool is used, but because of the sensitive nature of the silicone, sandpaper works better to avoid peeling up traces.

We have featured [CNLohr] before, as he does some top-notch tutorials in his workshop — which makes for both a fascinating and distracting backdrop for the videos. This one is a bit long (~20 minutes), but is very thorough and goes through the entire process from start to finish. Check it out after the break.

Continue reading “DIY Heatsinking PCBs”

Controlling Real World Objects From Your Lucid Dream For $15

[Kyle Fredericks] tipped us about his first electronics project, a cheap and smart sleep mask that uses a vibration sensor to detect rapid eye movements.

As some of you may know, REM sleep is the part where you dream the most vividly and actively. If some external stimulation (sound, movement) is sent to you at this moment, it may help you take control of your dream by becoming aware of it. If not, your brain will create dream scenarios that incorporate this stimulus.

The interesting part of the concept is that the vibration sensor calibrates itself at the stage 2 sleep, when no eye movement occurs. This later allows a very accurate detection of the REM sleep stage, triggering a shelf stereo. Secondary buttons are even included in the mask sides.

[Kyle Fredericks] went to great lengths to document every step of the project, making it a perfect first step to learn electronics for beginners out there.

Electric Skillet Reflow Soldering Guide

skillet-reflow-tutorial

It’s no secret that we’re bizarrely drawn to macro videos showing solder paste during the reflow process. This electric skillet reflow guide provides the fix we’ve been jonesin’ for while including some helpful tips for first-timers and veterans alike. Not sure what we’re talking about? Look at the grey paste at the top of this image. As it heats up it’s drawn under each component as seen in the lower half of the image.

This particular guide is aimed at one-off assembly so a solder paste stencil is not used (we learned a lot about those earlier in the month). It instead uses the painstaking toothpick application technique. It takes time but the upside is that once you get the hang of it you’ll apply the perfect amount of solder each time. After placing all of the components [Count Spicy] carefully transfers the board to an electric skillet, covers it with the glass lid (so he can see what’s going on), and sets the temperature just above the solder’s specified melting point.

Since the skillet is cheap and easy to find you really just have to order the solder paste to get into this type of assembly. Our only gripe is that you can’t really follow a temperature profile with this rig. For that you need to move up to some PID controlled hardware.

Continue reading “Electric Skillet Reflow Soldering Guide”

Adafruit Launches Educational Show Aimed At Kids

adafruit-kids-show

Adafruit Industries just posted the first episode in a new educational series aimed at teaching kids about electronics. The episode is entitled “A is for Ampere” and teaches the basic theory behind electrical current. The subject seems like a common one for A-to-Z themed electrical tutorials. [Jeri Ellsworth] did a similar episode but hers is aimed more at the electronics hobby crowd.

[Limor] and gang (that’s [Collin Cunningham] dressed up as [Andre-Marie Ampere]) seem to be all-in on this project. The episode features ADABOT, the blue puppet which takes on the role of the student in this episode. After demonstrating a mains circuit breaker tripping the episode goes on to discuss electron flow and how current is measured.

We’re all about this type of educational opportunity. The age group at which this series is targeted have never known a day without touchscreens, they should know at least something about how those devices actually work.

Continue reading “Adafruit Launches Educational Show Aimed At Kids”

How-to: Turn On A Light Bulb

header

All too often, the commentors here on Hackaday display some parsimony in their engineering prowess. If someone uses a Raspberry Pi to blink a few LEDs, someone will invariably chime in that an ARM microcontroller would do just as well. Switching a relay on and off belies the capabilities of a 32-bit Cortex microcontroller when a simpler 8-bit build would certainly suffice. Of course this can always be reduced to a 555 circuit and further still to conditioned pigeons tapping a key in response to either food or opiates. I’d like to take this opportunity to present a tutorial. Not just any tutorial, but the actual foundation of everything we love here at Hackaday: blinky, glowey things.

You can check out the rest of this tutorial after the break.

Continue reading “How-to: Turn On A Light Bulb”