Woodworkers have always been very clever about making strong and attractive joints — think of the strength of a mortise and tenon, or the artistry of a well-made dovetail. These joints have been around for ages and can be executed with nothing more than chisels and a hand saw, plus a lot of practice, of course. But new tools bring new challenges and new opportunities in joinery, like this interesting “hammer joint” that can be made with a laser cutter.
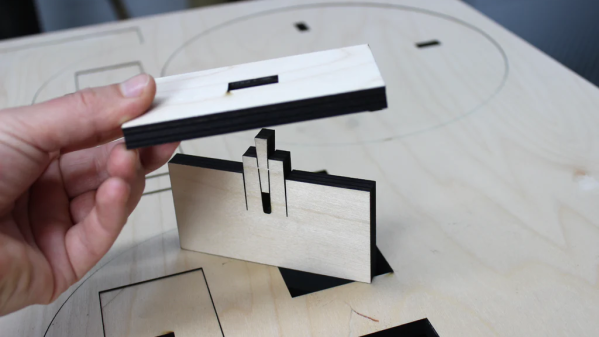
This interesting joint comes to us from [Jiskar Schmitz], who designed it for quick, solid, joints without the need for glue or fasteners. It’s a variation on a wedged mortise and tenon joint, which strengthens the standard version of the joint by using a wedge to expand the tenon outward to make firm contact with the walls of the tenon.
 The hammer joint takes advantage of the thin kerf of a laser cutter and its ability to make blind cuts to produce a tenon with a built-in wedge. The wedge is attached to a slot in the tenon by a couple of thin connectors and stands proud of the top of the tenon. The tenon is inserted into a through-hole mortise, and a firm hammer blow on the wedge breaks it free and drives it into the slot. This expands the tenon and locks it tightly into the mortise, creating a fairly bulletproof joint. The video below tells the tale.
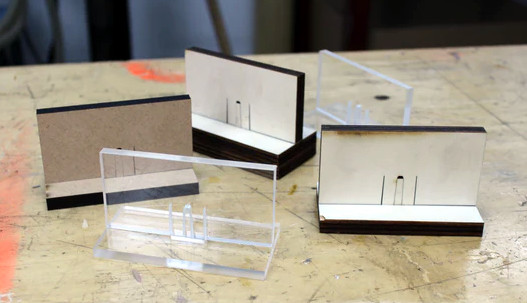
While the hammer joint seems mainly aimed at birch plywood, [Jiskar] mentions testing it in other materials, such as bamboo, MDF, and even acrylic, although wood seems to be the best application. [Jiskar] also mentions a potential improvement: the addition of a ratchet and pawl shape between the wedge and the slot in the tenon, which might serve to lock the wedge down and prevent it from backing out.
Continue reading “This Laser-Cut One-Piece Wedge Tenon Locks Wood Joints Tight”