Using An FPGA To Glitch The Olimex LPC-P1343

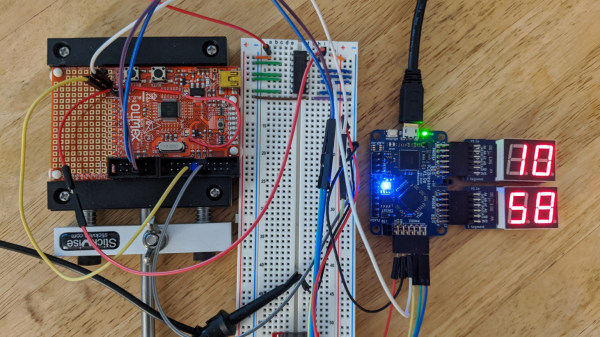
After trying out hardware hacking using an FPGA to interface with target hardware, [Grazfather] was inspired to try using the iCEBreaker (one of the many hobbyist FPGAs to have recently flooded the market) to build a UART-controllable glitcher for the Olimex LPC-P1343.

FPGA Modules (The cmd module intercepts what the host computer sends over UART, the resetter holds the reset line until the target is reset, the delay starts counting on reset and waits for a configured number of cycles before sending its signal, the trigger waits for the delay to finish before telling the pulse module to send a pulse, and the pulse works similar to the delay module and outputs to the power multiplexer.)

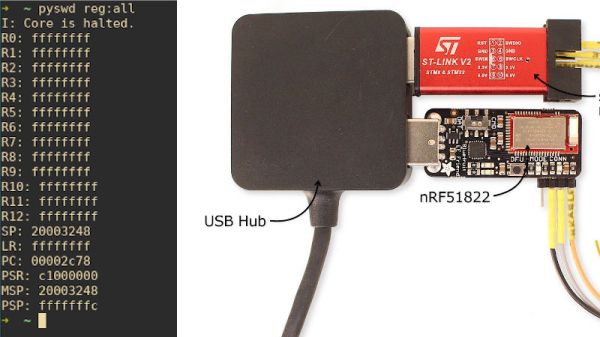
When the target board boots up, the bootROM reads the flash and determines whether the UART goes to a shell and if the shell can be used to read out the flash. This is meant for developing firmware and debugging it in the bootloader, only flashing a version when the firmware is production-ready. The vulnerability is that only a specific value read from address 0x2FC and the state of a few pins can lock the bootloader in the expected way, and any other value at the address causes the bootROM to consider the device unlocked. Essentially, the mechanism is the opposite of how a lock ought to work.

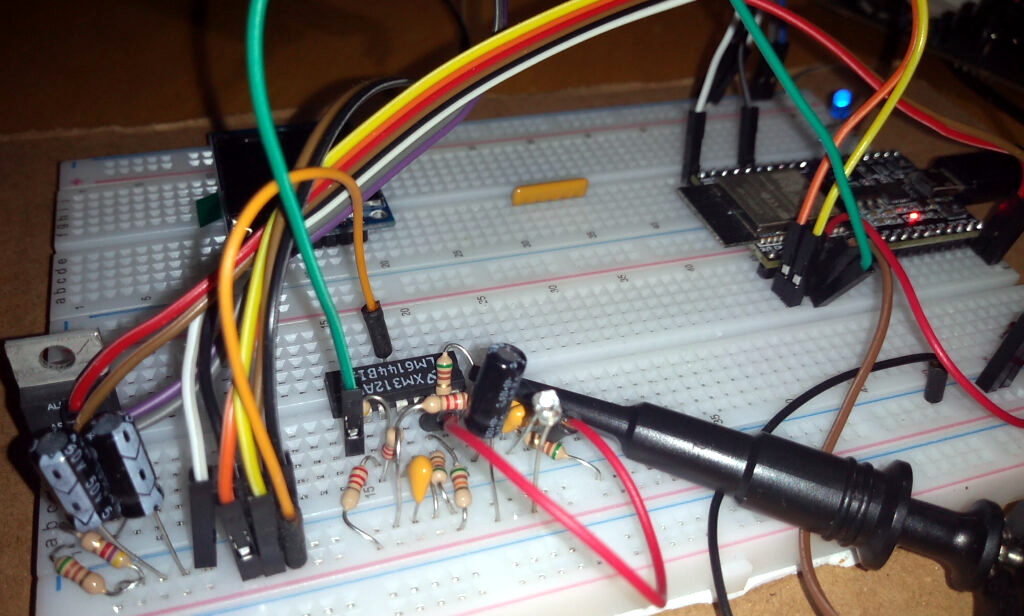
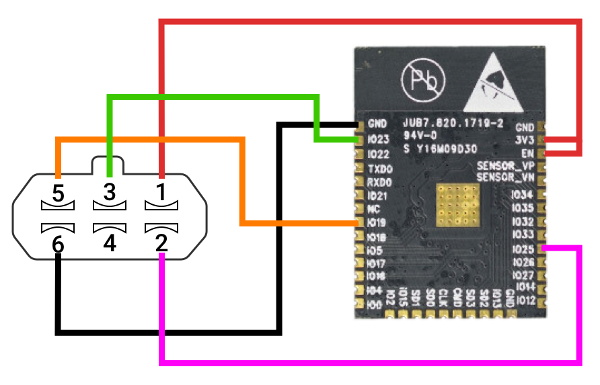
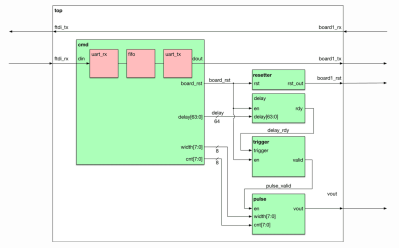
The goal is to get the CPU to misread the flash at the precise moment it is meant to be reading the specific value, then jumping to the bootloader in the unlocked state. The FPGA can be used as a tool between the host machine and target board, communicating via UART. The FGPA can support configuring the delay between resetting the target board and pulsing a ‘glitch voltage’, as well as resetting the target board and activating the glitch. The primary reasons for using the FPGA over a different microcontroller are that the FPGA allows for precise timing (83.3ns precision) and removes worries about jitters (a Raspberry Pi might have side effects from OS scheduling and other processes and microcontrollers might have interrupts messing up the timing).

The logic analyzer view

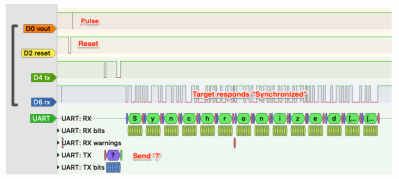
To simulate the various modules, [Grazfather] used Icarus Verilog as well as GTKWave to observe the waveforms generated. A separate logic analyzer observes the effects on real hardware.

With enough time, it is possible to brute force any combination of delay and width until you get a dump of the flash you’re not meant to read. You can check out how the width of the pulse gets wider until the max, when the delay is incremented and the width values are tried again.

Continue reading “Using An FPGA To Glitch The Olimex LPC-P1343”

Get Your Microcontroller Online At The Speed Of Light

When developing a network-enabled project with the ESP8266 or ESP32, the easiest way to handle WiFi credentials is to just hardcode the access point and encryption key into the program. But that means recompiling the firmware if you ever want to use it on a different network, which isn’t really an option if you’re trying to make something that other people can easily use. If you’re expecting grandma to bust out the UART cable, we’ve got bad news for you.

There are various ways around this problem, but we think the one developed by [Pekka Lehtikoski] is particularly clever. With a simple application, network credentials can be literally “flashed” to the waiting microcontroller by rapidly blinking the flash LED on an Android device. This allows the information to be transferred quickly and easily regardless of the user’s technical proficiency. One could even make the argument that it’s more secure than some of the other methods of doing initial setup, since an eavesdropper would literally need to see you do it if they wanted to steal your encryption key.

[Pekka] has made the source code for the Android application and the “Gazerbeam” library open for anyone who wants to include the capability in their own projects. To pick up the blinking light you just need to add a phototransistor, an opamp, and a handful of passives to your circuit; making this solution cheap enough that you could even use it in a small-scale production run. The concept isn’t limited to network credentials either. Whenever we can hold conferences again, it could be an interesting way to let attendees customize their badge.

Of course, [Pekka] isn’t the first person to use this trick. Hackers well versed in the history of WiFi MCUs may recall that the Electric Imp used a very similar method of configuration called BlinkUp. If you ever come across a device that asks you to put your phone’s screen down on a little window to perform the initial setup, there’s a good chance it has an Imp inside.

Instruction Set Hack For Protected Memory Access

The nRF51 Series SoCs is a family of low power Bluetooth chips from Nordic Semiconductor that is based on ARM Cortex cores. The nRF51822 has the Cortex M0 core and is used in a lot of products. [Loren] has written a blog post in which he claims to be able to circumvent read back protection on the chip, thus giving access to the ROM, RAM and registers as well as allow for interactive debugging sessions.

The hack stems from the fact that theĀ  Serial Wire Debug or SWD interface cannot be completely disabled on these chips even if the Memory Protection Unit prevents access to any memory regions directly. The second key piece is the fact that CPU can fetch stuff from the code memory. Combined with the SWD super powers to make changes to the registers themselves, this can be a powerful tool.

Continue reading “Instruction Set Hack For Protected Memory Access”

NEO430 Puts A Custom MSP430 Core In Your FPGA

We are certainly spoiled by all the microcontroller options nowadays — which is a great problem to have. But between the good old 8-bit controllers and an increasing number of 32-bit varieties, it almost seems as if the 16-bit ones are slowly falling into oblivion. [stnolting] particularly saw an issue with the lack of 16-bit open source soft cores, and as a result created the NEO430, an MSP430 compatible soft processor written in VHDL that adds a custom microcontroller to your next FPGA project.

With high customization as main principle in mind, [stnolting] included a wide selection of peripherals and system features that can be synthesized as needed. Not limiting himself to the ones you would find in an off-the-shelf MSP430 controller, he demonstrates the true strength of open source soft cores. Do you need a random number generator, CRC calculation, and an SPI master with six dedicated chip select lines? No problem! He even includes a Custom Functions Unit that lets you add your own peripheral feature or processor extension.

However, what impresses most is all the work and care [stnolting] put into everything beyond the core implementation. From the C library and the collection of examples for each of the controller’s features, so you can get started out of the box with GCC’s MSP430 port, to writing a full-blown data sheet, and even setting up continuous integration for the entire repository. Each topic on its own is worth looking at, and the NEO430 offers a great introduction or reference for it.

Of course, there are some shortcomings as well, and the biggest downer is probably the lack of analog components, but that’s understandable considering your average FPGA’s building blocks. And well, it’s hard to compete with the MSP430’s ultra low-power design using an FPGA, so if you’re thinking of replicating this watch, you might be better off with a regular MSP430 from a battery lifetime point of view.

Custom Bluetooth Joystick In A Nunchuk Shell

With the Wii’s unique controller, Nintendo not only provided new gaming experiences to players, but gave hardware hackers a platform for experimentation that’s still going strong. Case in point, this modification of a third party Wii “Nunchuk” by [Giliam de Carpentier] that turns the accessory into a stand-alone wireless controller powered by a ATtiny44A.

Milling a new home for the AVR

It turns out there’s a considerable amount of free space inside the Nunchuk case, so [Giliam] found adding in the new hardware wasn’t nearly as difficult as you might expect. Of course, it helps that the diminutive SMD ATtiny44A and its support hardware are housed on a very neatly milled PCB that attaches to the back of the original board.

Most of the other hardware comes in the form of modular components, like the Bluetooth transmitter and TP4056 charge controller for the 300 mAh battery. A micro USB charging port is mounted where the original Nunchuk cable entered the case, making the whole thing look very professional.

Even if you aren’t interested in making your own controller, [Giliam] covers many interesting topics in this write-up such as handling different methods of Bluetooth connectivity and various power management techniques to eke out as much life from the relatively small battery as possible. It’s not only a fascinating read, but a great example of what thorough project documentation should look like.

In the past we’ve seen Bluetooth conversions for the Wii Nunchuck, but traditionally they left the original electronics in place. On the other side of the spectrum, we’ve also seen the internals get replaced with something as powerful as the Raspberry Pi Zero.

Continue reading “Custom Bluetooth Joystick In A Nunchuk Shell”

Tired Of Fruit Ninja? Try Vegetable Assassin Using An ESP32 Sword

In a world where ninjas no longer rule the social hierarchy, where can a ninja-wannabe practice their sword fighting skills? In the popular Introduction to Embedded Systems class at the Massachusetts Institute of Technology, a team of students made their own version of the popular mobile game Fruit Ninja with a twist – you’re fighting your true nemesis, vegetables.

Vegetable Assassin allows single or multi-player mode, with players slicing vegetables on a screen using fake swords with sensors to detect the players’ motion. The web-based game allows swords to communicate their orientation to the game session with a WebSocket connection to a server, with the game generated and rendered using a 3D client JavaScript library. Rather than using MQTT, which also uses a persistent TCP connection as well as lower overhead, WebSocket provided maximum browser support.

An onboard ESP32 microcontroller and IMU track the sword movements. The game begins by calibrating the sword movements within the play area. Information is generated using the Madgwick algorithm, a 9-degrees-of-freedom algorithm that uses 3-axis data from the sword’s gyroscope, accelerometer, and magnetometer and outputs the absolute orientation of the sword.

The sword and browser both connect to the same channel on the server through a WebSocket connection, identified by a session ID similar to how web chat rooms are implemented. A statistics server manages the allocation of session IDs and other persistent game data to track high scores.

As for the graphics, a Three.js WebGL library creates the scene and camera, loading the game into the browser’s animation frame. Other scripts load the 3D models for the fruits and vegetables in the game, update their positions based on the physics engine provided by Cannon.js, and render UI elements within the game.

Curious? The project site has the microcontroller code to build your own sword that you can use to play the demo. If you don’t have an ESP32 and accelerometer handy you can play Vegetable Assassin in your browser instead.

ESP32 Refines Game Boy Bluetooth Adapter

Last year we brought word of a project from [Shyri Villar] that turned a stock Game Boy Advance into a Bluetooth controller by exploiting the system’s “multiboot” capability. The prototype hardware was a bit ungainly, but the concept was certainly promising. We’re now happy to report that the code has been ported over to the ESP32, making the project far more approachable.

To clarify, the ESP32 is now theĀ only component required for those who want to play along at home. Just five wires connect the microcontroller to the GBA’s Link Cable connector, which is enough to transfer a small ROM over to the system and ferry user input to the Bluetooth hardware. Even if you aren’t interested in using it as a game controller, this project is an excellent example of how you can get your own code running on a completely stock GBA.

While the original version of the hardware was a scrap of perfboard dangling from the handheld’s expansion connector, reducing the part count to one meant [Shyri] was able to pack everything into a tidy enclosure. Specifically, a third party GBA to GameCube link cable. This not only provides a sleek case for the microcontroller that locks onto the handheld with spring loaded tabs, but also includes a male Link Cable connector you can salvage. It looks as though there’s a bit of plastic trimming involved to get the ESP32 to fit, but otherwise its a very clean installation.

The GBA will be 20 years old soon, but that doesn’t mean the hardware and software exploration is over. The original Game Boy is over 30, and people are still giving talks about it.