This Atomic Pi Eats Other Pis For Lunch

The world is full of single board computers that want a slice of the Raspberry Pi action. Most of them are terrible. But fools and their money, yadda yadda, and there’s a new sucker born every minute. The latest contender to the Raspberry Pi is the Atomic Pi. It’s an x86-based single board computer that costs $35, shipped to your door. Is it worth it? Is it even in the same market as a Raspberry Pi? Or is it just a small budget computer without a box? I have no idea.

With that said, the Atomic Pi comes with an Intel Atom x5-Z8350 with Intel HD Graphics (Cherry Trail). There is 2 GB of DDR3L-16000, 16 GB of eMMC, and an SD slot for storage. Connectivity is a full HDMI port (primary audio out), USB 3.0 and 2.0 ports, a Mediatec RT5572 used for WiFi, a Qualcomm CSR8510 for Bluetooth 4.0, a “Legitimate licensed BIOS”, and a real-time clock. Overall, you’re looking at a top-of-the-line tablet computer from four years ago. One that would run Windows.

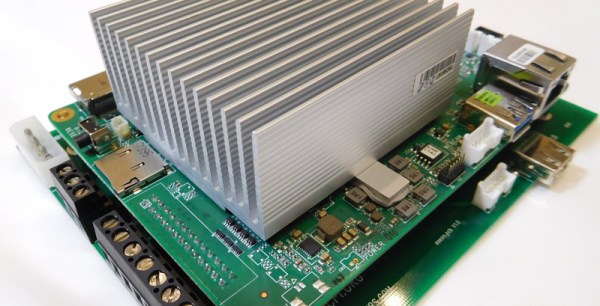
To use all the features of the Atomic Pi, you will need to buy a $15 breakout board to supply power to the board, and use a large industrial power supply, the kind you would normally find bolted to a RepRap or a homemade CNC machine. You will need to supply both 5 V and 12 V to the board if you would like to use the Class D audio amplifier, but if you only want to use audio over HDMI, supplying only 5 V will do. If you want to boot this board, it looks like you’ll need to bring a USB/TTL cable to make everything work. This may be a tough sell to a crowd with zero experience booting a bare Linux system. That said, it runs Nintendo 64 emulators well, which is the only reason people buy Raspberry Pis anyway.

Is the Atomic Pi the single board computer you need? I don’t know. But we’ve got an Atomic Pi on order, and we’re ready to go with a full review when it show up.

Play Tetris On A Transistor Tester, Because Why Not?

[Robson] had been using the same multimeter since he was 15. It wasn’t a typical multimeter, either. He had programmed it to also play the Google Chrome jumping dinosaur game, and also used it as a badge at various conferences. But with all that abuse, the ribbon cable broke and he set about on other projects. Like this transistor tester that was just asking to have Tetris programmed onto its tiny screen.

The transistor tester is a GM328A made for various transistor testing applications, but is also an LCR meter. [Robson]’s old meter didn’t even test for capacitance but he was able to get many years of use out of that one, so this device should serve him even better. Once it was delivered he set about adding more features, namely Tetris. It’s based on an ATmega chip, which quite easy to work with (it’s the same chip as you’ll find in the Arduino Uno but [Robson’s] gone the Makefile route instead of spinning up that IDE). Not only did he add more features, but he also found a mistake in the frequency counter circuitry that he fixed on his own through the course of the project.

If you’ve always thought that the lack of games on your multimeter was a total deal breaker, this project is worth a read. Even if you just have a random device lying around that happens to be based on an ATmega chip of some sort, this is a good primer of getting that device to do other things as well. This situation is a fairly common one to be in, too.

Continue reading “Play Tetris On A Transistor Tester, Because Why Not?”

How-To: Mapping Server Hits With ESP8266 And WS2812

It has never been easier to build displays for custom data visualization than it is right now. I just finished one for my office — as a security researcher I wanted a physical map that will show me from where on the planet my server is being attacked. But the same fabrication techniques, hardware, and network resources can be put to work for just about any other purpose. If you’re new to hardware, this is an easy to follow guide. If you’re new to server-side code, maybe you’ll find it equally interesting.

I used an ESP8266 module with a small 128×32 pixel OLED display connected via an SSD1306 controller. The map itself doesn’t have to be very accurate, roughly knowing the country would suffice, as it was more a decorative piece than a functional one. It’s a good excuse to put the 5 meter WS2812B LED strip I had on the shelf to use.

The project itself can be roughly divided into 3 parts:

  1. Physical and hardware build
  2. ESP8266 firmware
  3. Server-side code

It’s a relatively simple build that one can do over a weekend. It mashes together LED strips, ESP8266 wifi, OLED displays, server-side code, python, geoip location, scapy, and so on… you know, fun stuff.

Continue reading “How-To: Mapping Server Hits With ESP8266 And WS2812”

FemtoBeacon Is A Tiny ESP32 Coin-Shaped Dev Board

Our single board microcontroller platforms have become smaller over the years, from the relatively large classic Arduino and Beagleboard form factors of a decade ago to the postage stamp sized Feather and ESP boards of today. But just how small can they go? With current components, [Femtoduino] think they’ve cracked it, delivering an ESP32-based board with WiFi and Bluetooth, and an LDO regulator for 5 V operation in a circular footprint that’s only 9 mm in diameter.

There are some compromises from such a paucity of real-estate, of which perhaps the most obvious is a lack of space to make I/O lines available. It has SPI, a UART, and a couple of I/O lines, and aside from an onboard RGB LED that’s it. But SPI is versatile well beyond its number of lines, and even with so little there is much that can be done. Another potential compromise comes from the antenna, a Molex surface-mount component, which is an inevitable consequence of a 9 mm circular board.

There has to come a point at which a microcontroller platform becomes so small as to be unusable, but it’s clear that there is a little further for this envelope to be pushed. We’d love to see what other designers do in response to this board.

All You Need To Know About I2S

Last month we marked the 40th birthday of the CD, and it was as much an obituary as a celebration because those polycarbonate discs are fast becoming a rarity. There is one piece of technology from the CD age that is very much still with us though, and it lives on in the standard for sending serial digital audio between chips. The protocol is called I2S and comes as a hardware peripheral on many microcontrollers. It’s a surprisingly simple interface that’s quite easy to work with and thus quite hackable, so it’s worth a bit of further investigation.

It’s A Simple Enough Interface

Don’t confuse this with the other Philips Semiconductor protocol: I2C. Inter-Integrated Circuit protocol has the initials IIC, and the double letter was shortened to come up with the “eye-squared-see” nomenclature we’ve come to love from I2C. Brought to life in 1982, this predated I2S by four years which explains the somewhat strange abbreviation for “Inter-Integrated Circuit Sound”.

The protocol has stuck around because it’s very handy for dealing with the firehose of serial data associated with high-quality digital audio. It’s so handy that you’ve likely heard of it being used for other purposes than audio, which I’ll get to in a little bit. But first, what does I2S actually do?

Continue reading “All You Need To Know About I2S”

FabGL Has Everything You Need To Write Games For The ESP32

Typically, when one considers writing a video game, the platform is among the first decisions to be made. The PC can be an easy one to start with, and mobile development is fairly accessible too. Of course, you could always develop for a microcontroller platform instead. [Fabrizio Di Vittorio] has built the perfect set of tools to do just that with the ESP32, by the name of FabGL.

The library contains a laundry list of features that are perfect for developing games. There’s VGA output with up to 64 colors, PS/2 mouse and keyboard inputs, as well as a capable graphics library and game engine. It can even act as an ANSI/VT terminal if necessary.

[Fabrizio] has put the hardware through its paces, with a variety of benchmarks displaying impressive performance with simple balls, polygons and sprites. You could easily produce a 2D game in an early 90s style without running into any hardware limitations — though given the ESP32 clocks in at up to 240MHz, that’s somewhat to be expected.

It’s an impressive project (video after the break), and we’d love to see more games developed on the platform. Once you have a VGA connector wired in you should try out some ESP32 VGA hacks. And for those ESP8266 die hards there’s a game engine for that chip too!

Continue reading “FabGL Has Everything You Need To Write Games For The ESP32”

A Robust ESP8266 RFID Access Control System

By now we’ve seen plenty of projects that use an ESP8266 as a form of rudimentary access control: tap a button on your smartphone, and the door to your apartment unlocks. With the power and flexibility of the ESP, it’s a very easy project to pull off with minimal additional hardware. But what about if you want to get a little more serious, and need to support many users?

Rather than reinvent the wheel, you might want to check out the extremely impressive ESP-RFID project. It’s still based on the ESP8266 we all know and love, but it combines the diminutive WiFi-enabled microcontroller with a nice custom PCB and some exceptionally slick software to create a very professional access control system without breaking the bank. As the name implies, the system is geared towards RFID authentication and supports readers such as the MFRC522, PN532 RFID, or RDM6300. Add in a stack of Mifare Classic 1KB cards, and your hackerspace is well on the way to getting a new door control system.

The official hardware for ESP-RFID can be purchased through Tindie with or without an installed ESP-12F module, but as it’s a fully open source project, you’re also free to build your own version if you’d like. In either event, the board allows you to easily connect the ESP up to your RFID reader of choice, as well as door sensors and of course the door locks themselves.

On the software side of things, ESP-RFID should be able to handle about 1000 unique users and their RFID cards before the relatively limited RAM and storage of the ESP catches up with it. But if you’ve got that many people coming and going in your hackerspace, it might be time to update your systems to begin with. Incidentally, the project makes no guarantees about the security of the ESP-RFID code, and says that the system shouldn’t be used for secure locations. That said, you can run ESP-RFID without an Internet connection to reduce your attack surface, at the cost of losing NTP time synchronization.

If you’re not managing a few hundred users and their RFID cards, one of the more simplistic ESP8266 door locks might be more your speed. We’ve also seen similar tricks pulled off with the Particle Photon, in case you’ve got one of those rattling around the parts bin.