Arduino Converts Serial To Parallel: The Paralleloslam

After a youth spent playing with Amigas and getting into all sorts of trouble on the school computer network, I’ve always had a soft spot in my heart for hardware from the 80s and 90s. This extends beyond computers themselves, and goes so far as to include modems, photocopiers, and even the much-maligned dot matrix printer.

My partner in hacking [Cosmos2000] recently found himself with a wonderful Commodore MPS 1230 printer. Its parallel interface was very appropriate in its day, however parallel ports are as scarce as SID chips. Thankfully, these two interfaces are easy to work with and simple in function. Work on a device to marry these two disparate worlds began.

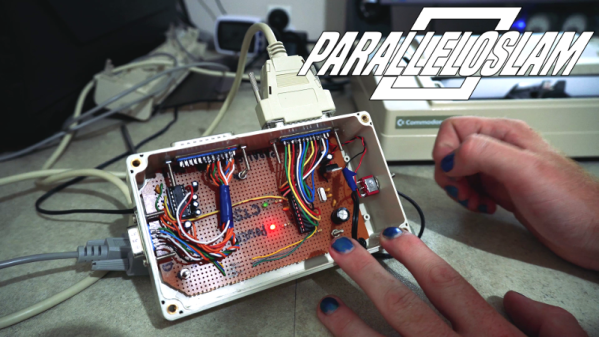
Enter: The Paralleloslam

While I was gallivanting around the Eastern coast of Australia, [Cosmos2000] was hard at work. After some research, it was determined that it would be relatively simple to have an Arduino convert incoming serial data into a parallel output to the printer. After some testing was performed on an Arduino Uno, a bespoke device was built – in a gloriously plastic project box, no less.

An ATMEGA328 acts as the brains of the operation, with a MAX232 attached for level conversion from TTL to RS232 voltage levels. Serial data are received on the hardware TX/RX lines. Eight digital outputs act as the parallel interface. When a byte is received over serial, the individual bits are set on the individual digital lines connected to the printer’s parallel port. At this point, the strobe line is pulled low, indicating to the attached device that it may read the port. After two microseconds, it returns high, ready for the next byte to be set on the output lines. This is how parallel interfaces operate without a clock signal, using the strobe to indicate when data may be read.

At this point, [Cosmos2000] reached out – asking if I had a name for the new build.

“Hm. Paralleloslam?”

“Done. Cheers!”

Continue reading “Arduino Converts Serial To Parallel: The Paralleloslam”

Tucoplexing: A New Charliplex For Buttons And Switches

Figuring out the maximum number of peripherals which can be sensed or controlled with a minimum number of IOs is a classic optimization trap with a lot of viable solutions. The easiest might be something like an i2c IO expander, which would give you N outputs for 4 wires (SDA, SCL, Power, Ground). IO expanders are easy to interface with and not too expensive, but that ruins the fun. This is Hackaday, not optimal-cost-saving-engineer-aday! Accordingly there are myriad schemes for using high impedance modes, the directionality of diodes, analog RCs, and more to accomplish the same thing with maximum cleverness and minimum part cost. Tucoplexing is the newest variant we’ve seen, proven out by the the prolific [Micah Elizabeth Scott] (AKA [scanlime]) and not the first thing to be named after her cat Tuco.

[Micah’s] original problem was that she had a great 4 port USB switch with a crummy one button interface. Forget replacement; the hacker’s solution was to reverse and reprogram the micro to build a new interface that was easier to relocate on the workbench. Given limited IO the Tucoplex delivers 4 individually controllable LEDs and 4 buttons by mixing together a couple different concepts in a new way.

Up top we have 4 LEDs from a standard 3 wire Charlieplex setup. Instead of the remaining 2 LEDs from the 3 wire ‘plex at the bottom we have a two button Charlieplex pair plus two bonus buttons on an RC circuit. Given the scary analog circuit the scan method is pleasingly simple. By driving the R and T lines quickly the micro can check if there is a short, indicating a pressed switch. Once that’s established it can run the same scan again, this time pausing to let the cap charge before sensing. After releasing the line if there is no charge then the cap must have been shorted, meaning that switch was pressed. Else it must be the other non-cap switch. Check out the repo for hardware and firmware sources.

Last time we talked about a similar topic a bunch of readers jumped in to tell us about their favorite ways to add more devices to limited IOs. If you have more clever solutions to this problem, leave them below! If you want to see the Twitter thread with older schematics and naming of Tucoplexing look after the break.

Continue reading “Tucoplexing: A New Charliplex For Buttons And Switches”

An ESP8266 Sundial For Your Wall

Hackers absolutely love building clocks. Seriously, there are few other devices for which we’ve seen such an incredible number of variations. But while the clocks that hackers build might blink out the time in binary, or write it out in words, they generally don’t feature hands. Apparently in 2019 it’s more reasonable to read binary than know which way the “little hand” is supposed to be pointing.

This ESP8266 powered “shadow clock” from [Dheera Venkatraman] technically keeps that tradition intact, but only just. His clock doesn’t feature physical hands, but it does use a strip of RGB LEDs to cast multi-colored shadows which serve the same function. With his clock, you don’t even have to try and figure out which hand is the big one, since they’re all the same length. Now that’s what we call progress.

Probably the biggest surprise about this clock, beyond how legitimately good it looks hanging on the wall, is how little work it takes to build your own version. That’s because [Dheera] specifically set out to design something that was cheaper and easier to build than what he’d seen previously, and we think he delivered on that goal in a big way. All you need are the 3D printed components, an ESP8266 board, and a strip of 144 WS2812B LEDs.

The software side of the project is similarly simplistic, and all you need to do is plug in your WiFi network credentials to have the ESP pull the current time from NTP. If you were so inclined, his source code would be an excellent base on which to implement additional features such as animations at the top of the hour.

Compared to something like the Bulbdial clock from 2009, it’s incredible how simple some of these projects have become in the last decade. With the tools and components available to hackers and makers today, there’s truly never been a better time to build something amazing.

New Part Day: Pyboard D Is Smaller, Wireless, And Has Expansion Modules

Historically, microcontrollers’ limited computing power and storage space meant software had to be written in low-level languages out of necessity. In recent years small affordable chips grew powerful enough that they could theoretically run higher level languages, sparking numerous efforts to turn that theory into reality. MicroPython delivered on this promise in a big way when their Kickstarter-funded pyboard was delivered along with its open source software. Several years have since passed, and now it is time for an upgraded pyboard: the D-series.

We’ve talked with [Damien George] back when the original Kickstarter was still underway. Since the launch of pyboard and release of MicroPython source code, we’ve played with ports running on an ESP8266 and on a BBC micro:bit. The software ecosystem has continued to grow, most recently we looked at LittlevGL graphics library. But just because all the flashy action has been happening on the software side doesn’t mean the hardware side has been sitting stagnant.

Pyboard-D upgraded from original pyboard’s STM32F4 to more capable STM32F7 chips. Witnessing the popularity of MicroPython on networked darlings ESP8266 and ESP32, there will be a pyboard D variant with a Murata 1DX on board for WiFi and Bluetooth connectivity. The new pyboard will be extremely compact with limited edge connections so a fine-pitched connector is required to bring out all the pins. To bring the new pyboard back to its educational and tinkerer roots, a breakout board will take those pins and spread them out in a breadboard friendly form factor. These breakout boards can also host small (12 mm x 12 mm) “tiles” to add individual features.

The wireless pyboard D will obviously invite comparison tests with an ESP32 running MicroPython, and its hardware expansion tiles invites comparison with Adafruit’s Wings. It’ll be interesting to see how they fare once widely available and we can get our hands on them. If you’ve picked up an earlier release at FOSDEM 2019, we invite you to share your experience in comments.

[via Adafruit blog]

Cortex M0 Becomes Platform-Game Platform

The Arduino Uno is an incredibly popular microcontroller platform. By virtue of being simple to understand, and having just enough processing power to be dangerous, it’s won fans the world over. In recent times, there have been efforts to replace it with something more powerful. The Arduino Zero is just one such device attempting to take the crown, and [Nicola Wrachien] decided to try game development on the platform.

[Nicola] chose to use the uChip, which is a remix of the Arduino Zero into a smaller form factor. This was combined with a 160×128 TFT display and a handful of buttons for control. The uChip module, along with the TFT are fitted to [Nicola]’s custom PCB which ties everything together.

By overclocking the SPI port to 24 MHz, [Nicola] is able to run a basic 2D platformer in excess of 50 frames per second. The frame rate is capped at a round 40 fps to keep things smooth and stable, and the results are impressive. Gameplay is fluid and responsive, and the screen looks vibrant with 16 bits per pixel providing plenty of colors to play with.

We love to see game systems hewn out of raw microcontrollers and displays. [Nicola]’s work goes to show that with a little tinkering, significant performance improvements are yours for the taking. For similarly impressive DIY handheld hacks, check out Star Fox on the Arduboy. Video after the break.

Continue reading “Cortex M0 Becomes Platform-Game Platform”

Hands-On: New Nvidia Jetson Nano Is More Power In A Smaller Form Factor

Today, Nvidia released their next generation of small but powerful modules for embedded AI. It’s the Nvidia Jetson Nano, and it’s smaller, cheaper, and more maker-friendly than anything they’ve put out before.

The Jetson Nano follows the Jetson TX1, the TX2, and the Jetson AGX Xavier, all very capable platforms, but just out of reach in both physical size, price, and the cost of implementation for many product designers and nearly all hobbyist embedded enthusiasts.

The Nvidia Jetson Nano Developers Kit clocks in at $99 USD, available right now, while the production ready module will be available in June for $129. It’s the size of a stick of laptop RAM, and it only needs five Watts. Let’s take a closer look with a hands-on review of the hardware.

Continue reading “Hands-On: New Nvidia Jetson Nano Is More Power In A Smaller Form Factor”

Custom Calculator Rolls D20 So You Don’t Have To

There are a number of sticking points that can keep new players away from complex tabletop games such as Dungeons & Dragons. Some people are intimidated by the math involved, and of course others just can’t find enough friends who are willing to sit down and play D&D with them in 2019. While this gadget created by [Caleb Everett] won’t help you get more open minded friends, it will take some of the mental gymnastics out of adding up dice rolls.

In its current form the device saves you from the hassle of not only having to roll various combinations of physical dice, but adding up all the faces after the fact as well. In the future [Caleb] plans on adding more advanced software features which will allow for tricks not possible with real dice, such as increasing the likelihood of rolling numbers which haven’t been seen in awhile. Now that the hardware is put together, he’s free to dig into the software side of things and really get creative.

Inside the 3D printed case of his calculator there’s a Adafruit Feather M0 Express, a 128 x 32 OLED display, and a 2200 mAh lithium ion battery that lets him go mobile. The keys, which are Cherry MX clones, are wired directly to the digital pins of the Feather board as [Caleb] found that easier to wrap his head around than doing a matrix. This ended up working out as he had enough pins, but does stifle future expansion a bit.

Even if you aren’t into the sort of tabletop gaming which would benefit from an automatic dice roller and tabulator, we think [Caleb] has come up with a very neat form factor for similar pocket sized gadgets. It reminds us of the Handlink fromĀ Quantum Leap; before the prop department swapped it out for a jumble of gummy bears later on in the series, anyway. Since he’s shared the link to the OnShape project, you can even tweak the design a bit without having to suffer through modifying the STLs.

Many of the electronic dice we’ve seen in the past have tried to emulate the size and appearance of traditional dice, so it’s interesting to see this approach which goes in the opposite direction entirely. Critics might say that at some point you’d be better off just using a software application for your smartphone, but we’re not in the business of complaining when people produce interesting pieces of hardware.