Did you know just how easily you can glitch microcontrollers? It’s so easy, you really have no excuse for not having tried it out yet. Look, [lord feistel] is doing glitching attacks on an ATMega328P! All you need is an Arduino board with its few SMD capacitors removed or a bare 328P chip, a FET, and some sort of MCU to drive it. All of these are extremely generic components, and you can quickly breadboard them, following [lord feistel]’s guide on GitHub.
In the proof-of-concept, you can connect a HD44780 display to the chip, and have the victim MCU output digits onto the display in an infinite loop. Inside of the loop is a command to output a smiley face – but the command is never reachable, because the counter is reset in an if right before it. By glitching the ATMega’s power input, you can skip the if and witness the ;) on your display; it is that simple.
What are you waiting for? Breadboard it up and see for yourself, this might be the method that you hack your next device and make it do your bidding. If the FET-and-MCU glitching starts to fail you at some point, there’s fancier tools you can use, like the ChipWhisperer. As for practical examples, [scanlime]’s elegant glitching-powered firmware hack is hard to forget.
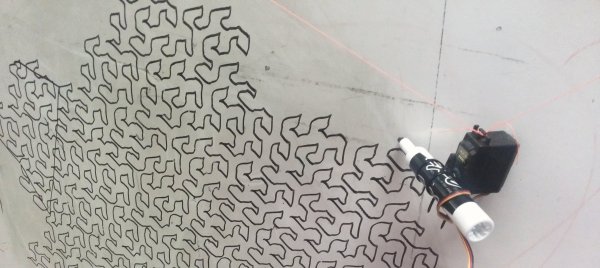
For the price of a toothbrush and a small motor with an offset weight, a bristlebot is essentially the cheapest robot that can be built. The motor shakes the toothbrush and the bristle pattern allows the robot to move, albeit in a completely random pattern. While this might not seem like a true robot that can interact with its environment in any meaningful way, [scanlime] shows just how versatile this robot – which appears to only move randomly – can actually be used to make art in non-random ways.
Instead of using a single bristlebot for the project, three of them are built into one 3D printed flexible case where each are offset by 120°, and which can hold a pen in the opening in the center. This allows them to have some control on the robot’s direction of movement. From there, custom software attempts to wrangle the randomness of the bristlebot to produce a given image. Of course, as a bristlebot it is easily subjected to the whims of its external environment such as the leveling of the table and even the small force exerted by the power/communications tether.
With some iterations of the design such as modifying the arms and control systems, she has an interesting art-producing robot that is fairly reliable for its inherently random movements. For those who want to give something like this a try, the code for running the robot and CAD files for 3D printing the parts are all available on the project’s GitHub page. If you’re looking for other bristlebot-style robots that do more than wander around a desktop, be sure to take a look at this line-following bristlebot too.
The Nintendo 64 was lauded for bringing quality 3D graphics and analog stick controls to the console realm, way back in 1996. Unfortunately, those analog sticks were never very good; if you’ve ever played four player Mario Kart 64, you know how it feels to be stuck with that controller. For a superior experience, consider building an adapter and upgrading to the GameCube controller instead.
Cube64 is a project that allows GameCube controllers to work with the original Nintendo 64 hardware. Using a PIC18F14K22 in its DIY version, or a PIC18F24Q10 in the SMD version, it’s the product of much work by [scanlime] and [darthcloud] to reverse engineer the N64 and GC controller protocols. The GameCube’s many buttons and sticks allow for easy mapping to the N64’s original button layout, and the hardware provides plenty of calibration options and maps to get things working exactly the way you like for the game you’re playing.
For the average person, decorating at home is as simple as a few choice picks from the IKEA catalogue. Makers are a different breed, though – preferring something customized and glowing. This LED triangle is a particularly great example of the form, and the latest benchmark for excellence to come out of [scanlime’s] workshop.
Hailing from the recent past of 2014, it’s a design that is well-suited to the average makerspace. Built out of layers of lasercut chipboard and acrylic, it creates 16 seperate pockets for LEDs with very little bleed in between. A black bezel is fitted to complete the effect, along with frosted white acrylic diffusers for each triangle element.
The build uses WS2812B LEDs, controlled by [scanlime’s] Fadecandy controller. Fadecandy is a combination of hardware and software designed specifically for LED art projects, providing high-quality control of dithering and other effects to help make glowables prettier. It tends to turn up wherever head-turning visualizations are needed. In this application, it does a great job, with the pseudo-random flickering of the pixels being almost hypnotizing in nature.
It’s a great cyberpunk art piece, and we’d love to have one on our coffee table at home. If you’re sick of LED cubes, triangle-based builds may reignite your passion. Video after the break.
Figuring out the maximum number of peripherals which can be sensed or controlled with a minimum number of IOs is a classic optimization trap with a lot of viable solutions. The easiest might be something like an i2c IO expander, which would give you N outputs for 4 wires (SDA, SCL, Power, Ground). IO expanders are easy to interface with and not too expensive, but that ruins the fun. This is Hackaday, not optimal-cost-saving-engineer-aday! Accordingly there are myriad schemes for using high impedance modes, the directionality of diodes, analog RCs, and more to accomplish the same thing with maximum cleverness and minimum part cost. Tucoplexing is the newest variant we’ve seen, proven out by the the prolific [Micah Elizabeth Scott] (AKA [scanlime]) and not the first thing to be named after her cat Tuco.
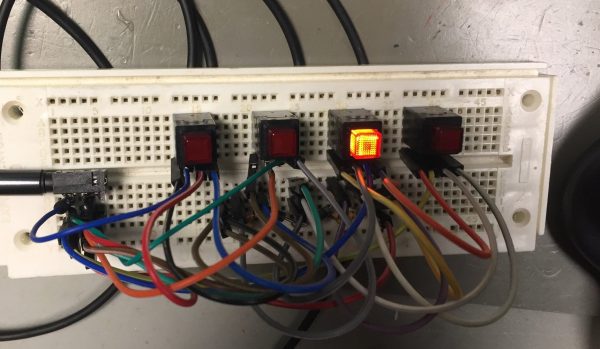
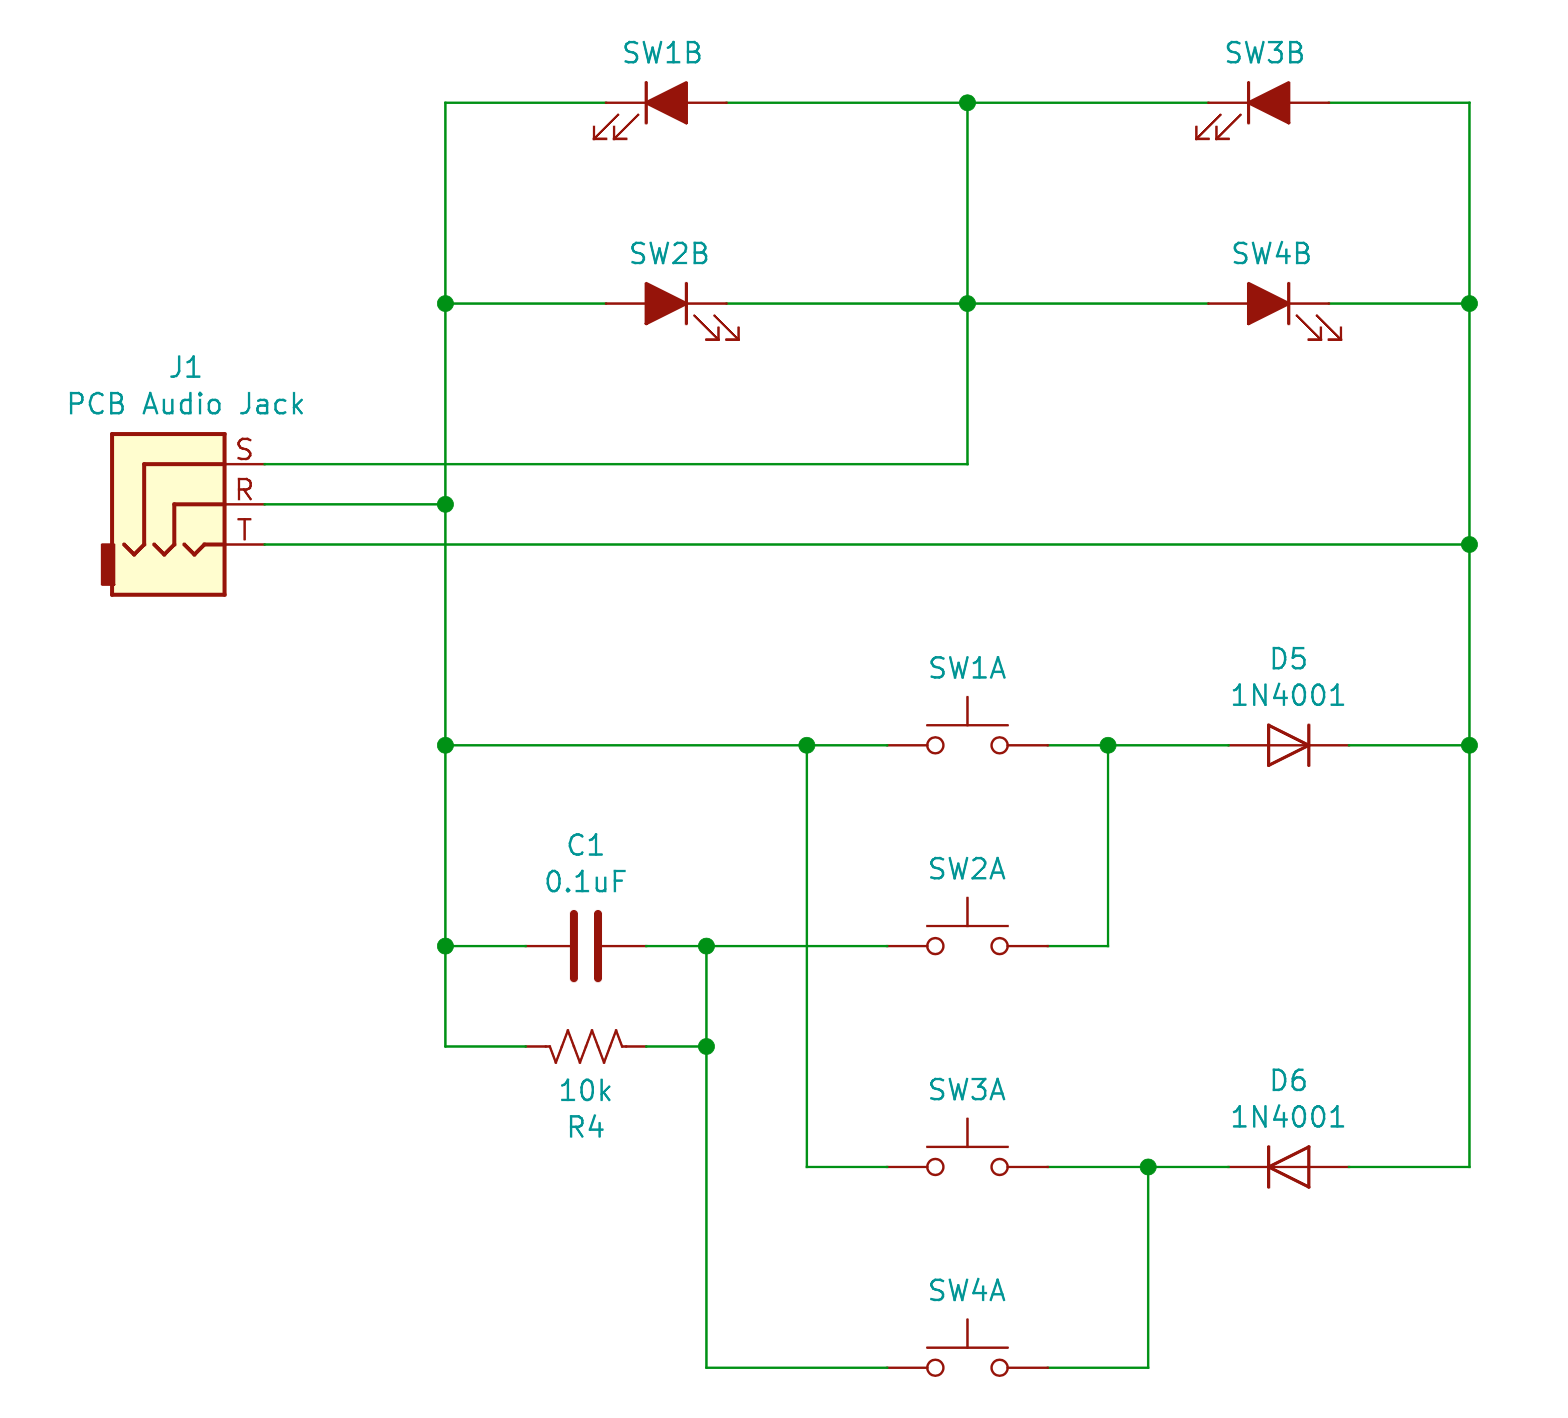
[Micah’s] original problem was that she had a great 4 port USB switch with a crummy one button interface. Forget replacement; the hacker’s solution was to reverse and reprogram the micro to build a new interface that was easier to relocate on the workbench. Given limited IO the Tucoplex delivers 4 individually controllable LEDs and 4 buttons by mixing together a couple different concepts in a new way.
Up top we have 4 LEDs from a standard 3 wire Charlieplex setup. Instead of the remaining 2 LEDs from the 3 wire ‘plex at the bottom we have a two button Charlieplex pair plus two bonus buttons on an RC circuit. Given the scary analog circuit the scan method is pleasingly simple. By driving the R and T lines quickly the micro can check if there is a short, indicating a pressed switch. Once that’s established it can run the same scan again, this time pausing to let the cap charge before sensing. After releasing the line if there is no charge then the cap must have been shorted, meaning that switch was pressed. Else it must be the other non-cap switch. Check out the repo for hardware and firmware sources.
Last time we talked about a similar topic a bunch of readers jumped in to tell us about their favorite ways to add more devices to limited IOs. If you have more clever solutions to this problem, leave them below! If you want to see the Twitter thread with older schematics and naming of Tucoplexing look after the break.
What do you do, when you need a random number in your programming? The chances are that you reach for your environment’s function to do the job, usually something like rand() or similar. This returns the required number, and you go happily on your way.
A shift register configured as a pseudo-random number generator. [by KCAuXy4p CC0 1.0]Except of course the reality isn’t quite that simple, and as many of you will know it all comes down to the level of randomness that you require. The simplest way to generate a random number in software is through a pseudo-random number generator, or PRNG. If you prefer to think in hardware terms, the most elementary PRNG is a shift register with a feedback loop from two of its cells through an XOR gate. While it provides a steady stream of bits it suffers from the fatal flaw that the stream is an endlessly repeating sequence rather than truly random. A PRNG is random enough to provide a level of chance in a computer game, but that predictability would make it entirely unsuitable to be used in cryptographic security for a financial transaction.
There is a handy way to deal with the PRNG predictability problem, and it lies in ensuring that its random number generation starts at a random point. Imagine the shift register in the previous paragraph being initialised with a random number rather than a string of zeros. This random point is referred to as the seed, and if a PRNG algorithm can be started with a seed derived from a truly unpredictable source, then its output becomes no longer predictable.
Selecting Unpredictable Seeds
Computer systems that use a PRNG will therefore often have some form of seed() function alongside their rand() function. Sometimes this will take a number as an argument allowing the user to provide their own random number, at other times they will take a random number from some source of their own. The Sinclair 8-bit home computers for example took their seed from a count of the number of TV frames since switch-on.
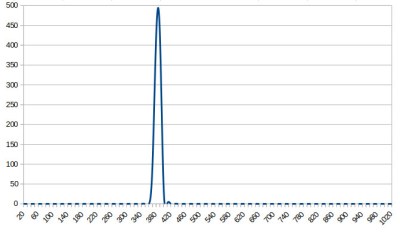
The not-very-random result of a thousand analogRead() calls.
The Arduino Uno has a random() function that returns a random number from a PRNG, and as you might expect it also has a randomSeed() function to ensure that the PRNG is seeded with something that will underpin its randomness. All well and good, you might think, but sadly the Atmel processor on which it depends has no hardware entropy source from which to derive that seed. The user is left to search for a random number of their own, and sadly as we were alerted by a Twitter conversation between @scanlime and @cybergibbons, this is the point at which matters start to go awry. The documentation for randomSeed() suggests reading the random noise on an unused pin via analogRead(), and using that figure does not return anything like the required level of entropy. A very quick test using the Arduino Graph example yields a stream of readings from a pin, and aggregating several thousand of them into a spreadsheet shows an extremely narrow distribution. Clearly a better source is called for.
Noisy Hardware or a Jittery Clock
As a slightly old-school electronic engineer, my thoughts turn straight to a piece of hardware. Source a nice and noisy germanium diode, give it a couple of op-amps to amplify and filter the noise before feeding it to that Arduino pin. Maybe you were thinking about radioactive decay and Geiger counters at that point, or even bouncing balls. Unfortunately though, even if they scratch the urge to make an interesting piece of engineering, these pieces of hardware run the risk of becoming overcomplex and perhaps a bit messy.
The significantly more random result of a thousand Arduino Entropy Library calls.
The best of the suggestions in the Twitter thread brings us to the Arduino Entropy Library, which uses jitter in the microcontroller clock to generate truly random numbers that can be used as seeds. Lifting code from the library’s random number example gave us a continuous stream of numbers, and taking a thousand of them for the same spreadsheet treatment shows a much more even distribution. The library performs as it should, though it should be noted that it’s not a particularly fast way to generate a random number.
So should you ever need a truly random number in your Arduino sketch rather than one that appears random enough for some purposes, you now know that you can safely disregard the documentation for a random seed and use the entropy library instead. Of course this comes at the expense of adding an extra library to the overhead of your sketch, but if space is at a premium you still have the option of some form of hardware noise generator. Meanwhile perhaps it is time for the Arduino folks to re-appraise their documentation.
Most CNC robots people see involve belts and rails, gantries, lead screws, linear bearings, and so forth. Those components need a rigid chassis to support them and to keep them from wobbling during fabrication and adding imperfections to the design. As a result, the scale is necessarily small — hobbyist bots max out at cabinet-sized, for the most part. Their rigid axes are often laid out at Cartesian right angles.
One of the exceptions to this common configuration is the delta robot. Deltas might be the flashiest of CNC robots, moving the end effector on three arms that move to position it anywhere in the build envelope. A lot of these robots are super fast and precise when charged with carrying a light load, and they get put to work as pick-and-place machines and that sort of thing. It doesn’t hurt that delta bots are also parallel manipulators, which means that the motors work together to move the end effector, with one motor pulling while the matching motor pulls.
But while Cartesian CNC bots are sturdy workhorses, and deltas are fly-weight racehorces, neither can really cut it when you want to go gigantic. In terms of simplicity and scale, nothing beats cable bots.
Cable Bots
Cable bots use wires or strings pulled by reel-mounted motors, with dimensions limited only by the room to mount the motors and the tensile strength of the cables used. When the strings are tensioned you can get a surprising degree of accuracy. Why not? Are they not computer-controlled motors? As long as your kinematic chain accounts for the end effector’s movement in one direction by unwinding another cable (for instance) you can very accurately control the end effector over a very wide scale.
The following are some fun cable bots that have caught my eye.


 Hailing from the recent past of 2014, it’s a design that is well-suited to the average makerspace. Built out of layers of lasercut chipboard and acrylic, it creates 16 seperate pockets for LEDs with very little bleed in between. A black bezel is fitted to complete the effect, along with frosted white acrylic diffusers for each triangle element.