Less Is More: A Micromatrix Display In A Square Inch

In your living room, the big display is what you want. But in an embedded project, often less is more. We think [bobricius] will agree since he submitted a tiny 4×5 LED display into our square inch challenge. The board features an ATtiny CPU and twenty SMD LEDs in a nice grid. You can see them in action, scrolling to some disco music in the video below.

There is plenty of room left in the CPU for bigger text strings — the flash memory is just over 10% full. A little side-mounted header makes it easy to program the chip if you want to change anything.

Continue reading “Less Is More: A Micromatrix Display In A Square Inch”

Create Your Own ESP8266 Shields

The ESP8266 has become incredibly popular in a relatively short time, and it’s no wonder. Cheap as dirt, impressively powerful, Arduino-compatible, and best of all, includes Wi-Fi right out of the box. But for all its capability and popularity, it’s still lagging behind the Arduino in at least one respect. Namely, the vast collection of add-on “Shields” which plug into the Arduino to add everything from breadboards to GPS receivers.

Until such time as the free market decides to pick up the pace and start making standardized shields for the various ESP8266 development boards, it looks as if hackers are going to have to pick up the slack. [Rui Santos] has put together a very detailed step-by-step guide on the creation of a simple shield for the popular Wemos D1 Mini board, which should give you plenty of inspiration for spinning up your own custom add-on modules.

Presented as a written tutorial as well as a two part video, this guide covers everything from developing and testing your circuit on a breadboard to designing your PCB in KiCad and sending it off for fabrication. The end result is a professional looking PCB that matches the footprint of the stock D1 Mini and adds a DS18B20 temperature sensor, PIR motion detector, photoresistor, and some screw down terminals.

[Rui] goes on to show how you can utilize the new sensors shield via a web interface hosted on the ESP8266, and even wraps the whole thing up in a 3D printed enclosure. All worthwhile skills to check out if you’re looking to produce more cohesive finished products.

If you’re looking for a similar project for the ESP32, [Rui] has you covered there as well. You may also be interested in the series of ESP8266 tutorials we recently highlighted.

Continue reading “Create Your Own ESP8266 Shields”

Photon Door Lock Swaps Keys For A POST Request

At this point we’re all well aware of the fact that there is some inherent danger involved when bringing “things” onto the Internet. Nobody wants to come home to a smoldering pile of ruble because their Internet connected toaster oven decided to get stuck on “Hades.” But even with the risks, occasionally we see projects that prove at least some intrepid hackers are managing to navigate the Internet of Things to solve real-world problems.

[Daniel Andrade] writes in to tell us about the Internet controlled entry system he’s setup at his new apartment, and while we imagine it’s not for everyone, we can’t deny it seems like it has improved his quality of life. Rather than giving all of his friends a copy of his key, he’s setup a system where anyone who has the appropriate link can “buzz” themselves in through the building’s existing intercom system.

Thanks to the old-school intercom setup, the hardware for this project is simple in the extreme. All [Daniel] needed was a relay to close the circuit on the door buzzer, and a way to fire it off. For his controller he chose the Photon from Particle, which is perhaps a bit overkill, but we all tend to work with what we’re personally comfortable with.

Most of the work went into the software, as [Daniel] ended up coming with two distinct ways to control the door lock over the Internet. The first method uses Blynk, which allows you to create slick visual interfaces for mobile devices. His second version is controlled with a POST request to a specific URL, which he likes because it gives him more flexibility as to how he can interact with the lock. Currently he has a simple web page setup that lets friends and family open the door by just clicking a button.

We’ve seen a similar setup using the Photon to open a garage door, and plenty of people have taken to using Blynk to control their home automation setups. All the tools are available for you to roll your own IoT gadgets, you just need to figure out what to do with the things…

ZPB30A1 Electronic Load Gets An Open Firmware

Importing cheap equipment and test gear is something of a mixed blessing. It allows you to outfit your lab without emptying your bank account, but on the other hand there’s usually a reason it’s cheap. Of course, the retail price of a piece of hardware shouldn’t be the metric by which we measure its quality, but there’s got to be a few corners cut someplace when they are selling this stuff for a fraction of what the name brands are charging.

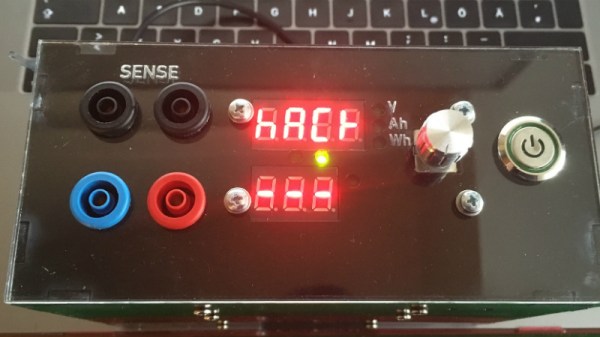
A perfect example is the ZHIYU ZPB30A1 electronic load, available from various online importers for about $30 USD. While the price is right for an adjustable load that can handle up to 110 W, it’s got some pretty glaring shortcomings. In an effort to address at least some of those issues, [Luca Zimmermann] has been working on an open source replacement firmware for the load’s STM8S microcontroller.

[Luca] quickly discovered that the device’s STM8S005K6 chip is write protected, so unfortunately you can’t just flash a new firmware to it. If you want to unlock additional features, you need to perform a brain transplant. Luckily these chips are quite cheap, and you can probably add a couple of them to your cart when you order he ZPB30A1.

With the new GPLv3 licensed firmware installed, the device gains constant power and resistances modes (stock firmware can only do constant current), serial logging, and support for adjusting the value of the shunt resistor. There’s even a basic menu system to shuffle through the new modes. There’s still a couple features that haven’t been implemented, such as automatic shutdown, but it’s already a considerable upgrade from the stock software. Now we just need some details on the slick custom enclosure that [Luca] has put his upgraded ZPB30A1 into.

If this looks too easy, you can always go the DIY Arduino route for your load testing needs, or build a monster than can sink up to 1 kW.

[Thanks to Benik3 for the tip.]

Demystifying The ESP8266 With A Series Of Tutorials

If your interest has been piqued by the inexpensive wireless-enabled goodness of the ESP8266 microcontroller, but you have been intimidated by the slightly Wild-West nature of the ecosystem that surrounds it, help is at hand. [Alexander] is creating a series of ESP8266 tutorials designed to demystify the component and lead even the most timid would-be developer to a successful first piece of code.

If you cast your mind back to 2014 when the ESP8266 first emerged, it caused great excitement but had almost no information surrounding it. You could buy it on a selection of modules, but there were no English instructions and no tools to speak of. A community of software and hardware hackers set to work, resulting in a variety of routes into development including the required add-ons to use the ever-popular Arduino framework. Four years later we have a mature and reliable platform, with a selection of higher-quality and well supported boards to choose from alongside that original selection.

The tutorials cover the Arduino and the ESP, as well as Lua and the official SDK. They are written for a complete newcomer, but the style is accessible enough that anyone requiring a quick intro to each platform should be able to gain something.

Our community never ceases to amaze us with the quality of the work that emerges from it. We’ve seen plenty of very high quality projects over the years, and it’s especially pleasing to see someone such as [Alexander] giving something back in this way. We look forward to future installments in this series, and you should keep an eye out for them.

An Arduino Watch Without A Clock

When you show up at a party wearing this bare PCB watch, there are effectively two possible reactions you might receive from the other people there. Either they are going to snicker at the nerd who’s wearing a blinking circuit board on their wrist in public, or they are going to marvel at the ridiculously low part count. We’ll give you one guess as to which reaction you’d likely get at any event Hackaday is involved in.

Designed and built by [Electronoobs], this extremely simple watch consists of a ATmega328P microcontroller, a dozen LEDs with their associated 200 Ω resistors, and a battery. There’s also a single push button on the front which is used to not only set the watch, but turn the LEDs on when you want to check the time. Short of dropping down to one LED and blinking out the time, it’s hard to imagine a timepiece with fewer components than this.

You’re probably wondering how [Electronoobs] pulled this off without an external clock source for the ATmega328P chip. The chip actually has an internal 8 MHz oscillator that can be used, but you need to flash the appropriate bootloader to it first. Accordingly, the backside of the PCB has both SPI and a UART solder pads for external bootloader and firmware programming.

As you might expect, there’s a downside to using the internal oscillator: it’s not very good. The ATmega328P spec sheet claims a factory calibrated accuracy of ±10%, and [Electronoobs] has found that equates to a clock drift of around 15 seconds per day. Not exactly great, but considering the battery only lasts for two days anyway, it doesn’t have much of an impact in this case.

Compared to other “analog” LED watches we’ve seen, the simplicity of this build is really quite remarkable. The closest competitor we’ve seen so far is this slick binary watch.

Continue reading “An Arduino Watch Without A Clock”

Simulate PIC And Arduino/AVR Designs With No Cloud

I’ve always appreciated simulation tools. Sure, there’s no substitute for actually building a circuit but it sure is handy if you can fix a lot of easy problems before you start soldering and making PCBs. I’ve done quite a few posts on LTSpice and I’m also a big fan of the Falstad simulator in the browser. However, both of those don’t do a lot for you if a microcontroller is a major part of your design. I recently found an open source project called Simulide that has a few issues but does a credible job of mixed simulation. It allows you to simulate analog circuits, LCDs, stepper and servo motors and can include programmable PIC or AVR (including Arduino) processors in your simulation.

The software is available for Windows or Linux and the AVR/Arduino emulation is built in. For the PIC on Linux, you need an external software simulator that you can easily install. This is provided with the Windows version. You can see one of several videos available about an older release of the tool below. There is also a window that can compile your Arduino code and even debug it, although that almost always crashed for me after a few minutes of working. As you can see in the image above, though, it is capable of running some pretty serious Arduino code as long as you aren’t debugging.

Continue reading “Simulate PIC And Arduino/AVR Designs With No Cloud”