Out With The Circus Animals, In With The Holograms

As futuristic as holographic technology may sound, in a sense it’s actually already in widespread commercial use. Concerts and similar events already use volumetric projection, with a fine mesh (hologram mesh or gauze) acting as the medium on which the image is projected to give the illusion of a 3D image. The widespread availability of this technology has now enabled Germany’s Roncalli circus to reintroduce (virtual) animals to its shows after ceasing the use of live lions and elephants in 1991 and other animals in 2018.

For the sticklers among us, these are of course not true holograms, as they do not use a recorded wavefront, nor do they seek to recreate a wavefront. Rather they employ as mentioned volumetric projection to essentially project in ‘thin air’, giving the illusion of a tangible object being present. By simultaneously projecting multiple views, to an observer standing outside the projection mesh, it would thus appear that there is a physical, three-dimensional object which can be observed. In the case of the Roncalli circus there are 11 projectors lining the circumference of the mesh.

To a circus the benefits of this approach are of course manifold, as not only do they no longer have to carry lots of animals around every time the circus moves to a new location – along with the on-site demands – but they get to experiment with new shows and new visuals that were never before possible. Ironically, this could mean that after 3D fizzled out at movie theaters, circuses and similar venues may be in a position to make it commonplace again for the masses.

This Keyboard Doesn’t Work Without Game Boy Cartridges

Just when we though we’d seen it all when it comes to custom keyboards (or most of it, anyway), along comes [Stu] with the TypeBoy and TypePak. Like the title implies, TypeBoy and TypePak are inseparable.

Let’s talk about TypePak first. Somehow, some way, [Stu] managed to fit the following into an aftermarket Game Boy Advance cartridge: a XIAO BLE microcontroller, a Sharp Memory Display, a shift register, and a LiPo battery. It’s all there in [Stu]’s incredibly detailed blog post linked above.

Amazing, no? And although [Stu] claims that the TypePak is mostly for aesthetics (boy howdy), it will make swapping microcontrollers much easier in the future.

If this looks sort of familiar, you may remember a likely render of [mujimaniac]’s board called the GIGA40 that also employed a cartridge system. Allegedly there is now a working prototype of the GIGA40.

Would you like to give the TypeBoy and TypePak a go? Files are available on GitHub, but this doesn’t seem like a project for the faint of heart.

Speaking of stuffing things in to Game Boy cartridges, check out this SNES cartridge turned hard drive enclosure.

Via KBD

Modding A Nerf Blaster The Old Fashioned Way

The Pistol Splat was a very weak blaster built for children, designed to shoot toy-grade paintball-like ammunition. [Matt Yuan] recognised the potential of the single-shot design, though, and repurposed it as a powerful Nerf blaster.

The blaster is a simple spring-plunger design. Upon pulling the trigger, the spring drives the piston forward, shooting the ammunition out the barrel. As stock, the Pistol Splat featured an incredibly strong spring and an unrestricted barrel, giving it plenty of performance capability. With some finagling, it’s capable of shooting a Nerf dart at 100 feet per second in stock form.

[Matt] improved the blaster by removing its dry-fire protection spring, which consists of a second spring to resist the plunger’s motion. Modification also involved fitting a barrel sized to properly seal on the darts. These two mods boosted the dart velocity to 110 feet per second. Adding a spacer to ensure the spring fully drove the piston forward for its full travel further boosted the dart velocity to a mighty 145 feet per second.

It bears noting that serious Nerf blasters like these demand eye protection. Video after the break.

Continue reading “Modding A Nerf Blaster The Old Fashioned Way”

All-Mechanical Coil Winder Is A Scrap-Bin Delight

If there’s something more tedious than winding coils, we’re not sure what it is — possibly rolling and wrapping coins; that’s really a bother. But luckily, just like there are mechanical ways to count coins, there are tools to make coil production a little less of a chore, but perhaps none that have as much charm as this all-mechanical coil winder.

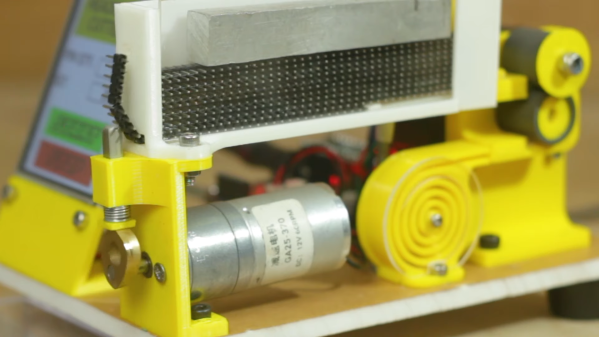
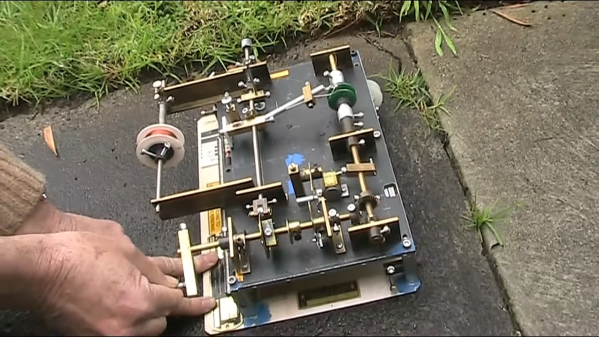
We’d say that [Ralph (VK3ZZC)]’s amazing invention firmly falls under the “contraption” category, without a hint of the term being used as a pejorative. The rig was based on the MoReCo Coilmaster, a machine that was once commercially available at a fairly steep price, according to [Ralph], and still seems to command a premium even today. Never being able to afford an original, [Ralph] spun up his own from scrap metal and tooling no more sophisticated than a drill press. It’s a riot of brass and steel, with a hand crank that drives the main winding shaft while powering a cam that guides the wire along the long axis of the coil form. Cams can be changed out for different winding patterns, and various chucks adapt to hold different coil forms to the winding shaft.

Continue reading “All-Mechanical Coil Winder Is A Scrap-Bin Delight”

Custom Font Generation Means Boss Embossing

[Attoparsec] loves learning languages, but says they have a hard time retaining anything. We find that hard to believe given the number of tongues that [Attoparsec] was able to translate into embossing plastic. That’s right, this project is about making custom font wheels for an embosser, formerly known as a label maker.

If you think this seems like a finicky and perhaps lengthy mission to undertake, you’re right. In case you’re unfamiliar, ye olde embosser uses both a positive and a negative of each glyph in order to impress the sticky-backed plastic strip. It all started when [Attoparsec] found out about the Dymo 1595, which comes with font wheels for both Japanese hiragana and katakana in addition to English.

After sacrificing the English wheel, it was time to model the wheel part itself. That was easy enough, but the characters themselves were another story. Because of how the thing works, the negative has to be bigger than the positive to provide enough room for the tape. After trying to achieve the right draft angle on the characters in several CAD packages, [Attoparsec] was told that it should be fairly easy in OpenSCAD, and it was.

Printing in resin took about five hours to do both wheels at once. Once [Attoparsec] had the workflow down, they were off to the races. In this video alone, they made Old English, Esperanto, the International Phonetic Alphabet, an alphabet created by playwright George Bernard Shaw, Palm Pilot input script, and of course, Tolkein’s Tengwar. Be sure to check out the video after the break.

Tired of turning the wheel of your embosser to make labels? Automate the process with a stepper motor or two.

Continue reading “Custom Font Generation Means Boss Embossing”

3D-Printed Woven Coasters Save Tabletops In Style

When regular people think of 3D printing, they likely imagine semi-newfangled objects like twisty vases and useless trinkets. But there is so much more to 3D printing, as [andrei.erdei]’s printed, woven coasters demonstrate.

The design is based on the stake and strand basket weaving technique, which uses rigid strips called stakes in one direction and thinner strips called strands in the other. Since the flexibility of PLA is questionable, [andrei] printed the stakes already bent in a square wave pattern that accommodates the strands fairly easily. To tie the coasters together and make them look more polished and commercial, [andrei] designed a holder as well.

The awesome thing about this technique is that you can do so much with it, like varying the stakes’ widths or making them diagonal instead of square. [andrei] designed these in Tinkercad using Codeblocks; of course, they are open source. Be sure to check out the assembly video after the break.

Continue reading “3D-Printed Woven Coasters Save Tabletops In Style”

Data Recovery In The Woodshed

A 1TB drive fails. How do you recover the data? If you are like us, you imagine a high-tech lab with serious-looking technicians and engineers. [John Graham-Cumming] managed it in his woodworking shop. Granted, it was a solid-state drive, so a clean room wasn’t necessary, but we still found it an unexpected story.

[John’s] gaming rig had two Seagate Firecuda 530 SSDs and decided not to boot. A quick analysis found one of the drives failed — it happens. However, the drive showed some signs of life after cooling off. A 30-minute trip to the freezer made the drive work again until it got warm again.

Continue reading “Data Recovery In The Woodshed”