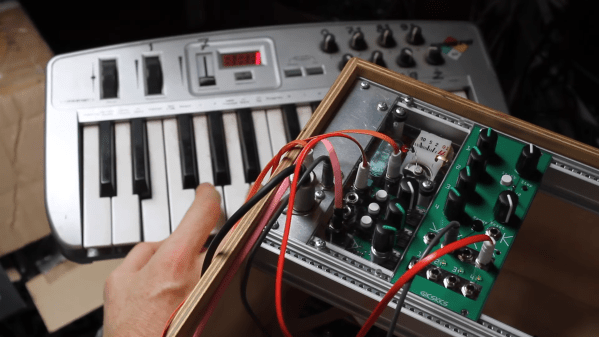
Giving Micro Channel Bus Computers A Sound Blaster Bark

Not many people today probably remember what ‘Micro Channel Architecture’ was about, though its acronym ‘MCA’ might ring a bell. Created by IBM to replace ISA (Industry Standard Architecture) and presumably claw back some of that sweet, sweet licensing money, it didn’t quite pan out as IBM hoped. As history shows us, PCI ended up replacing MCA in all of IBM’s systems. The IBM PS/2 systems that used MCA didn’t miss out on classic 1990s cards, such as the original Sound Blaster, but today MCA versions of the Sound Blaster are admittedly rather… rare, not to mention expensive.

But, no longer: decades after the last PS/2 users have moved on, [Tube Time] proudly presents the Snark Barker MCA. It’s a fully Sound Blaster compatible sound card. It supports AdLib synthesis, digital sound playback and recording, as well as a joystick input and MIDI. Based around a Xilinx XC9572XL CPLD and featuring what looks like a full-length MCA card, it would have made an original Sound Blaster card proud.

The GitHub repository not only contains the schematics, BOM and Verilog-based HDL for the CPLD, but also extensive documentation on the assembly and programming. As a bonus, there’s a troubleshooting section which covers some of the joys that came with the sloppy implementations of MCA across systems. Definitely worth a read.

If anyone decides to build this project and use it in their IBM PS/2 system, we would love to hear about it.

Of course, if all you need is a garden variety PCI Sound Blaster clone, the original Snark Barker is the way to go.

(Thanks, Darry)

He’s The Operator Of His Pocket Arduino

The band Kraftwerk hit the music scene with its unique electronic sound in the 70s in Germany, opening the door for the electronic music revolution of the following decade. If you’re not familiar with the band, they often had songs with a technology theme as well, and thanks to modern microcontroller technology it’s possible to replicate the Kraftwerk sound with microcontrollers as [Steven] aka [Marquis de Geek] demonstrates in his melodic build.

While the music is played on a Stylophone and a Korg synthesizer, it is fed through five separate Arduinos, four of which have various synths and looping samplers installed on them (and presumably represent each of the four members of Kraftwerk). Samplers like this allow pieces of music to be repeated continuously once recorded, which means that [Steven] can play entire songs on his own. The fifth Arduino functions as a controller, handling MIDI and pattern sequencing over I2C, and everything is finally channeled through a homemade mixer.

[Marquis] also dressed in Kraftwerk-appropriate attire for the video demonstration below, which really sells the tribute to the famous and groundbreaking band. While it’s a great build in its own right and is a great recreation of the Kraftwerk sound, we can think of one more way to really put this project over the top — a Kraftwerk-inspired LED tie.

Continue reading “He’s The Operator Of His Pocket Arduino”

3D Print Your Way To A Modular MIDI Playset

Have you ever wanted to experiment with MIDI, but didn’t know where to start? Or perhaps you didn’t think you could afford to properly outfit your digital beat laboratory, especially given the average hacker’s penchant for blinkenlights? Well worry no more, as [Johan von Konow] has unveiled a collection of DIY MIDI devices that anyone with a 3D printer can build on the cheap.

The LEET modular synthesizer is made up of a keyboard, drum pad, chord keyboard, arpeggiator and a step sequencer that plug into your computer and interface with industry standard digital audio workstation (DAW) programs. The down side is that they don’t do anything on their own, but this simplification allowed [Johan] to really streamline the design and bring the cost of the build down to the bare minimum.

Integrated wire channels mean no PCB is required.

You don’t need to build all the components either, especially if you’re just testing the waters. The keyboard is a great starting point, and even if you have to buy all the components new from eBay, [Johan] says it shouldn’t cost you more than $10 USD to build. You just need an Arduino Pro Micro, some tact switches, and a section of WS2812 RGB LED strip. There’s an excellent chance you’ve already got some of that in the parts bin, which will make it even cheaper.

There is one missing element though: the PCB. But not because you have to source it yourself. Like his clever Arduboy clone we covered earlier in the year, the 3D printed bodies for all of the LEET devices have integrated wiring channels that serve as a stand-in for a traditional circuit board. Simply place all your components, push some stiff 0.3 mm diameter wire down into the channels, and solder the ends. It’s a very neat approach, and something we could see becoming more popular as desktop 3D printers become an increasingly common sight in the home workshop.

Continue reading “3D Print Your Way To A Modular MIDI Playset”

Illuminated 3D Printed Guitar Is Ready To Rock

When we think of 3D printed parts for our projects, most of us imagine little bits like brackets and mounting plates. Perhaps the occasional printed project enclosure. But if you’ve got a big custom printer as [Joshendy] does, plus plenty of time, it opens up a whole new world of large scale projects. Take for example the gorgeous RGB LED guitar body he recently completed.

Despite the considerable 300 x 300 mm build area of his custom 3D printer, [Joshendy] still had to design the guitar body in sections that could be bolted together after being printed in ABS. It took around 60 hours to run off all the parts, with the large central section taking the longest to print at 28 hours. With the generous application of heat-set inserts, the assembled guitar should be plenty strong.

The white ABS of the guitar body helps diffuse the LEDs.

While the skeletal plastic body of the guitar is certainly visually interesting in itself, it only makes up for half of the final look. Inside the central cavity, [Joshendy] has embedded two strips of RGB LEDs, a 128×64 OLED screen, and a custom PCB that plays host to a STM32L4 microcontroller the appropriate voltage regulators necessary to run it all on a battery pack.

The board taps into the audio being produced by the guitar and uses a fast Fourier transform (FFT) to get the LEDs reacting to the beat. As demonstrated in the video after the break, you can use the screen to navigate through the different lighting modes in real-time right on the instrument itself.

We covered the equally impressive large-format 3D printer that [Joshendy] used to produce this guitar earlier in the month, and it’s quite exciting to see the sort of things he’s printing on it already. This project has already set the bar very high, and we can’t wait to see what he comes up with next.

Continue reading “Illuminated 3D Printed Guitar Is Ready To Rock”

Infinity Mirror Guitar Shreds Forever

Just when we thought there was nothing left to make into an infinity mirror, [Burls Art] goes and builds something that seems obvious now that it exists — an infinity mirror guitar. Check out the build video after the break, where [Burls Art] gets right to it without wasting any time.

He started by making a 3/4″ wood frame for the body and the one-piece neck and headstock. The acrylic on the top has two-way mirror film, and the back piece is painted with mirror paint to get the infinity effect going. [Burls Art] also fashioned acrylic boxes for the pickup and the electronics. Those are both buffed to be frosty, so the lights reflect nicely off of them.

There’s nothing super-fancy going on with the electronics, just some app-controlled RGB LEDs. We would love to see a version where the LEDs respond in real time to the music. The effect is still quite cool, so if you don’t want to watch the whole build, at least check out the demo at the end where [Burls Art] plays a riff. Never has a delay pedal been so appropriate.

If you’re not much of a luthier, don’t fret about not being able to make a cover version. We’ve seen plenty of infinity mirrors, but if you want something useful, whip up some infinity drink coasters.

Continue reading “Infinity Mirror Guitar Shreds Forever”

Rockin’ Out In LTSpice: Simulating Classic Guitar Pedals

Musicians have a fantastic language to describe signals. A sound can be fat, dark, crunchy, punchy — the list goes on. These aren’t very technical terms, but they get the job done. After all, it’s much easier to ask to guitarist for a crisper sound than to ask them to sharpen the edges of the waveform, while amplifying the high-frequency components and attenuating the low-frequency components. Of course, it’s fun to look at signals this way as well, especially when you can correlate shifts in sound quality to changes in the waveform and, ideally, the circuit that produces it.

To undergo such an investigation, [Nash Reilly] has been simulating guitar effects pedals in LTSpice. Able to find most of the schematics he needs online, [Nash] breaks down the function of each part of the circuit and builds a simulation of the entire system. His write-up clearly explains, and often demonstrates, what’s going on inside the box. On the surface, it’s an interesting tour of the inner workings of your favorite effects pedals. Beyond that, it’s an excellent survey of analog design that is well-worth the read for anybody interested in audio, electronics, or audio electronics.

For those interested in taking the physical route rather than the simulated one, we’ve taken a look at pedal design before. Anybody who wants to try their hand at creating simulations can grab a copy of LTSpice, or check out a package called LiveSpice, which lets you simulate circuits in realtime and use them to process live audio — pretty useful for prototyping guitar effects.

When Only The Tiniest Of Violins Will Do

Playing the tiniest of violins may be a phrase to encapsulate the complete lack of sympathy as someone unpleasant receives their just deserts, but have any of you ever considered how such a feat might be achieved? Unless you’re an unusually talented virtuoso with the bow, it’s difficult to believe that such a small instrument could be played with ease, even if it were to be available in the first place.

Happily a solution is at hand to all those minuscule stringed instrument woes, courtesy of [Alexandra Covor], who has created a miniature PCB violin that is after a fashion playable. It may not be a conventional instrument with a horsehair bow and traditional sounding mechanism, but its electronic voice should still deliver enough to delight.

At the heart of the violin-shaped PCB is an ATtiny85 and a piezoelectric buzzer, and just where you might expect them are a set of strings made from wire attached to the PCB. The instrument can play stored tunes, but since the strings are hooked up to an analogue input on the microcontroller, it can be played as a touch instrument. Finally a pair of LEDs behind the translucent FR4-only F-holes complete the look. It’s fair to say that Itzhak Perlman and his ilk are safe from challengers bearing this instrument, but it’s still an eye-catching piece of PCB art.

This isn’t the first tiny violin that’s been featured here, some others are much smaller.