“Brain In A Vat” 6502

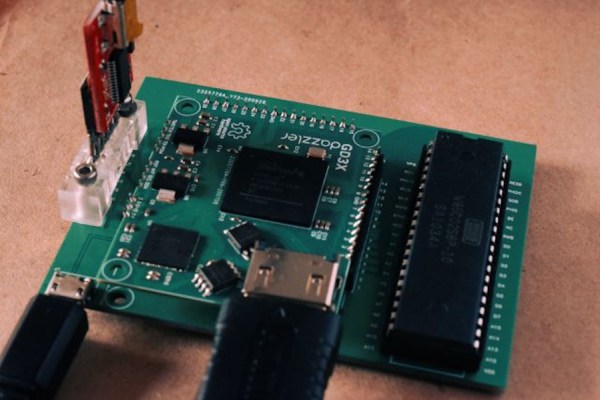
The 6502 was a revolutionary processor for its time. Offered at a small fraction of the cost of other processors available when it was released, it became adopted in such iconic computers at the Atari 2600, the Apple II, the NES, and the Commodore 64. For that reason it’s still extremely popular among retrocomputing enthusiasts who will often go to great lengths to restore these computers or build them from scratch. [jamesbowman] had an idea to build a 6502-based computer with the processor only, leaving the rest of the computer up to an FPGA.

He describes the system as a “brain in a vat” since a real 6502 is used as the “brain” and all other functions are passed off to the FPGA. In his build he uses an FPGA board with built-in graphics abilities, but the truly interesting part of this build is how the FPGA handles memory. If a particular value is placed on the data bus of the 6502, it loops forever through the entire memory and executes all of the instructions it finds. This saved a lot of time getting this system up and running, and he is able to demonstrate it by showing a waveform on the video output of the device.

Of course you can take an FPGA and emulate an entire computer based on a 6502, but using the actual silicon in a build like this really ensures that the user can learn and understand the hardware involved without some of the other tedium of doing things such as converting old video signals to HDMI for example. It’s a great take on retrocomputing that we expect to see more of in the future.

Altair Front Panel Tutorials

If you aren’t old enough to remember when computers had front panels, as [Patrick Jackson] found out after he built a replica Altair 8800, their operation can be a bit inscrutable. After figuring it out he made a pair of videos showing the basics, and then progressing to a program to add two numbers.

Even when the Altair was new, the days of front panels were numbered. Cheap terminals were on their way and MITS soon released a “turnkey” system that didn’t have a front panel. But anyone who had used a minicomputer from the late 1960s or early 1970s really thought you needed a front panel.

Continue reading “Altair Front Panel Tutorials”

A Look Behind The “Big Boards” At Mission Control In The Golden Age Of NASA

Certified space-nerd and all-around retro-tech guru [Fran Blanche] has just outdone herself with a comprehensive look at how NASA ran the Mission Control “Big Boards” that provided flight data for controllers for Apollo and for the next 20 years of manned spaceflight.

We’ve got to admit, [Fran] surprised us with this one. We had always assumed that the graphs and plots displayed in front of the rows of mint-green consoles and their skinny-tie wearing engineers were video projections using eidophor projectors. And to be sure, an eidophor, the tech of which [Jenny] profiled a while back, was used on one of the screens to feed video into Mission Control, either live from the Moon or from coverage of the launch and recovery operations. But even a cursory glance at the other screens in front of “The Pit” shows projections of a crispness and clarity that was far beyond what 1960s video could achieve.

Instead, plots and diagrams were projected into the rear of the massive screens using a completely electromechanical system. Glass and metal stencils were used to project the icons, maps, and grids, building up images layer by layer. Colors for each layer were obtained by the use of dichroic filters, and icons were physically moved to achieve animations. Graphs and plots were created Etch-a-Sketch style, with a servo-controlled stylus cutting through slides made opaque with a thin layer of metal. The whole thing is wonderfully complex, completely hacky, and a great example of engineering around the limits of technology.

Hats off to [Fran] for digging into this forgotten bit of Space Race tech. Seeing something like this makes the Mission Control centers of today look downright boring by comparison.

Continue reading “A Look Behind The “Big Boards” At Mission Control In The Golden Age Of NASA”

This Z80 Computer Bootstraps Itself

[Plasmode] has created several Z80-compatible board designs, at least four of them using the oddball Z280. The Z280 was a special variant of a Z80 that could bootstrap itself with no external PROM, making it ideal for anyone trying to build a system on a breadboard. According to his post, the cost to build the board is about $35.

Although the 8080 CPU got a lot of glory, it was much harder to use than the Zilog Z80. The Z80 only required a single clock and power supply, so it was much easier to build a system, even on a breadboard. On top of that, the bus wasn’t multiplexed and it could refresh DRAM memory by itself. Maybe that’s why you can still get Z80-derived chips readily. There was one thing, though, you needed an EPROM or some other way to run some initial code to bootstrap your system. Zilog knew this was a problem. In those days, you had to use a special tool to burn a PROM and, unless it was erasable and you had the special UV light to erase it, any mistakes cost you a chip.

Continue reading “This Z80 Computer Bootstraps Itself”

A VGA Retro Console With Everything Generated From A Single ARM Cortex M0

The later game consoles of the 8-bit era such as Nintendo’s NES or Sega’s Master System produced graphics that went beyond what owners of early 1980s home computers had come to expect from machines with the same processors, but they did so only with the help of powerful custom chipsets for their day that took care of the repetitive hard work of assembling frames and feeding them to the display device. Reproducing their equivalent with more modern hardware requires either some means of creating similar custom silicon, or a processor significantly more powerful such that it can do the work of those extra chips itself. But even with a modern microcontroller it’s still a significant challenge, so [Nicola Wrachien]’s uChip, a VGA console that does the whole job in software on a humble ARM Cortex M0 is a significant achievement.

If you are familiar with the home computers that used the processor to generate the display output, you’ll know that they spent most of their time working on the lines of the display and only had a few milliseconds of the frame blanking period for the device to perform any computing tasks before returning to the next frame. The 320×240 at 57 frames per second gives a line sync frequency of 30 kHz, and the computing happens while the display is sent the black space at the top and bottom of the screen. This is reckoned to be equivalent of the ATSAMD21E18 microcontroller on the uChip module the system uses running at only 10MHz rather than the 48MHz it is running at in reality, and with these resources it also runs the game logic, USB controller interfacing, reading games from the SD card, and game sound.

The result is a complete game console on a small PCB little longer on its longest side than its connectors. We may have largely seen the demise of VGA on the desktop several years after we called it, but it seems there is plenty of life in the interface yet for hardware hackers.

Iconic Yugoslavian Galaksija Computer Reborn, With A Documentary Too

One of the humbling things about writing for Hackaday is the breadth of experience among our colleagues, despite one’s own skills or achievements there is probably for all of us a level of impostor syndrome when we look at their work. This week provided a reminder of this, while taking a closer look at the crowdfunder for a documentary about the Galaksija, the Yugoslavian 8-bit computer from the 1980s designed by our colleague [Voja Antonić]. Not only will the documentary be produced, but also they are recreating the Galaksija as a kit, so you can experiment with this historic computer for yourself. The campaign has reached passed its goal a couple times over but still has a few days left, so jump in if you are interested.

Freshly made original Galaksija (top), and new double-sided Galaksija (bottom).

With the advantage of being able to reach out to [Voja] as a colleague, it was time to secure the straight dope on the project. Though he’s not spearheading it, aside from appearing in the documentary he’s also produced the new Galaksija PCB to take advantage of double-sided manufacture and remove the wire links that were a feature of the original.

In that sense this isn’t so much a clone of the original as an updated version from the same designer, with only a few other updates such as key switches and connectors where the exact original component could no longer be sourced. A particularly fascinating side-tale comes from a reprint of the first Galaksija magazine. Photo-reproductions of the original printed pictures did not yield good results, so [Voja] built from scratch an entirely original Galaksija, carefully recreating the framing of each step shown in those original photos.

This project has faced its fair share of obstacles before launching on Crowd Supply, so it’s very good indeed to see it receive its funding with time to spare. We look forward to seeing the results, meanwhile you can see a promo video in Serbian with Youtube’s English subtitling below the break. You can read [Voja]’s writing on the machine in Hackaday articles past, but don’t miss the opportunity to meet him at a live event — he’s the mastermind behind a number of hardware badges at Hackaday events.

Continue reading “Iconic Yugoslavian Galaksija Computer Reborn, With A Documentary Too”

Relay Computer Consumes Six Years And 4.5 Suitcases

If you thought your home-brew project was taking a long time, [Jeroen Brinkman]’s MERCIA Relay Computer project probably has you beat. He began working on this impressive computer back in 2014, and has been at it ever since.  In fact, the ongoing nature of the project is embedded into the name itself — the English translation of the acronym MERCIA is “My Simple Relay Computer Under Construction”.  Being interested in old analog and relay computers from an early age, [Jeroen] took on this project to educate students about how computers work.  The entire computer is build only using relays, diodes, and capacitors, not to mention color-coded wire based on signal functions. Using relays as the primary switching elements is at the core of his educational goal — anyone can understand how a relay works.

Understandably, this thing is big.  But he has cleverly packaged it to visually show the major building blocks of a computer.  While the exact size isn’t stated, we can estimate based on the photo of [Jeroen] standing next to the modules that these panels are about 1.5 m tall and perhaps 60 cm wide.  The whole computer is nine panels wide, making it about 5 meters long.  Except for the ROM assembly, pairs of panels are hinged together and they fold like a book and carried like a suitcases when being moved.  If you enjoy the clickety-clack sound of relays, be sure to watch the relay longevity test in the video below and check out our article on the 1958 FACOM from last year.

This is a fascinating project, but unless you have a couple thousand relays laying around and a decade of free time, it’s probably better to just enjoy [Jeroen]’s work rather than build your own.  We hope he releases schematics and other documentation once the project is finished.  You can follow his Facebook build log if you want to keep track of the progress. Thanks to [David Gustafik] for the tip.

Continue reading “Relay Computer Consumes Six Years And 4.5 Suitcases”