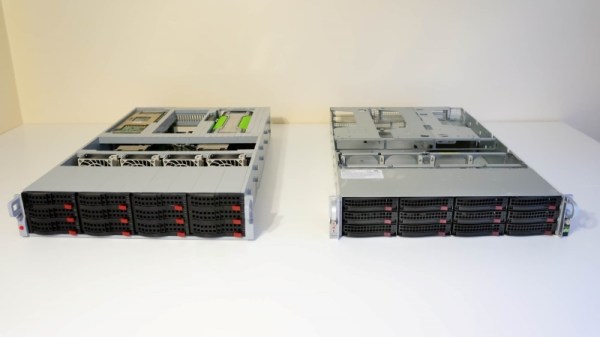
Lessons In Disposable Design From A Cheap Blinky Ball

Planned obsolescence, as annoying as it is when you’re its victim, still has to be admired. You can’t help but stand in awe of the designer who somehow managed to optimize a product to live one day longer than its warranty period. Seriously, why is it always the next day?

The design of products that are never intended to live long enough to go obsolete must be similarly challenging, and [electronupdate] did a teardown of a cheap LED blinky toy to see what’s involved. You’ve no doubt seen these seizure-triggering silicone balls before, mostly at checkout counters and the like where they’re sold at prices many hundreds of times what it took to make them. This particular device, which seems representative of the species, has two bright LEDs, a small controller chip, a trio of button cells for power, and a springy switch to activate it. All this is mounted to a cheap scrap of phenolic resin PCB, with the controller chip and one of the LEDs covered by a blob of clear epoxy.

This teardown one-ups most others, as [electronupdate] disrobes the chip and points a microscope at the die; the video below shows just how few transistors are employed and proposes a likely circuit. Everything about this ball just oozes cheapness, and it’s likely these things cost essentially nothing to build. Which makes sense for something destined for the landfill within a week or so.

Yes, this annoying blinky-thing is low-end garbage, but there are still design lessons to be learned from it. Anything that’s built for a broad market has to be built to a price point, and understanding those constraints is important to understanding how planned obsolescence works.

Continue reading “Lessons In Disposable Design From A Cheap Blinky Ball”

Redeem Your Irresponsible 90s Self

If you were a youth in the 90s, odds are good that you were a part of the virtual pet fad and had your very own beeping Tamagotchi to take care of, much to the chagrin of your parents. Without the appropriate amout of attention each day, the pets could become sick or die, and the only way to prevent this was to sneak the toy into class and hope it didn’t make too much noise. A more responsible solution to this problem would have been to build something to take care of your virtual pet for you.

An art installation in Moscow is using an Arduino to take care of five Tamagotchis simultaneously in a virtal farm of sorts. The system is directly wired to all five toys to simulate button presses, and behaves ideally to make sure all the digital animals are properly cared for. Although no source code is provided, it seems to have some sort of machine learning capability in order to best care for all five pets at the same time. The system also prints out the statuses on a thermal printer, so you can check up on the history of all of the animals.

The popularity of these toys leads to a lot of in-depth investigation of what really goes on inside them, and a lot of other modifications to the original units and to the software. You can get a complete ROM dump of one, build a giant one, or even take care of an infinite number of them. Who would have thought a passing fad would have so much hackability?

Continue reading “Redeem Your Irresponsible 90s Self”

You Should Not Try These Taser NERF Darts

For most of us, a good part of our childhood involved running around someone’s backyard (or inside the house) trying to score hits with a toy NERF gun. The fun level was high and the risk of personal injury was low. Now that we’re all mostly adults, it’s probably time to take our NERF game to the next level with some risk of serious personal harm.

In an effort to help his brother get back at him for being somewhat of a bully in their youth, [Allen Pan] gifted him with an upgraded NERF gun. Specifically, one with darts that pack a punch. Each of the “Elite” darts was equipped with a 300 V capacitor packed into the interior of the dart. New tips were 3D printed with special metal tips that allow the capacitor to discharge upon impact.

Besides the danger, there’s a good bit of science involved. Parts were scavenged from a new (and surprisingly expensive) disposable camera, and a customized circuit was constructed around the barrel of the dart gun that allows the darts to charge up when they’re loaded. It’s an impressive build that would be relatively simple to reconstruct for yourself, but it’s probably not the worst thing we’ve seen done with high voltage and a few small capacitors.

Thanks to [Itay] for the tip!

Continue reading “You Should Not Try These Taser NERF Darts”

3D Printed Catamaran Eats Benchy’s Lunch

If we’ve learned anything, it’s that 3D printers are exceptionally well suited to printing little boats. According to the Internet, 3D printers are at their best when pumping out cute PLA boats in all the colors of the rainbow; perfect for collecting dust on a shelf somewhere. Ask not what your Benchy can do for you, ask what you can do your Benchy.

But this 3D printed boat isn’t so cute and cuddly. In fact, it’s an absolute beast. Built by [Wayne Andrews], this nearly meter long 3D printed racing catamaran looks more Batman than Popeye. In the video after the break you can see a recent run of the boat on the lake, and we think you’ll agree it definitely has the performance to back up its fierce looks.

Impressively, the hull isn’t printed out of some expensive high-tech filament. It’s the cheapest PLA [Wayne] could get his hands on, and glued together with nothing more exotic than Loctite Super Glue Gel. The secret is the internal “West System” fiberglass cloth and resin work, which is the same stuff used on real boat hulls. It took about 5 days of continuous printing to produce all the pieces needed to assemble the hull, which is a scaled up version of a design by [Thomas Simon].

The internal layout is about what you’d expect in a fast RC boat. It’s running on a 1900 Kv motor powered by dual 6S batteries and a water cooled 180 A Seaking ESC which provides 5 BHP to the Octura x452 propeller. On the business end of his boat, [Wayne] used a commercial aluminum strut and rudder unit. Running gear printed out of something strong like nylon would be an interesting experiment, but perhaps a tall order for this particular motor.

We recently covered a 3D printed jet boat that’s no slouch either, but if you’re looking for a more relaxed ride you could always 3D print a FPV lifeboat.

Continue reading “3D Printed Catamaran Eats Benchy’s Lunch”

Tiny Plotter Is Made Of Strings And Cardboard

If you’ve been hanging around Hackaday for any length of time, you’ve undoubtedly seen the work of [Niklas Roy]. A prolific maker of…everything, we’ve covered his projects for over a decade now. He’s one of an elite group of hackers who can say they’ve been around since Hackaday was still using black & white pictures. Yet sometimes projects fall through the cracks.

Thanks to a tip sent in from one of our beloved readers, we’re just now seeing this incredible cardboard plotter [Niklas] made for a workshop he ran at the University of Art and Design Offenbach several years ago. The fully manual machine is controlled with two rotary dials and a switch, and it even comes with a book that allows you to “program” it by dialing in specific sequences of numbers.

Not that it detracts from the project, but its worth mentioning that the “cardboard” [Niklas] used is what is known as Finnboard, a thin construction material made of wood pulp that looks similar to balsa sheets. The material is easy to work with and much stronger than what we’d traditionally think of as cardboard. Beyond the Finnboard, the plotter uses welding rods as axles and slide rails, with glue, tape, and string holding it all together.

The dials on the control panel correspond to the X and Y axes: turning the X axis dial moves the bed forward and backward, and the Y dial moves the pen left and right. The switch above the dial lowers and raises the pen so it comes into contact with the paper below. With coordination between these three inputs, the operator can either draw “freehand” or follow the sequences listed in the “Code Book” to recreate stored drawings and messages.

Believe it or not, this isn’t the first time we’ve seen somebody made a plotter out of cardboard. Though previous entries into this specific niche did use servos to move around.

Continue reading “Tiny Plotter Is Made Of Strings And Cardboard”

Bot Makes Etch A Sketch Art In One Continuous Line

Introduced in 1960 for the princely sum of $2.99 ($25.00 today), Etch A Sketch was to become a standard issue item for the Baby Boomers’ toy box. As enchanting as the toy seems, it’s hard to see why it had staying power: it was hard for young fingers to twirl the knobs, diagonal lines and smooth curves required a concert pianist’s fine motor control, and whatever drawings we managed to make were erased at the slightest jostle of the tablet.

Intent on righting these wrongs, [Sunny Balasubramanian] not only motorized an Etch A Sketch, but he’s also given it a mind of its own in a way. For those unfamiliar with the toy, it’s basically a manual X-Y plotter that drags a stylus across the underside of a glass screen, scraping off a silver powder clinging to the glass to make dark lines. Replacing the knobs with steppers is straightforward, of course, but driving them is the trick. [Sunny] hooked his up to a Raspberry Pi and wrote some Python code to drive them. The Pi also accepts input image files and processes them for rendering through the plotter, first doing Canny edge detection in OpenCV, then plotting a single path through the largest collection of connected pixels in the image. From there it’s just a matter of spinning the motors to create surprisingly detailed images. Check out the short video below to see it in action.

It’s hardly the first automatic Etch A Sketch we’ve seen – here’s one that automates everything including the shake to erase the drawing. That one cheats a little though, in that it rasters across the screen like a CRT. We really like how this one just does a single path. Pretty clever.

Continue reading “Bot Makes Etch A Sketch Art In One Continuous Line”

LEGO bricks sorter

Sorting LEGO Is Like Making A Box Of Chocolates

Did you know that chocolate candy production and sorting LEGO bricks have something in common? They both use the same techniques for turning clumps of chocolates or bricks into individual ones moving down a conveyor belt. At least that’s what [Paco Garcia] found out when making his LEGO Sorter.

Sorting LEGO bricks using guidesHowever, he didn’t find that out right away. He first experimented with his own techniques, learning that if he fed bricks to his conveyor belt by dropping a batch of them in a line perpendicular to the direction of belt travel then no subsequent separation attempt of his worked. He then turned to [akiyuky’s] LEGO sorter for inspiration and dropped them onto the belt at an angle, ensuring that some bricks would be in front of others. A further trick he found is very well demonstrated in the chocolate sorting video below and shown in the image here. That is to use guides on the belt which serve to create speed differentials. Bricks move slower than the conveyor belt while pressed against a guide but when a brick leaves the guide, it accelerates to the speed of the conveyor belt, pulling away from the bricks still at the guide and thus separating them.

A further discovery had nothing to do with chocolate production, unless maybe for quality control. Once an individual brick had been separated out, it had to be classified. To do that he used Google’s Inception v3 neural network. But first, he had to retrain it for recognizing different types of LEGO bricks, something we’ve seen done before for use with recognizing playing cards. And to do the retraining, he needed many images of different bricks all separated into their different types. That’s where he came up with a clever trick. He used his own sorter for that. For example, to get a bunch of images of 1×1 bricks of different colors and orientations, he simply ran them through the sorter, saving the images to files and assigning them to the 1×1 brick class. He then used his desktop machine with a GeForce GT 730 GPU for the retraining, taking around 2.7 seconds per brick. For sorting though, he runs the trained neural network on a Raspberry Pi, taking 3.8 seconds for each brick. The resulting sorter works quite well, sorting with 89% accuracy. Watch it in action in the video below.
Continue reading “Sorting LEGO Is Like Making A Box Of Chocolates”