Solve: An ESP32-Based Equation Solving Calculator

We’re suckers for good-looking old-school calculators, so this interesting numerical equation-solving calculator by [Peter Balch] caught our attention. Based around the ESP32-WROOM-32 module and an LCD, the build is quite straightforward from an electronics point of view, with the main work being on the software side of things.

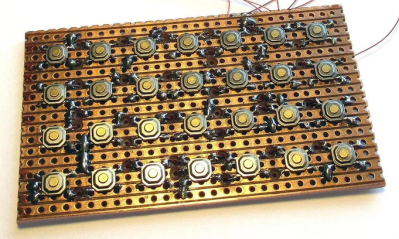
A custom keyboard was constructed on Veroboard using a handful of tactile switches arranged in a charlieplexing array to minimize the number of IO pins consumed. For the display, an off-the-shelf 240×320 ILI9341-based module hooked up by SPI was used. A single lithium cell was used for the power supply, connected to a USB

You don’t need much to make a usable keyboard.

charger module, but you could just as easily substitute a 3 x AA battery box. The case was designed in DesignSpark mechanical and 3D printed. It’s unclear what keyboard version they settled on; there are options for one with keycaps and one without. Regardless, a 3D-printed frame sits atop the keyboard circuit, with the graphics printed on photo paper and a protective coversheet on top. Continue reading “Solve: An ESP32-Based Equation Solving Calculator”

2024 Tiny Games Contest: Neat PCB Business Card Was Inspired By The Arduboy

The humble business card is usually a small slip of cardboard with some basic contact details on it — but as hackers know, it can be so much more. [Marian] has provided us a great example in the form of his own digital business card, which doubles as a handheld game!

Wanting to make his business card more interesting for better engagement, [Marian] was inspired by the Arduboy to give it some interactivity. He chose the STM32G030F6 microcontroller as a cheap and reliable option to run his business card. He then created a 10×9 LED matrix display using Charlieplexing to minimize the amount of I/O pins required. For controls, he went with the usual directional cross plus two action buttons. He implemented a variety of games on the card—including a Flappy Bird clone and a game similar to the classic Simon toy.

Files are on GitHub for the curious. We’ve featured some other great business cards this year, too. Indeed, we ran a whole challenge! If you’re cooking up your own exemplary little PCB to hand out at conferences, don’t hesitate to let us know!

A PCB business card that plays tic-tac-toe with red and blue LEDs.

2024 Business Card Challenge: Go Tic-Tac-Toe-to-Toe With Them

There is perhaps no more important time to have a business card than when you’re in college, especially near the end when you’re applying for internships and such. And it’s vital that you stand out from the crowd somehow. To that end, Electrical & Computer Engineer [Ryan Chan] designed a tidy card that plays tic-tac-toe.

Instead of X and O, the players are indicated by blue and red LEDs. Rather than having a button at every position, there is one big control button that gets pressed repeatedly until your LED is in the desired position, and then you press and hold to set it and switch control to the other player. In addition to two-player mode, the recipient of your card can also play alone against the ATMega.

The brains of this operation is an ATMega328P-AU with the Arduino UNO bootloader for ease of programming. Schematic and code are available if you want to make your own, but we suggest implementing some type of changes to make it your own. Speaking of, [Ryan]  has several next steps in mind, including charlieplexing the LEDs, using either USB-C or a coin cell for power, upgrading the AI, and replacing the control button with a capacitive pad or two. Be sure to check it out in action in the two videos after the break.

Continue reading “2024 Business Card Challenge: Go Tic-Tac-Toe-to-Toe With Them”

Baffle The Normies With This Binary Thermometer

We think it’s OK to admit that when someone puts a binary display on a project, it’s just a thinly veiled excuse to get more blinkenlights into the world. That and it’s a way to flex a little on the normies; you’ve gone pretty far down the tech rabbit hole to quickly decipher something like this binary-display thermometer, after all.

Don’t get us wrong, we think those are both perfectly valid reasons for going binary. And all things considered, a binary display for a thermometer like [Clovis Fritzen]’s is much simpler to decode than, say, a clock. Plus, it seems a bit that this build was undertaken at least partially as an exercise in Charlieplexing, which [Clovis] uses to drive the six-bit LED display using only three lines of GPIO from the Digispark ATtiny85 board running the show.

The temperature sensor is a DHT11, whose output is read by the microcontroller before being converted to binary and sent to the six-bit display. The 64-degree range is perfect for displaying the full range of temperatures most of us would consider normal, although we’d find 63°C a touch torrid so maybe there’s a little too much resolution on the upper end of the scale. Then again, switching to Fahrenheit would shift it toward the hypothermia end of the scale, which isn’t helpful. And you can just forget about Kelvin.

ACK1 Makes Getting To Know The ATtiny1616 Easy

Many readers will be familiar with Microchip’s ATtiny85, which has been a popular choice for DIY projects in the past for its low price and (for the time) small size. But those looking for a more modern and capable 8-bit chip may find the ATtiny1616-MNR of interest. It offers expanded flash storage, more GPIO, and ditches SPI programming in favor of UPDI — a protocol that can be done using nothing more than an USB-UART converter and a resistor.

The contents of the ACK1 kit
What’s in the kit if you buy it.

But here’s the catch: the new chip is only available in SMD and there are far fewer tutorials for it! That’s why [Bradán Lane] has created ACK1, a cute little AVR Coding Kit for those of us who want to play with the ATtiny1616 and a companion for his free and open-source course.

The board contains an array of 6 by 7 LEDs in a charlieplexed configuration, a large piezo buzzer, two push buttons, an on/off switch, and a CR2032 battery holder to keep it on without the need for a cable. The kit looks gorgeous in its white-on-black theme with gold plated contacts and can be had for $20 on Tindie at the time of writing.

The ATtiny1616 itself runs at up to 20 MHz and has 17 GPIO pins, 16 KiB of flash storage, 2 KiB of RAM, and 256 bytes of EEPROM for configuration — making it roughly on par with the original Arduino Uno.

The course that goes hand-in-hand with the ACK1 is all about the features of the ATtiny1616, from the basics of using the programmer to reading the buttons, using timers, driving the charlieplexed LEDs, storing data in the EEPROM and much more. Though it does not cover the basics of C, the course is free, and even licensed MIT, so that anyone can share it and improve upon it.

If you enjoy seeing beautiful microcontrollers, you’ll definitely want to see the stylish Uno Plus+.

Blinky Business Card Plays Snake And Connect Four

There’s no better way to introduce yourself than handing over a blinky PCB business card and challenging the recipient to a game of Connect Four. And if [Dennis Kaandorp] turns up early for a meeting, he can keep himself busy playing the ever popular game of Snake on his PCB business card.

The tabs are 19 mm long and 4 mm wide.

Quite wisely, [Dennis] kept his design simple, and avoided the temptation of feature creep. His requirements were to create a minimalist, credit card sized design, with his contact details printed on the silk legend, and some blinky LED’s.

The tallest component on such a design is usually the battery holder, and he could not find one that was low-profile and cheap. Drawing inspiration from The Art of Blinky Business Cards, he used the 0.8 mm thin PCB itself as the battery holder by means of flexible arms.

Connect-Four is a two player game similar to tic-tac-toe, but played on a grid seven columns across and six rows high. This meant using 42 dual-colour LED’s, which would require a large number of GPIO pins on the micro-controller. Using a clever combination of matrix and charlieplexing techniques, he was able to reduce the GPIO count down to 13 pins, while still managing to keep the track layout simple.

It also took him some extra effort to locate dual colour, red / green LED’s with a sufficiently low forward voltage drop that could work off the reduced output resulting from the use of charlieplexing. At the heart of the business card is an ATtiny1616 micro-controller that offers enough GPIO pins for the LED matrix as well as the four push button switches.

His first batch of prototypes have given him a good insight on the pricing and revealed several deficiencies that he can improve upon the next time around. [Dennis] has shared KiCad schematic and PCB layout files for anyone looking to get inspired to design their own PCB business cards.

Continue reading “Blinky Business Card Plays Snake And Connect Four”

For The ESP’s Next ESP Trick…

It is a pretty stale dad joke to tell someone you have ESP when you mean you have an ESP8266 or ESP32 in your hand. However, [Naufil Metkar] uses an ESP device to pretend — via a magic trick — that he does have ESP. The trick requires a bit of 3D printing, an MPU6050 gyro sensor, and a lot of showmanship.

We hate to spoil an illusion, but you can probably figure it out from the list of things you need. The die has a gyro in it and uses a small ESP module to transmit its current orientation out to a display. There is a small reed switch that lets you turn off the device with a magnet. Without it, the battery dies quickly.

Continue reading “For The ESP’s Next ESP Trick…”