One can 3D print with conductive filament, and therefore plausibly create passive components like resistors. But what about active components, which typically require semiconductors? Researchers at MIT demonstrate working concepts for a resettable fuse and logic gates, completely 3D printed and semiconductor-free.
Now just to be absolutely clear — these are still just proofs of concept. To say they are big and perform poorly compared to their semiconductor equivalents would be an understatement. But they do work, and they are 100% 3D printed active electronic components, using commercially-available filament.
How does one make a working resettable fuse and transistor out of such stuff? By harnessing thermal expansion, essentially.
[Azpaca] purchased a fun little toy car from Tamiya, only… there was a problem. The little off-roader wasn’t up to scratch—despite its four-wheel-drive, it couldn’t get over rough ground to save its life. Thus, it was time to 3D-print a better chassis that could actually get through it!
The problem was quite obvious. With no suspension and a rigid chassis, the vehicle would tend to end up with one or more wheels on the air on rough surfaces. To rectify this, [Azpaca] created a twisting chassis which would allow the wheels to better remain in contact with the ground. The design is relatively straightforward, and reuses much of the original drivetrain, including the simple brushed motor. However, with a pivot right behind the front wheels, it has much more traction on rocks and gravel, and can traverse these terrains much more easily.
Tamiya’s motorized toys aren’t particularly well known in the West, but it’s neat to see the community that exists around modifying them around the world. Design files are available for the curious. If you’re not down with mods, perhaps you’d prefer to print your own cars from scratch. Video after the break.
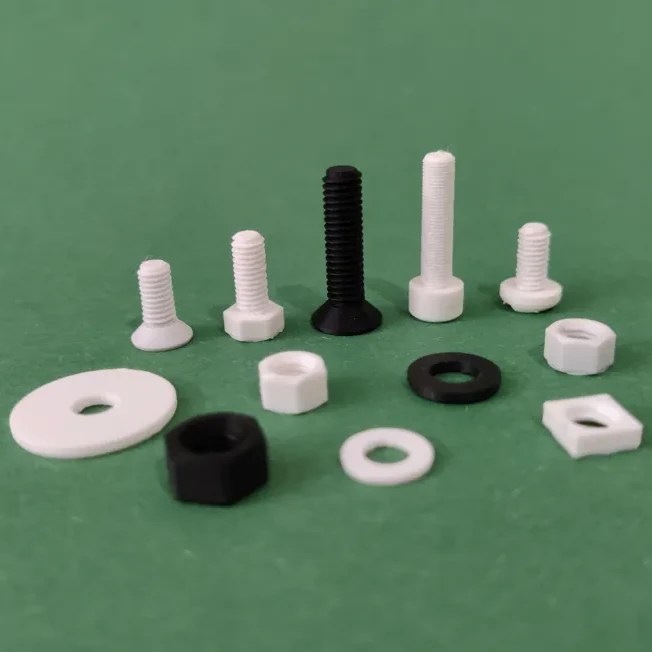
For those times when you could really use a quick 3D model, this metric screw generator will do the trick for screws between M2 and M16 with matching nuts and washers. Fastener hardware is pretty accessible, but one never knows when a 3D printed piece will hit the spot. One might even be surprised what can be usefully printed on a decent 3D printer at something like 0.08 mm layer height.
Behind the scenes, [Jason]’s tool is an OpenSCAD script with a very slick web-based interface that allows easy customization of just about any element one might need to adjust, including fine-tuning the thread sizing. We’re fans of OpenSCAD here and appreciate what’s going on behind the scenes, but one doesn’t need to know anything about it to use the online tool.
Generated models can be downloaded as .3mf or .stl, but if you really need a CAD model you’re probably best off looking up a part and downloading the matching 3D model from a supplier like McMaster-Carr.
Prefer to just use the OpenSCAD script yourself, instead of the web interface? Select “Download STL/CAD Files” from the dropdown of the project page to download ScrewGenerator.scad for local use, and you’re off to the races.
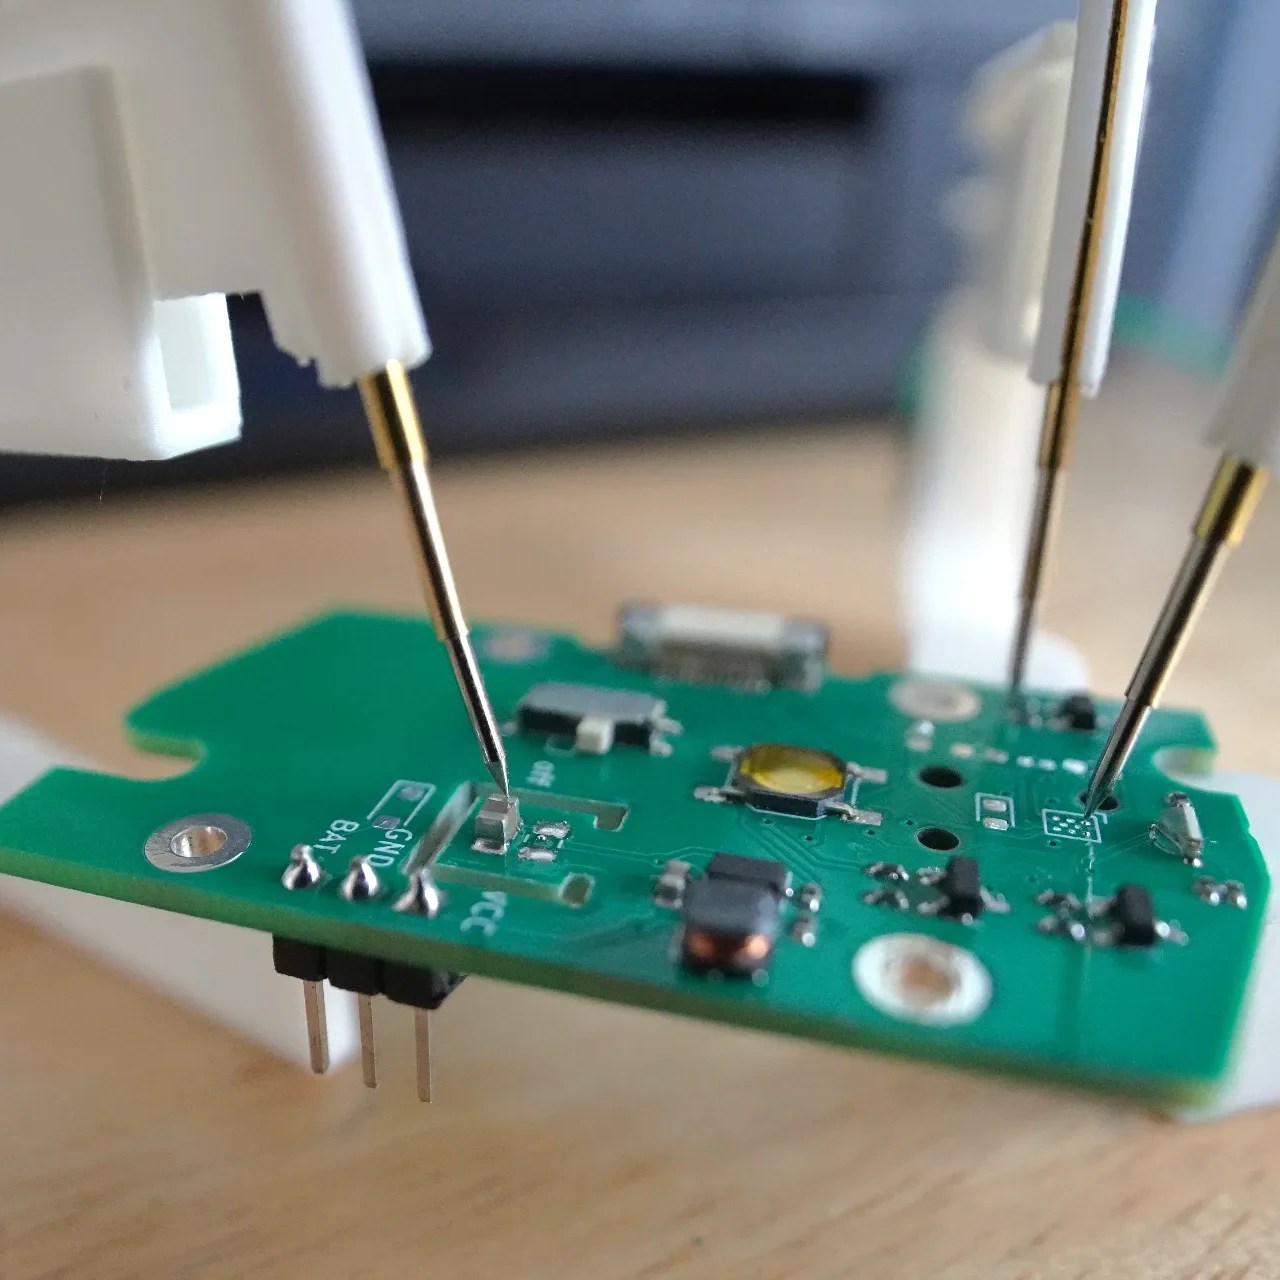
Those of us familiar with PCB work would agree that anything that helps hold probes secure and hands-free to components, traces, or test points is worth looking at. That’s where [2048bits]’ snap probe design comes in. With a little additional and inexpensive hardware, one can have all the hands-free probe clamps one’s workbench can fit!
That first link is where you’ll find a list of required hardware and the CAD files (in .step format) for the probe itself. The obvious approach to making the pieces would be to 3D print them, but we notice the design — while attractive — looks like a challenging print due to the features. We’re not the only ones to see that, and happily there’s already a remix by [user_2299476772] aimed at keeping the essential features while making them easier to print.
If you’re taking a DIY approach to PCB probes, we’d like to remind you that one of our readers discovered dental burrs make absolutely fantastic, non-slip probe tips. This seems like a good opportunity to combine two ideas, and having the CAD files for the probe clamp means modification is straightforward. Let us know on the tips line if you get something working!
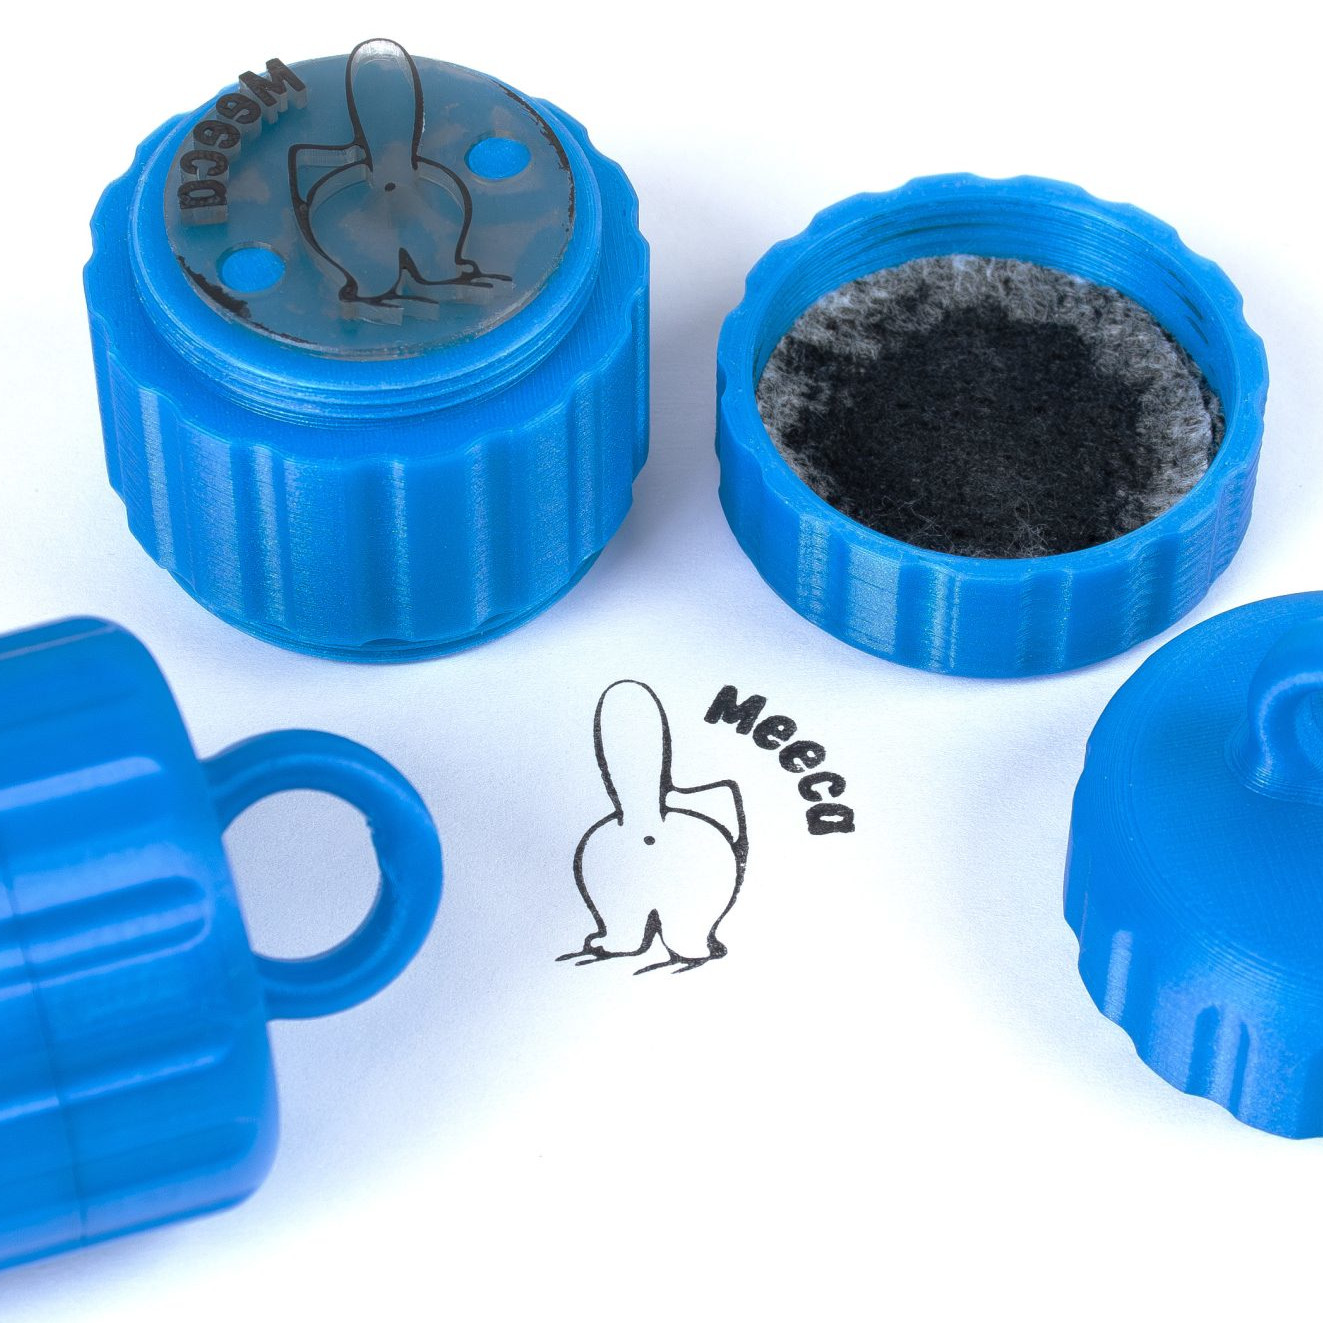
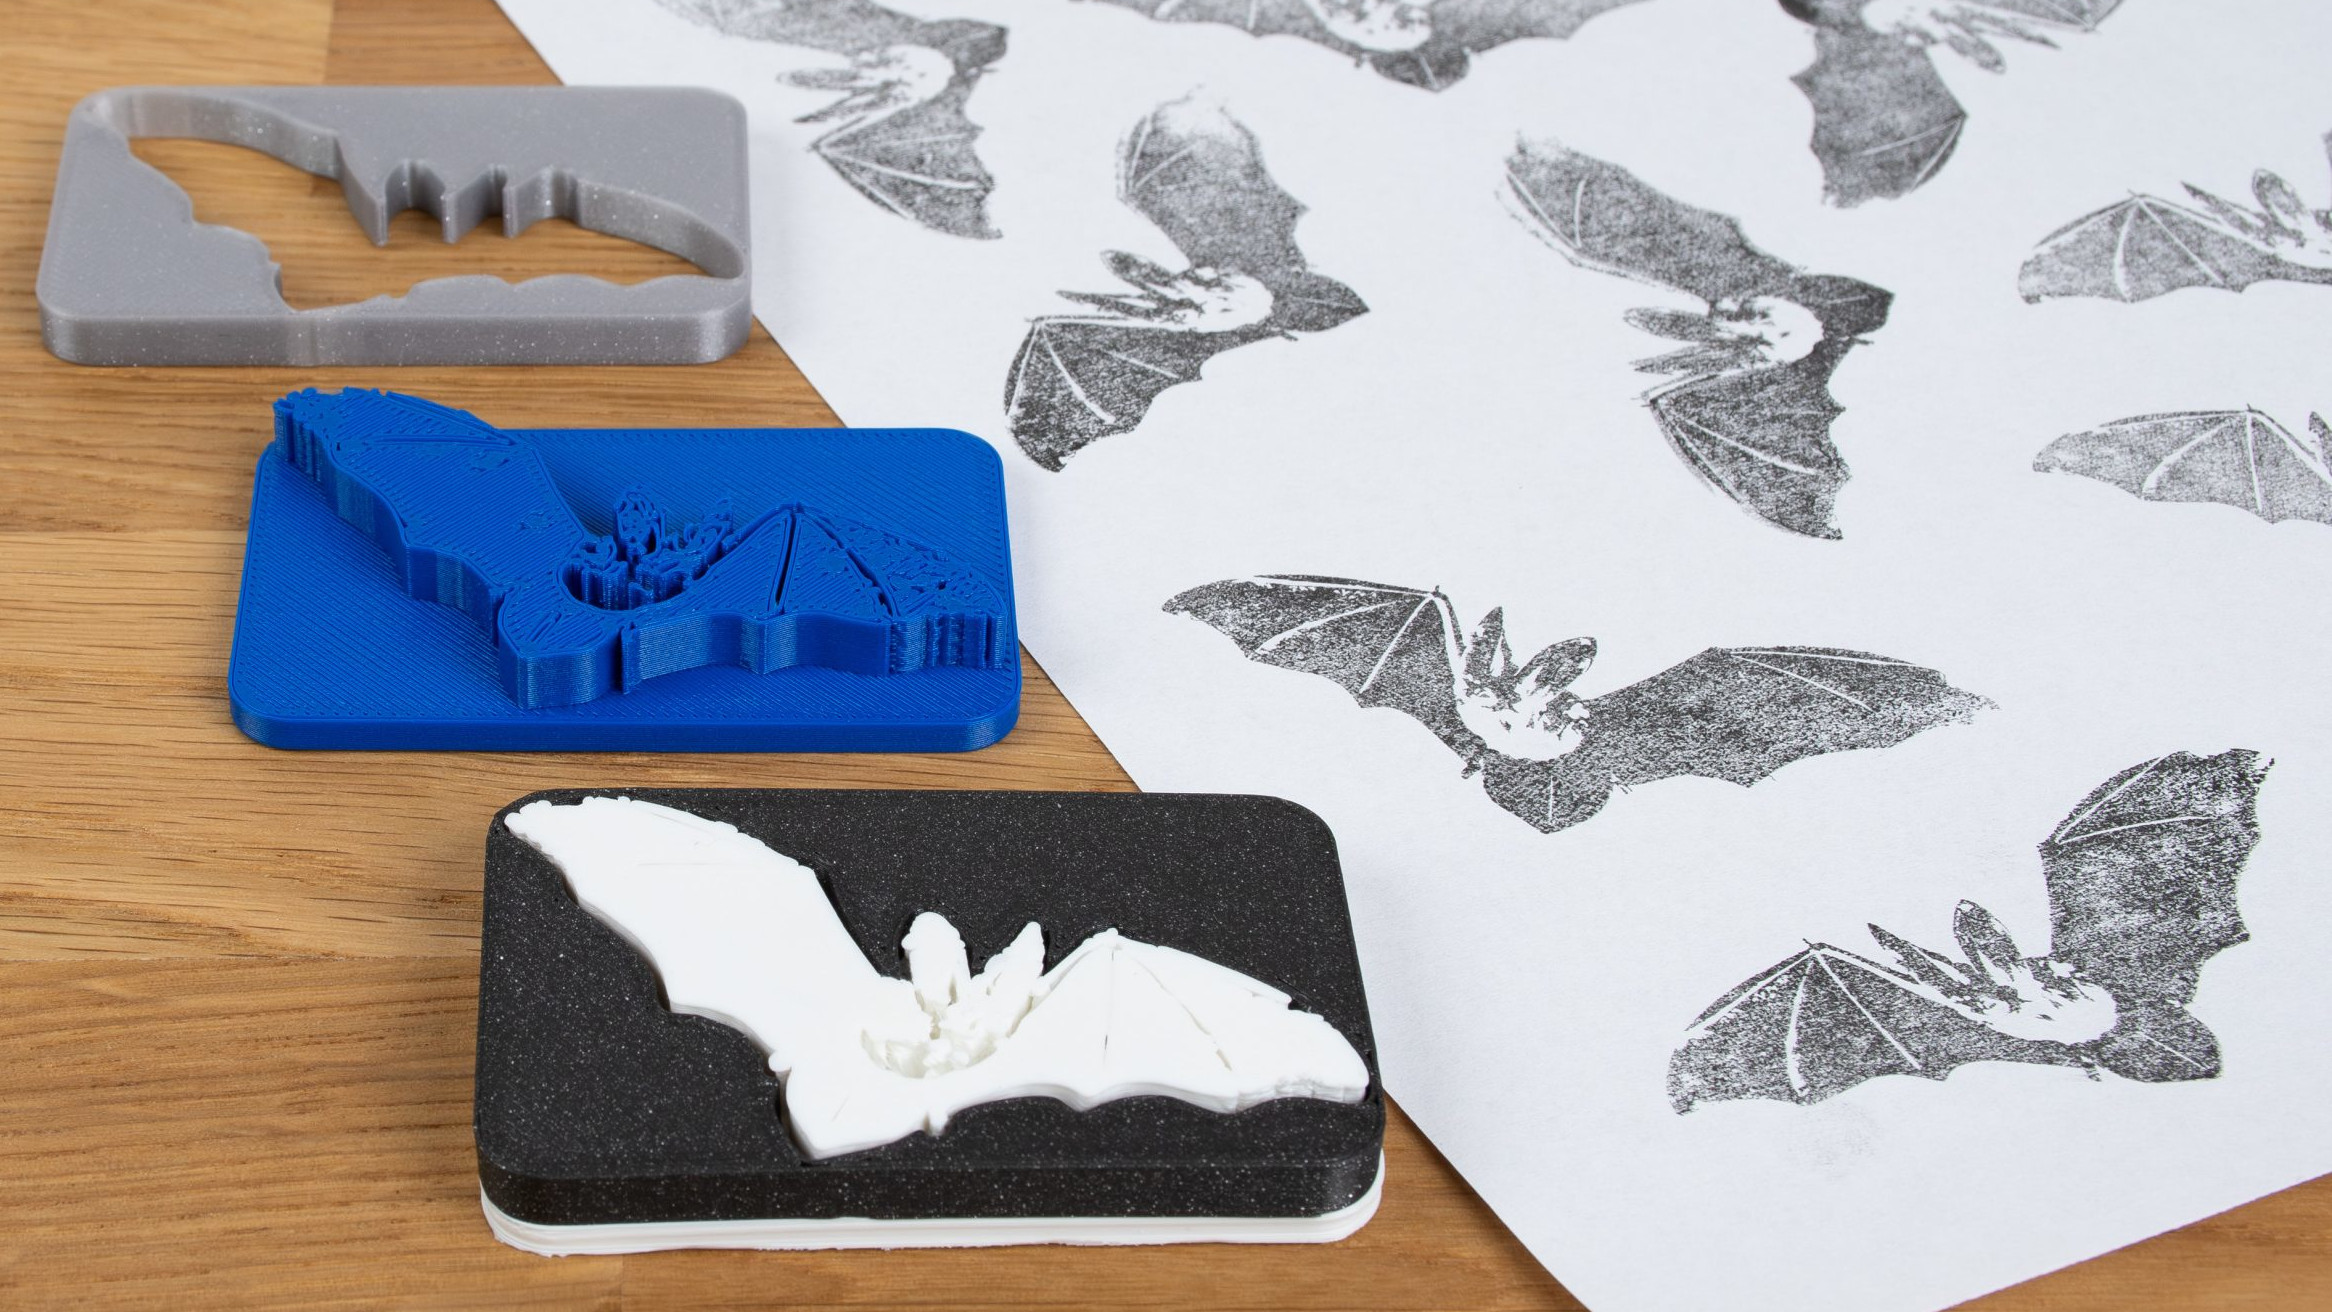
Ink stamps can be fun to make and use, and 3D printers are uniquely positioned to create quality stamps of all kinds with just a little care. As with most things, the devil is in the details and the best results will require some extra work. Luckily, [Prusa] has a blog post that goes through how to 3D print the best stamps and includes concrete recommendations and tips to get the most out of the process.
Resin printers can create stamps too, just ensure a flexible material is used.
What makes a good 3D-printed stamp? It should be easy to use, transfer an image cleanly, and retain ink reasonably well. To hit these bases, printing the stamp face out of a flexible material is probably the most important, but a flat and smooth stamp surface is equally crucial. Satin-finish build plates will give a weathered look to the stamp, but textured build plates in general are no good.
As for the design, turning an image into a 3D object can be a bit challenging for novices, but there are tools that make that much easier now than it used to be. Some slicers allow importing .svg files (scalable vector graphics) with which to emboss or deboss objects, and online tools as well as free software like Inkscape will let folks covert images into .svg format.
Flexible filaments tend to be stringy so they should be dried before use, especially if the stamp design has a lot of separate elements that invite stringing. Any flex filament should do the job, but of course some specific filament brands perform better than others. Check out the full blog post for specific recommendations.
Pausing a print and inserting a pre-printed support piece (removed after the print completes) helps form big overhangs.
The remaining tricky element is that flexible filaments also tend to be poor at bridging, and if one is printing a stamp face-down on the build plate (to get that important, ultra-flat face) then the upper inside of the stamp may need some support for it to come out right. As [Prusa] suggests, this is a good place to use a manual, drop-in pre-printed support piece. Or if one has the ability to print in multiple materials, perhaps print the support structure in PLA since it is just about the only material that won’t completely weld itself to flex filaments. Of course, if one is designing the stamp entirely in CAD, then the best option would be to chamfer the stamp elements so supports aren’t necessary in the first place. Finally, don’t overlook the value of a physical design that makes handling easy and attractive.
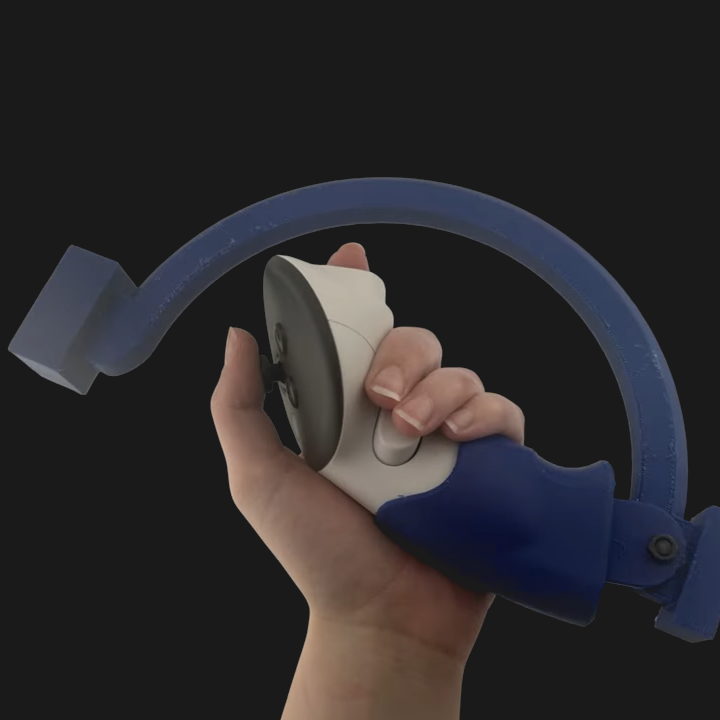
Wielding things like two-handed swords in VR can be awkward. There’s no sense of grasping a solid object. The controllers (and therefore one’s hands) feel floaty and disconnected from one another, because they are. [Astro VR Gaming] aims to fix this with a DIY attachment they are calling the ARC VR Sword Attachment.
The ARC is a 3D-printed attachment that allows a player to connect two controllers together. They can just as easily be popped apart, which is good because two separate controllers is what one wants most of the time. But for those moments when hefting a spear or swinging a two-handed sword is called for? Stick them together and go wild.
The original design (the first link up above) uses magnets, but an alternate version uses tapered inserts instead, and provides a storage stand. Want to know if the ARC is something you’d like to make for yourself? Watch it in action in the video embedded just under the page break.
VR is an emerging technology with loads of space for experimentation and DIY problem solving. We wish more companies would follow Valve’s example of hacker-friendly hardware design, but even just providing CAD models of your hardware to make attachments easier to design would be a big step forward, and something every hacker would welcome.
There are a huge number of manufacturers building awesome radio-controlled cars these days. However, sometimes you just have to go your own way. That’s what [snamle] did with this awesome 3D-printed RC car—and the results are impressive.
This build didn’t just aim to build something that looked vaguely car-like and whizzed around on the ground. Instead, it was intended to give [snamle] the opporunity to explore the world of vehicle dynamics—learning about weight distribution, suspension geometry, and so many other factors—and how these all feed into the handling of a vehicle. The RC side of things is all pretty straightforward—transmitter, receiver, servos, motors, and a differential were all off-the-shelf. But the chassis design, the steering, and suspension are all bespoke—designed by [snamle] to create a car with good on-road handling and grip.
It’s a small scale testbed, to be sure. Regardless, there’s no better way to learn about how a vehicle works on a real, physical level—you can’t beat building one with your own two hands and figuring out how it works.
It’s true, we see a lot of 3D printed RC cars around these parts. Many are built with an eye to robotics experimentation or simply as a learning exercise. This one stands out for its focus on handling and performance, and of course that nicely-designed suspension system. Video after the break.