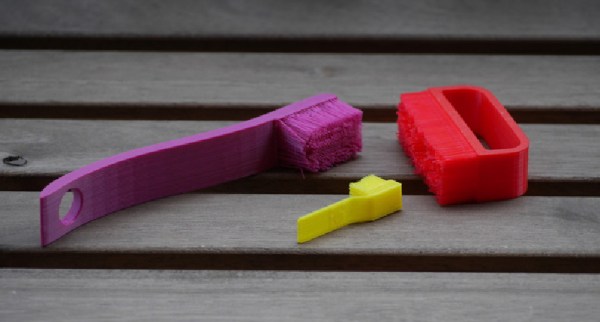
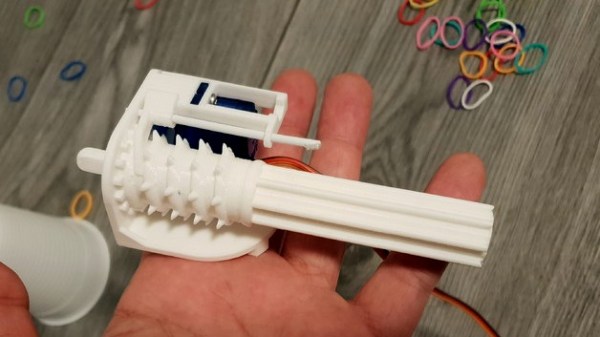
Gorgeous NickelBot Serves Up Lasered Wooden Nickels

[bdring] just recently completed his absolutely fantastic NickelBot, which is a beautifully made unit that engraves small wooden discs with a laser like some kind of on demand vending machine, and it’s wonderful. NickelBot is small, but a lot is going on inside. For example, there’s a custom-designed combination engraving platform and hopper that takes care of loading a wooden nickel from a stack, holding it firm while it gets engraved by a laser, then ejects it out a slot once it’s done.

NickelBot is portable and can crank out an engraved nickel within a couple of minutes, nicely fulfilling its role of being able to dish out the small items on demand at events while looking great at the same time. NickelBot’s guts are built around a PSoC5 development board, and LaserGRBL is used on the software side to generate G-code for the engraving itself. Watch it work in the video embedded below.

Continue reading “Gorgeous NickelBot Serves Up Lasered Wooden Nickels”

Home Made 5-Axis CNC Head Is A Project To Watch

[Reiner Schmidt] was tired of renting an expensive 5-axis CNC head for projects, so he decided to build his own. It’s still a work in progress, but he’s made remarkable progress so far. The project is called Bridge Boy, and it is designed to use a cheap DC rotary mill to cut soft materials like plastic, wood and the like. Most of it is 3D printed, and he has released the Autodesk 360 plans that would allow you to start building your own. His initial version uses an Arduino with stepper drivers, and is designed to fit onto the end of a 60mm arm of a standard 3-axis CNC,  so technically it’s a 3+2 axis CNC. With the appropriate software, it should be able to work as a full 5-axis machine, though, and it should be possible to integrate it with a CNC that has a 5-axis driver board without too much effort.

Continue reading “Home Made 5-Axis CNC Head Is A Project To Watch”

DIY Magnetic Actuator, Illustrated And Demonstrated

Electromagnetic actuators exert small amounts of force, but are simple and definitely have their niche. [SeanHodgins] took a design that’s common in flip-dot displays as well as the lightweight RC aircraft world and decided to make his own version. He does a good job of explaining and demonstrating the basic principles behind how one of these actuators works, although the “robotic” application claimed is less clear.

It’s a small, 3D printed lever with an embedded magnet that flips one way or another depending on the direction of current flowing through a nearby coil. Actuators of this design are capable of fast response and have no moving parts beyond the lever itself, meaning that they can be made very small. He has details on an imgur gallery as well as a video, embedded below.

Continue reading “DIY Magnetic Actuator, Illustrated And Demonstrated”

Customize All The Fan Covers You Never Knew You Needed

Do you need a fancy fan cover with precisely specified attributes, but have no desire to design one from scratch? If you answered yes (or no) then [mightynozzle] has the answer. The Customizable Fan Grill Cover is a parametric design in OpenSCAD that allows adjusting the frame style, size, and grill pattern for any fan cover one may possibly need. [mightynozzle] also went the extra mile to provide a large number of pre-made STL files for a variety of designs in a wide range of sizes, so those who don’t want to fuss with customizing can simply download and print.

Normally Thingiverse would allow customizing this model’s attributes with their built-in Customizer, but the functionality and availability of that feature is spotty. Luckily it’s always an option to download the source and do the customizing directly in OpenSCAD. For those who may be intrigued but are not sure where to start, here’s a reminder that we covered how to make a thing with OpenSCAD that demonstrates the whole process.

Art Deco Radio Gets FM Reception

Taking a vintage radio and cramming it full of modern, Internet-connected, guts has long been a staple of the hacking and making scene. While some might see it as a crime to take what’s arguably a legitimate piece of history and turn it into nothing more than a slipshod case for the Raspberry Pi, we have to admit there’s a certain appeal to the idea. Taking the beauty of classic design and pairing it with more modern capabilities is getting the best of both worlds.

But this project by [Nick Koumaris] is a somewhat unique take on the concept. Rather than sacrificing a real vintage piece of hardware to house the electronics, he’s designed a 3D printable case that looks like a classic 1936 AWA Radiolette. But what’s really interesting to us is that he then puts a basic FM radio inside of it.

That’s right, no Internet radio streaming or smartphone Bluetooth compatibility here. It’s just a regular FM radio, not entirely unlike the kind of hardware you’d expect to be inside of a classic radio. Of course, it’s much more modern, and [Nick] actually built it himself from a TEA5767 FM radio module and an Arduino Pro Mini.

While functionally it might not be terribly exciting, we do appreciate that he went through the trouble to make a vintage-looking user interface for the radio. While physical buttons would arguably have been more appropriate given the era, the art deco inspired font and graphics that show on the device’s Nokia 5110 LCD do look really slick.

Purists will surely be happy to see another project where a piece of vintage piece of audio equipment wasn’t sacrificed at the Altar of Hack, but we’ve also played host to many projects which weren’t nearly as concerned with historical preservation.

Continue reading “Art Deco Radio Gets FM Reception”

Handheld Arduino Light Painter

Light painting is a technique which allows you to “draw” on a photograph by moving a light past the camera during a long exposure shot. While it can be difficult to master, light painting allows for some incredible effects such as text and images that appear to be hovering in mid-air. Think of it like a very slow but much cooler version of an augmented reality app.

[Reven] recently wrote in to tell us about the Arduino light painter he put together, and while DIY (and even commercial) light painting gear isn’t exactly new at this point, we think he’s raised the bar a bit with his design. With the addition of a slick 3D printed enclosure and on-board display and menu system, his light painter looks exceptionally professional for being built out of hardware he had on hand.

On his blog, [Reven] has done a phenomenal job of documenting the build from start to finish. Not only does he include a detailed Bill of Materials and the STL files so you can build your own version of his light painter, he walks the reader though his design process and explains why he did the things he did. Even if you aren’t interested in building a light painter, there’s almost certainly something of interest for anyone who’s ever looked at a pile of parts on their workbench and wondered how they were going to turn it into a functioning device.

Powered by an Arduino Uno, the light painter provides a user interface on a 16×2 LCD which allows control over not only the brightness of the WS2812 LED strips but selecting and loading different images from the micro SD card. The case was designed in FreeCAD, and while [Reven] mentions there are a number of issues which could be improved, satisfies all his design goals.

We covered the original Adafruit project that [Reven] based his code all the way back in 2013, though there’s certainly been more modern interpretations of the idea since then.

A True 3D Printed Weather Station

If the term “3D printed weather station” makes you think of a printed enclosure for off-the-shelf sensors, don’t feel bad. We thought the same thing when we first read the message [Rob Ward] sent in about his latest project. Surely he couldn’t mean that he actually printed all the principal parts of a serious weather station setup, such as the wind vane, anemometer, or rain gauge?

Except, on closer inspection, that’s exactly what he did. Every part of the weather station is designed in OpenSCAD, printed out, and infused with various vitamins to turn them into functional pieces of hardware. Interestingly enough, most of the magic is done with simple reed switches and magnets.

For example, the wind vane uses eight reed switches and an embedded magnet to communicate the current wind direction to the Arduino Uno which handles the user interface. Wind speed, on the other hand, it done with a single reed switch as it just needs to count rotations to calculate speed.

[Rob] did “cheat” by using an off-the-shelf barometric pressure sensor, but we’ll give him a pass for that one. Unless somebody wants to hit the tip line with a design for a printable barometer, we’ll consider this the high water mark in printable weather stations.

This isn’t the first time we’ve seen a DIY anemometer or rain gauge, of varying degrees of complexity. But the clean look of the final version, completely open nature of the OpenSCAD source, and the low part count make this an extremely compelling option for anyone looking to up their home forecasting game.