What is part way between a printed circuit board and a rats-nest of point-to-point wiring? We’re not sure, but this is it. [Johan von Konow] has come up with an inspired solution, 3D printing an Arduboy case with channels ready-made for all the wires. The effect with his 3DPCBoy is of a PCB without the PCB, and allows the console to be made very quickly and cheaply.
The Arduboy — which we originally looked at back in 2014 — is a handheld gaming console in a somewhat Gameboy-like form factor. Normally a credit-card sized PCB hosts all the components, including a microcontroller, display, and buttons. Each has a predictable footprint and placement so they can simply be wired together with hookup wire, if you don’t mind a messy result.
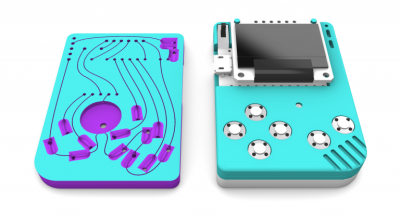
Here the print itself has all the holes ready-created for the components, and the path of the wires has a resemblance to the sweeping traces of older hand-laid PCBs. The result is very effective way to take common components — and Arduino pro micro board for the uC, an OLED breakout board, and some buttons — and combine them into a robust package. This technique of using 3D prints as a combination of enclosure and substrate for components and wiring has an application far beyond handheld gaming. We look forward to seeing more like it.
[Via the Arduboy community forum, thanks Kevin Bates for the tip.]