Grawler: Painless Cleaning For Glass Roofs

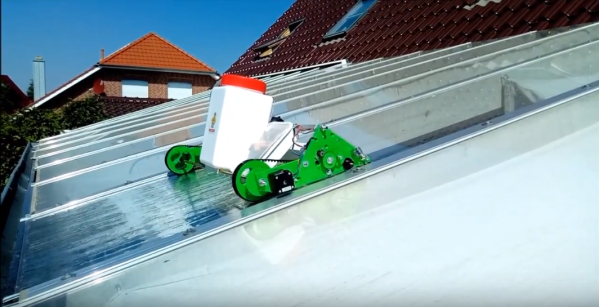
Part of [Gelstronic]’s house has a glass roof. While he enjoys the natural light and warmth, he doesn’t like getting up on a ladder to clean it every time a bird makes a deposit or the rainwater stains build up. He’s tried to make a cleaning robot in the past, but the 25% slope of the roof complicates things a bit. Now, with the addition of stepper motors and grippy tank treads, [Gelstronic] can tell this version of GRawler exactly how far to go, or to stay in one place to clean a spot that’s extra dirty.

GRawler is designed to clean on its way up the roof, and squeegee on the way back down. It’s driven by an Arduino Pro Micro and built from lightweight aluminium and many parts printed in PLA. GRawler also uses commonly-available things, which is always a bonus: the brush is the kind used to clean behind appliances, and the squeegee blade is from a truck-sized wiper. [Gelstronic] can control GRawler’s motors, the brush’s spin, and raise/lower the wiper blade over Bluetooth using an app called Joystick BT Commander. Squeak past the break to see it in action.

As far as we can tell, [Gelstronic] will still have to break out the ladder to place GRawler and move him between panels. Maybe the next version could be tethered, like Scrobby the solar panel-cleaning robot.

Continue reading “Grawler: Painless Cleaning For Glass Roofs”

AM ultrasonic transmitter and receiver

AM Ultrasonic Transmitter And Receiver

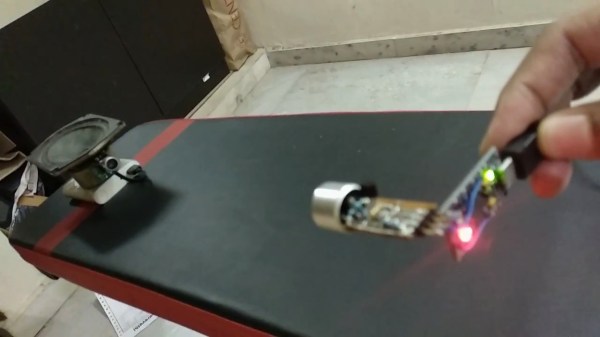
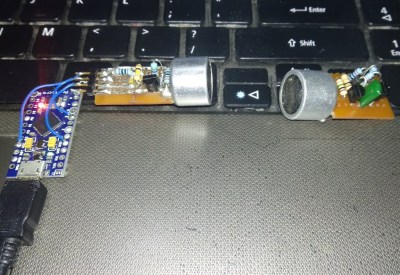
Most often ultrasonic transducers are used for distance measurements, and in the DIY world, usually as a way for robots to detect obstacles. But for a weekend project, [Vinod.S] took the ultrasonic transmitter and receiver from a distance-meter module and used amplitude modulation to send music ultrasonically from his laptop to a speaker, essentially transmitting and receiving silent, modulated sounds waves.

The transmitter and receiver

For the transmitter, he turned an Arduino Pro Micro into a USB sound card which he could plug into his laptop. That outputs both the audio signal and a 40 kHz carrier signal, implemented using the Arduino’s Timer1. Those go to a circuit board he designed which modulates the carrier with the audio signal using a single transistor and then sends the result out the ultrasonic transmitter.

He took care to transmit a clear signal by watching the modulated wave on an oscilloscope, looking for over-modulation and clipping while adjusting the values of resistors located between the transistor, a 5 V from the Arduino and the transmitter.

He designed the receiver side with equal care. Conceptually the circuit there is simple, consisting of the ultrasonic receiver, followed by a transistor amplifier for the modulated wave, then a diode for demodulation, another transistor amplifier, and lastly a class-D amplifier before going to a speaker.

Due to the low 40 kHz carrier frequency, the sound lacks the higher audio frequencies. But as a result of the effort he put into tuning the circuits, the sound is loud and clear. Check out the video below for an overview and to listen to the sound for yourself. Warning: Before there’s a storm of comments, yes the video’s shaky, but we think the quality of the hack more than makes up for it.

Continue reading “AM Ultrasonic Transmitter And Receiver”

Arduino Keyboard Is Gorgeous Inside And Out

While the vast majority of us are content to plod along with the squishy chiclet keyboards on our laptops, or the cheapest USB membrane keyboard we could find on Amazon, there’s a special breed out there who demand something more. To them, nothing beats a good old-fashioned mechanical keyboard, where each key-press sounds like a footfall of Zeus himself. They are truly the “Chad” of the input device world.

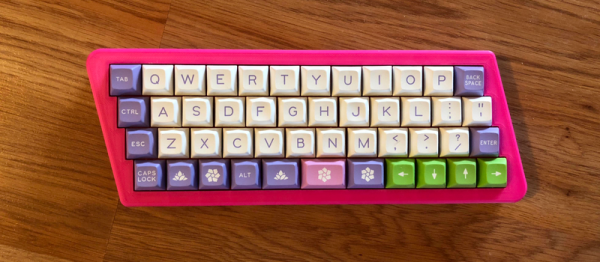
But what if even the most high end of mechanical keyboards doesn’t quench your thirst for spring-loaded perfection? In that case, the only thing left to do is design and build your own. [Matthew Cordier] recently unveiled the custom mechanical keyboard he’s been working on, and to say it’s an elegant piece of engineering is something of an understatement. It may even look better inside than it does on the outside.

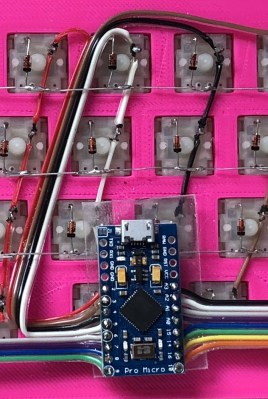
The keyboard, which he is calling z.48, is based around the Arduino Pro Micro running a firmware generated on kbfirmware.com, and features some absolutely fantastic hand-wiring. No PCBs here, just a rainbow assortment of wire and the patience of a Buddhist monk. The particularly attentive reader may notice that [Matthew] used his soldering iron to melt away the insulation on his wires where they meet up with the keys, giving the final wiring job a very clean look.

Speaking of the keys, they are Gateron switches with DSA Hana caps. If none of those words mean anything to you, don’t worry. We’re through the Looking Glass and into the world of the keyboard aficionado now.

Finally, the case itself is printed on a CR-10 with a 0.3 mm nozzle and 0.2 mm layers giving it a very fine finish. At 70% infill, we imagine it’s got a good deal of heft as well. [Matthew] mentions that a production case and a PCB are in the cards for the future as he hopes to do a small commercial run of these boards. In the meantime we can all bask in the glory of what passes for a prototype in his world.

We’ve seen some exceptionally impressive mechanical keyboards over the years, including the occasional oddity like the fully 3D printed one and even one that inexplicably moves around. But this build by [Matthew] has to be one of the most elegant we’ve ever come across.

Hackaday Prize Entry: Unlock Your PC The RFID Way

Sometimes we see projects whose name describes very well what is being achieved, without conveying the extra useful dimension they also deliver. So it is with [Prasanth KS]’s Windows PC Lock/Unlock Using RFID. On the face of it this is a project for unlocking a Windows PC, but when you sit down and read through it you discover a rather useful primer for complete RFID newbies on how to put together an RFID project. Even the target doesn’t do it justice, there is no reason why this couldn’t be used with any other of the popular PC operating systems besides Windows.

The project takes an MRFC-522 RFID module and explains how to interface it to an Arduino. In this case the Arduino in question is an Arduino Pro Micro chosen for its ability to be a USB host. The supplied code behaves as a keyboard, sending the keystroke sequence to the computer required to unlock it. The whole is mounted in what seems to be a 3D printed enclosure, and for ease of use the guts of the RFID tag have been mounted in a ring.

As we said above though, the point of this project stretches beyond a mere PC unlocker. Any straightforward RFID task could use this as a basis, and if USB is not a requirement then it could easily use a more run-of-the-mill Arduino. If you’re an RFID newbie, give it a read.

Plenty of RFID projects have made it here before, such as this door lock. And we’ve had another tag in a ring, too.

Sawed Off Keyboard

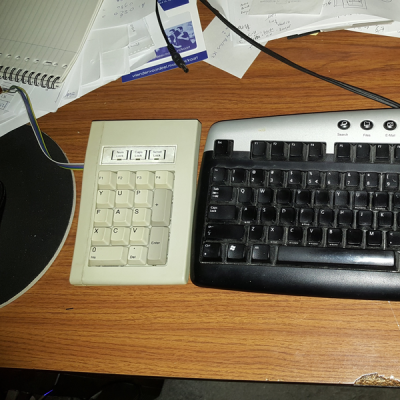
Have you ever had to cut a piece of furniture in two to get it into a new place? Yours truly has, having had to cut the longer part of a sectional sofa in two to get it into a high-rise apartment. That’s what [Charles]’ sawed off keyboard immediately reminded us of. It sounds just as crazy, but brilliant at the same time.

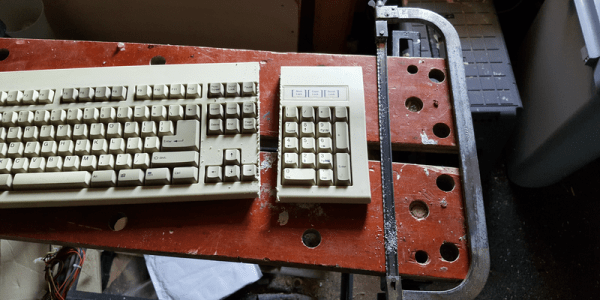
In [Charles]’ case he wanted a keypad whose keys were customizable, and that would make a single keypress do common things like cut, copy and paste, which are normally ctrl-X, ctrl-C and ctrl-V in Windows. To do that he literally sawed off the numeric keypad from a full-sized keyboard. He also sawed off the end to the left of the QWERTY keyboard, and glued it onto the open end of his keypad.

The circuit board was too wide to fit in his new keypad, but he couldn’t stretch out the connections from the keypad’s keys to the board. So he did what any self-respecting hacker would do, he cut the circuit board where there were a manageable number of traces, leaving one part that would fit inside the keypad and another part that he could connect the traces to using a few wires. Lastly, he’d started with a PS/2 keyboard but he wanted USB output and programmability. So he redirected the PS/2 wires to an Arduino compatible Pro Micro and wrote some conversion code which you can find on his GitHub.

What other transformations can we do to keyboards? [Shrodingers_Cat] combined his with some DVD case covers to come up with a pedal board for use with his feet. And given that the keys on the numeric keypad are redundant, [Kipkay] put it to use as a hiding place for valuables instead.

Trackpad with Arduino PS/2-to-USB converter

Raspberry Pi Trackpad From Salvaged Trackpad Plus Arduino

Old laptops are easy to find and many have a trackpad with a PS/2 interface hardwired into the guts of the laptop. [Build It] wanted one of those trackpads for use in the DIY Raspberry Pi laptop he’s working on. But the Raspberry Pi has no PS/2 input, and he read that a PS/2 to USB adapter wouldn’t be reliable enough. His solution? Wire the trackpad to an Arduino and have the Arduino convert the trackpad’s PS/2 to USB.

After removing a few screws, he had the trackpad free of the laptop. Looking up the trackpad’s part number online he found the solder pads for data, clock and five volts. He soldered his own wires to them, as well as to the trackpad’s ground plane, and from there to his Arduino Pro Micro. After installing the Arduino PS/2 mouse and the Mouse and Keyboard libraries he wrote some code (see his Instructables page). The finishing touch was to use generous helpings of hot glue to secure all the wires, as well as the Arduino, to the back to the trackpad. By plugging a USB cable into the Arduino, he now had a trackpad that could plug in anywhere as a USB trackpad. Watch [Build It] put it all together step-by-step in the video below.

Continue reading “Raspberry Pi Trackpad From Salvaged Trackpad Plus Arduino”

Illuminated arcade spinners

Awesome Illuminated Arcade Spinner

[Tinker_on_Steroids] made some awesome looking spinners that not only light up when spun but are a really professional looking build on their own. Before we’d watched his assembly video we were sure he’d just added on to something he’d bought, but it turned out it’s all custom designed and made.

In case you’ve never played the old arcade games, a spinner is an input device for games such as Tempest or Breakout where you rotate a knob in either direction to tell the game which way and how fast to move something. In Tempest you rotate something around the middle of the screen whereas in Breakout you move a paddle back and forth across the bottom of the playing field.

He even detects rotation with a home-made quadrature encoder. For each spinner, he uses two ITR9608 (PDF) optical switches, or opto-interrupters. Each one is U-shaped with an LED in one leg of the U facing a phototransistor in the other leg. When something passes between the two legs, the light is temporarily blocked and the phototransistor detects it i.e. the switch turns off. When the thing moves away, the light is unblocked and it turns on again. The direction of movement is done by having the thing pass between two ITR9608’s, one after the other. The “things” that pass between are the teeth of a 3D printed encoder wheel. Continue reading “Awesome Illuminated Arcade Spinner”