Junkyard RC Conversion Looks Like Mad Max Extra

Over the years we’ve noticed that there is a subset of hackers out there who like to turn real life vehicles into remote controlled cars. These vehicles are generally destroyed in short order, either by taking ridiculous jumps, or just smashing them into stuff until there’s nothing left. In truth that’s probably what most of us would do if we had access to a full size RC car, so no complaints there.

As a rule, the donor vehicles for these conversions are usually older and cheap. That only makes sense, why spend a lot of money on a vehicle you intend on destroying? But even still, the RC conversion [William Foster] has recently completed may take the cake. We don’t know how much of the “antiquing” of his donor vehicle was intentionally done, but on the whole, the thing looks like it got dragged from the bottom of a lake somewhere. Presumably, he got a great deal on it.

The video posted to YouTube is primarily about [William] driving his creation around (sometimes from the back seat, no less), but towards the second half of the video there’s a quick rundown on the hardware used to make this pile of rust move.

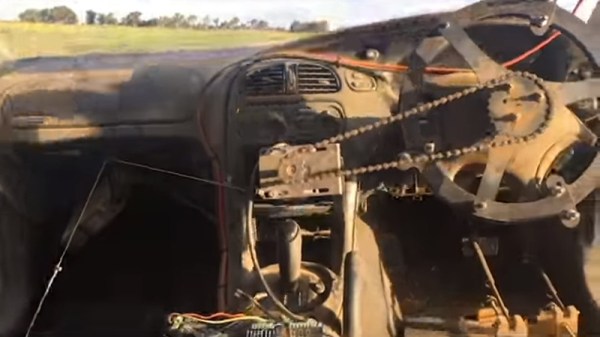
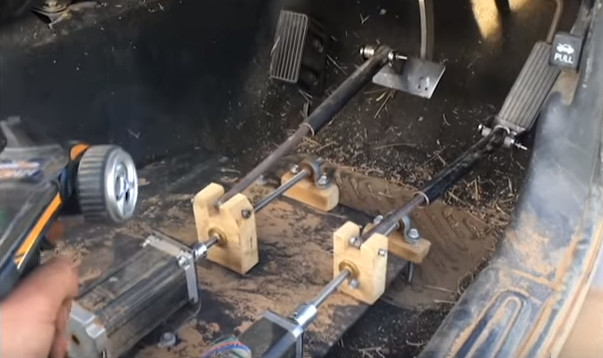
A standard RC transmitter and receiver combination are used to control a pair of Arduinos mounted in the center console, which are in turn hooked up to external stepper drivers. The wheel is turned via a chain and sprocket arrangement, and the pedals are pushed with homebrew contraptions that look like they are made from lead screws intended for 3D printers.

All in all, it appears [William] has cooked up a fairly responsive control system with commodity hardware you could get on Amazon or eBay. Not sure we’d be backseat driving this thing personally, but to each their own.

We recently covered a Jeep that got a similar remote control upgrade, but these super-sized remote controlled vehicle builds are not just limited to the ground either.

Continue reading “Junkyard RC Conversion Looks Like Mad Max Extra”

Gesture Control For Lunch Money

[Dimitris Platis] wanted to add gesture control to his PC. You’d think that would be expensive, but by combining a diminutive Arduino, a breakout board with a gesture controller, and an interconnect PCB, he managed to pull it off for about $7. That doesn’t include the optional 3D-printed case and we think you could omit the interconnect board if you don’t mind some wires and further cut costs. [Dimitris] calls it Nevma, and you can see how the device works in the video below.

The heart of the project is a sensor that measures light and motion. The chip and the breakout board are just a couple of bucks if you order them from China. You can find them in the US if you don’t mind spending a little bit more. The device has an I2C interface, and [Dimitris] uses a tiny Mini SS Micro for the USB interface and the CPU.

Continue reading “Gesture Control For Lunch Money”

Modified Uke Keeps The Beat With A Solenoid

A classic one-man band generally features a stringed instrument or two, a harmonica in a hands-free holder, and some kind of percussion, usually a bass drum worn like a backpack and maybe some cymbals between the knees. The musician might also knock or tap the sound-boards of stringed instruments percussively with their strumming hand, which is something classical and flamenco guitarists can pull off with surprising range.

The musician usually has to manipulate each instrument manually. When it comes to percussion, [JimRD] has another idea: keep the beat by pounding the soundboard with a solenoid. He built a simple Arduino-driven MOSFET circuit to deliver knocks of variable BPM to the sound-board of a ukulele. A 10kΩ pot controls the meter and beat frequency, and the sound is picked up by a mic on the bridge. So far, it does 3/4 and 4/4 time, but [JimRD] has made the code freely available for expansion. Somebody make it do 5/4, because we’d love to hear [JimRD]  play “Take Five“.

He didn’t do this to his good uke, mind you—it’s an old beater that he didn’t mind drilling and gluing. We were a bit skeptical at first, but the resonance sweetens the electromechanical knock of the solenoid slug. That, and [JimRD] has some pretty good chops. Ax your way past the break to give it a listen.

Got a cheap ukulele but don’t know how to play it? If you make flames shoot out from the headstock, that won’t matter as much. No ukes? Just print one.

Continue reading “Modified Uke Keeps The Beat With A Solenoid”

Arduino Saves Game Boy Camera

[Brian Khuu] bought a few Game Boy cameras on the Internet and found that they still had pictures on them from the previous owners. The memory in the camera has a backup battery and if that battery dies, the pictures are history, so he decided to mount a rescue operation.

He knew the protocol for how the Game Boy talked to the companion pocket printer was available, so he used an Arduino and a Web browser to extract the photos. The resulting code is on GitHub if you want to save your pictures. Although [Brian] didn’t have to crack the protocol, he does offer a good explanation of it. There’s even some sniffed displays. The Arduino does all the communications and fools the game into thinking it is the companion printer. However, it simply streams the data out and a Javascript decoder handles the actual decoding. In fact, in the blog post, you can enter data, click a button, and see the resulting Game Boy picture.

It works, but [Brian] did run into a few problems. For one thing, the devices don’t seem to use any flow control so he had no choice but to keep up with the Game Boy. Also, there is a CRC he could not correctly decode. However, the pictures look good — well, as good as Game Boy pictures look, at least. So he did get results.

We’ve seen this done with a PC before. If you are more interested in the reverse, by the way, you can use a real Game Boy printer to print from an Arduino.

Zigbee-Based Wireless Arduinos, Demystified

Hackday regular [Akiba] is working on a series of video tutorials guiding newbies into the world of the 802.15.4 wireless protocol stack — also known as ZigBee. So far, his tutorials include a “getting started with chibiArduino”, his own Arduino-based wireless library, as well as a more basic tutorial on how radio works.

[Akiba] already made a name for himself though a large number of wireless projects, including his Saboten sensor boards, which are ruggedized for long-term environmental monitoring. The Saboten boards use the same wireless stack as his Arduino-compatible wireless development boards, his Freakduino products. The latest version features an ATmega 1284P with 8x the RAM and 4x the flash of the older, 328P-based Freakduinos. It comes in both 900 MHz and 2.4 GHz and there’s also a special 900 Mhz “Long Range” variant. The boards include some great power-saving features, including switchable status LEDs and on-board battery regulation circuity allowing one to run a full year on two AA cells while in sleep mode. They also have a USB stick configuration that is great for Raspberry Pi projects and for running straight from the PC.

For more [Akiba] goodness, check out our colleague [Sophi]’s SuperCon interview with him as well as our coverage of his Puerto Rico lantern project.

Gamify Your Workout With This Wearable Console Controller

‘Tis soon to be the season when resolutions falter and exercise equipment purchased with the best of intentions is cast aside in frustration. But with a little motivation, like making your exercise machine a game console controller, you can maximize your exercise gear investment and get in some guilt-free gaming to boot.

Honestly, there is no better motivation for keeping up with exercise than taking classes, but not many people have the discipline — or the pocketbook — to keep going to the gym for the long haul. With this in mind, [Jason] looked for a way to control PS4  games like Mario Karts or TrackMania with his recumbent bike. In an attempt to avoid modifying the bike, [Jason] decided on a wearable motion sensor for his ankle. Consisting of an Uno, an MPU9250 accelerometer, and a transmitter for the 433-MHz ISM band, the wearable sends signals to a receiver whenever the feet are moving. This simulates pressing the up arrow controller key to set the game into action. Steering and other game actions are handled by a regular controller; we’d love to see this expanded to include strain gauges on the recumbent bike’s handles to allow left-right control by shifting weight in the seat. Talk about immersive gameplay!

While we like the simplicity of [Jason]’s build and the positive reinforcement it provides, it’s far from the first exercise machine hack we’ve seen. From making Google Street View bike-controlled to automatically logging workouts, exercise machines are ripe for the hacking.

Continue reading “Gamify Your Workout With This Wearable Console Controller”

The King Of All Game Genies In An Arduino

While Nintendo is making a killing on nostalgic old consoles, there is a small but dedicated group of hackers still working with the original equipment. Since the original NES was rolled out in the 80s, though, there are a few shortcomings with the technology. Now, though, we have Arduinos, cheap memory, and interesting toolchains. What can we do with this? Absolutely anything we want, like playing modern video games on this antiquated system. [uXe] added dual-port memory to his ancient NES console, opening up the door to using the NES as a sort of video terminal for an Arduino. Of course, this is now also the King of All Game Genies and an interesting weekend project to boot.

Most NES cartridges have two bits of memory, the PRG and CHR ROMs. [uXe] is breaking out the cartridge connector onto an exceptionally wide rainbow ribbon cable, and bringing it into a custom Arduino Mega shield loaded up with two 16K dual-port RAM chips. These RAM chips effectively replace the PRG and CHR ROMs Since these are dual-port RAM chips, they can be written to by the Arduino and read by the NES simultaneously.

The NES sees one port of the RAM and can read and write from it while the Arduino still has access to make changes to the other post while that’s happening. A trick like this opens up a whole world of possibilities, most obviously with tiling and other graphics tricks that can push beyond the console’s original capabilities. [uXe] is currently playing Arduboy games on the NES — a really neat trick to pull off. Well done [uXe]!

Be sure to check out the video below of the NES running some games from the Arduboy system. It seems to integrate seamlessly into the hardware, so if you’ve always had a burning desire to fix crappy graphics on some of your favorite games, or run some special piece of software on an NES, now might just be your time to shine.

Continue reading “The King Of All Game Genies In An Arduino”