Hand Made Manipulator Arm

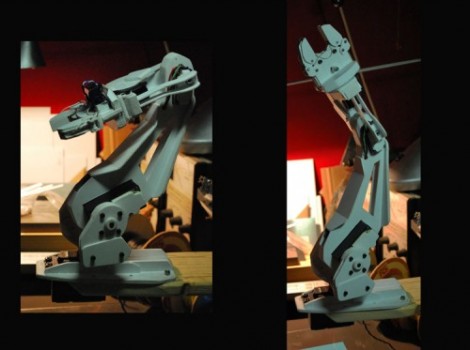
We’re pretty used to seeing CAD used in the design process for most things. It’s a bit of a shocker to come across a project this involve, and this well executed, that didn’t use CAD.

[Anton] spent 100 hours building this manipulator arm by hand. He made the parts by drawing them on styrene and cutting them out with scissors. He has started building version two with AutoCAD but from what we’ve seen in the video after the break, improvements on the original design will be minor. The speed and fluidity of the servos with added magnetic encoders makes for a graceful robotic dance; we’d love to be its chess partner. Continue reading “Hand Made Manipulator Arm”

Report From ESC Silicon Valley 2010

Ah, the heady aroma of damp engineers! It’s raining in Silicon Valley, where the 2010 Embedded Systems Conference is getting off the ground at San Jose’s McEnery Convention Center.

ESC is primarily an industry event. In the past there’s been some lighter fare such as Parallax, Inc. representing the hobbyist market and giant robot giraffes walking the expo. With the economy now turned sour, the show floor lately is just a bit smaller and the focus more businesslike. Still, nestled between components intended to sell by the millions and oscilloscopes costing more than some cars, one can still find a few nifty technology products well within the budget of most Hack a Day readers, along with a few good classic hacks and tech demos…

Continue reading “Report From ESC Silicon Valley 2010”

Robotic Chess Opponent

[youtube=http://www.youtube.com/watch?v=CkGqn5rNzK8]

[Dennis] is using a robotic arm as a chess opponent. Rather than using an under-board movement system, a Lynxmotion AL5A robotic arm plucks each piece and moves it to the next space. He tells us that he’s using a Python script that he created to process the moves and decide what’s next. That must mean he’s using a webcam to capture the location of the pieces on the board. About half way through you can see the robot run into one of the pawns. We’d like to know if he has problems with picking up the pieces as the game progresses and they get further away from the center of each square. From what we can see, looks like a great job!

What Input Device? Just Use Your Arm

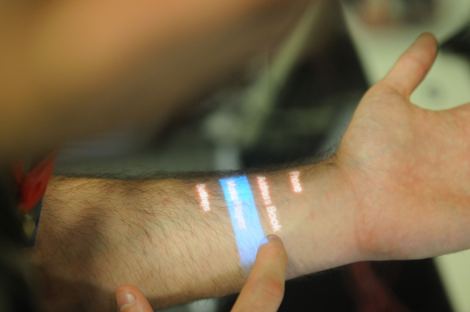
This one could be a game changer. [Chris Harrison] and a team of researchers are showing off a method of using your arm as an input device. An arm band worn by the user picks up acoustic signatures created by tapping on your arm with the other hand, or taping your fingers and thumb together on the same hand. They’re achieving accuracies in the 82-97% range but it gets even better. Take a look at the video after the break and see what they’ve done by adding a pico-projector to the arm band in order to use your arm or hand as a touch display.

We liked seeing the concept mice from October, but the future of input devices might already be attached at the elbow.

Continue reading “What Input Device? Just Use Your Arm”

ARM-based CNC Mill Needs No Computer

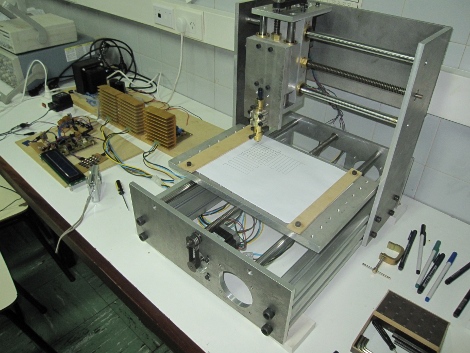
[Fedeortiz12] and his team are nearing completion of their CNC mill (english translation). They set out to build a standalone machine that takes G-code in the RS274/NGC format from an SD card and machines parts accordingly. At the heart of the system is an ARM LPC2148 controller with a character LCD and control pad for operation. The guys have made a teaser video showing the project being tested with a felt-tipped pen. Take a look after the break.

We’d like to see the final product milling PCBs. We’ve always been a little jealous of the PCB milling setup that [imsolidstate] has in his shop.

Continue reading “ARM-based CNC Mill Needs No Computer”

ARM Cortex-M3 Prototyping On A Budget

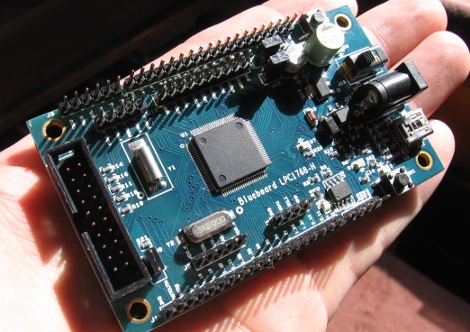
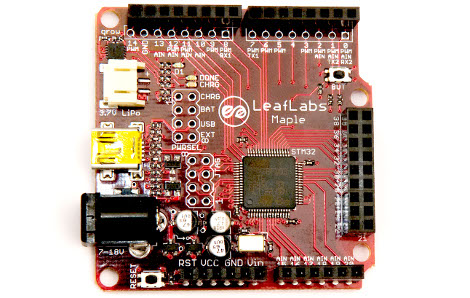
NGX Technologies sent us this Blueboard LPC1768-H to play with. It’s basically a breakout board for an NXP LPC1768 ARM cortex-M3 microcontroller (datasheet). The board adds a few extra goodies, such as a choice of mini-USB connector or barrel-jack to provide regulated power to the chip. There’s also a clock crystal for the internal RTC and an Atmel 256kb EEPROM chip. This chip has 70 I/O ports, accessed through the pin headers on top and bottom of the board. The 20-pin header to the left is for a JTAG programmer (yes, you’ll need a separate programmer). Coming in at only $32.78 this is a very accessible route for projects that require more power than some of the traditional hobby controllers. The shipping seems to have come down since NGX’s last offering, now it would be under $10 to ship to the States.

The LPC1768 is the same controller from the mbed that we reviewed. What’s missing is some of the interface hardware and the boot-loader, but the tradeoff comes with a $66 savings. This is to mbed what an AVR board is to the Arduino, a way to get even closer to the hardware.

There are a few things we think are missing. Most notably, there isn’t a datasheet or user guide for the board itself.  The only information available is a schematic (PDF), but that should be enough for those already well versed in working with microcontrollers. There is also a 12MHz clock crystal on the board but it doesn’t seem to be jumpered in case you wanted to use a different frequency. We’re not sure if this is much of an issue, the internal RC oscillators offer a lot of flexibility including operation up to 100MHz.

We feel this is a solid platform that will help to get more people into ARM development because of its low price. Let us know your thoughts in the comments.

Giving An Old Arm New Life

[Jarek] found a non-functional robotic arm sitting around and wanted to get it working again. By adding a few custom boards to an Arduino he managed to do just that.

The arm is driven by six stepper motors, each having four control wires. To handle all of these [Jarek] used TIP120 transistors to protect the controller. This still leaves the problem of 24 control wires to connect. By using a couple of 74HC4514 demultiplex chips he cut that number down to just 8 Arduino control pins. He completed the project by interfacing an original Playstation controller as the input device.

Source code for the project is available for download but we didn’t see a schematic for his setup. This shouldn’t be a problem as the low parts count should mean the datasheets for the transistors and demultiplexers are all you really need.