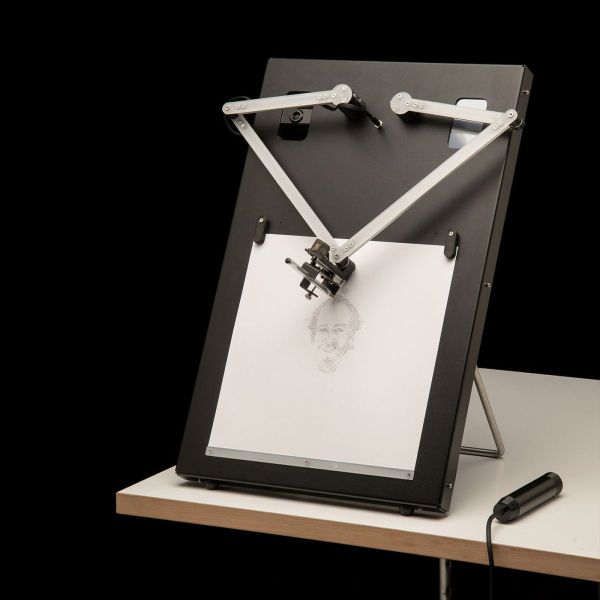
Radio Build Goes Outside The Box

It’s easy to get caught up in a build and forget that the final version usually needs some sort of enclosure, especially things with sensitive electronics in them. The [Director of Legal Evil] at the LVL1 Louisville Hackerspace notes as much in his recent radio build. It seems as though the case was indeed an afterthought, but rather than throwing it in a nondescript black project enclosure it was decided to turn the idea of a project enclosure itself inside-out.

The radio build is based on an SI4732 radio receiver which is a fairly common radio module and is easily adaptable. It needs a microcontroller to run though, so a Maple STM32 platform was chosen to do all of the heavy lifting. The build includes a screen, some custom analog controls, and a small class D audio amplifier, but this is the point it begins to earn its name: the Chaos Radio. While playing around with the project design in CAD, a normal design seemed too bland so one was chosen which makes the radio look like the parts are exploding outward from what would have been a more traditional-style enclosure.

While the project includes a functioning radio receiver, we have to complement the creator for the interesting display style for this particular set of hardware. It can get boring designing the same project enclosures time after time, so anything to shake things up is often welcomed especially when it puts all of the radio components on display like this. In fact, it’s reminiscent of some of [Dmitry]’s projects, an artist known for deconstructing various common household appliances like this CD Player.

Thanks to [Jose] for the tip!

Random Robot Makes Random Art

For the price of a toothbrush and a small motor with an offset weight, a bristlebot is essentially the cheapest robot that can be built. The motor shakes the toothbrush and the bristle pattern allows the robot to move, albeit in a completely random pattern. While this might not seem like a true robot that can interact with its environment in any meaningful way, [scanlime] shows just how versatile this robot – which appears to only move randomly – can actually be used to make art in non-random ways.

Instead of using a single bristlebot for the project, three of them are built into one 3D printed flexible case where each are offset by 120°, and which can hold a pen in the opening in the center. This allows them to have some control on the robot’s direction of movement. From there, custom software attempts to wrangle the randomness of the bristlebot to produce a given image. Of course, as a bristlebot it is easily subjected to the whims of its external environment such as the leveling of the table and even the small force exerted by the power/communications tether.

With some iterations of the design such as modifying the arms and control systems, she has an interesting art-producing robot that is fairly reliable for its inherently random movements. For those who want to give something like this a try, the code for running the robot and CAD files for 3D printing the parts are all available on the project’s GitHub page. If you’re looking for other bristlebot-style robots that do more than wander around a desktop, be sure to take a look at this line-following bristlebot too.

Thanks to [johnowhitaker] for the tip!

Continue reading “Random Robot Makes Random Art”

Artwork Spans Fifty Years Of Display Technology

Swiss artist and designer [Jürg Lehni] was commissioned to create an artwork called Four Transitions which has been installed in the HeK (House of electronics Arts) in Basel. This piece visually depicts the changes in technologies used by public information displays, such as those in airports and train stations. As the title of the installation suggests, four different technologies are represented:

  • Flip-Dot, early 1960s, 15 each 7 x 7 modules arrayed into a 21 x 35 pixel panel
  • LCD, 1970s and 1980s, two each 36 x 52 modules arrayed into 52 x 76 pixel panel
  • LED, 2000s, six each 16 x 16 RGB modules arrayed into a 32 x 48 pixel panel
  • TFT, current, one 24 inch module, 1200 x 1920 pixel panel

The final work is quite striking, but equally interesting is the summary of the the design and construction process that [Jürg] provides on Twitter. We hope he expands this into a future, more detailed writeup — if only to learn about reverse engineering the 20 year old LCD controller whose designer was in retirement. His tweets also gives us a tantalizing glimpse into the software, controllers, and interconnections used to drive all these displays. There is quite a lot of interesting engineering going on in the background, and we look forward to future documentation from [Jürg].

You may recognize [Jürg] as the creator of Hektor, a graffiti output device from 2002 which we’ve referenced over the years in Hackaday. Check out the short video below of the displays in operation, and be sure to unmute the volume so you can listen to the satisfying sound of 735 flip-dots changing state. [Jürg] also gives in interview about the project in the second video below. Thanks to [Niklas Roy] for sending in the tip about this most interesting exhibition.

Continue reading “Artwork Spans Fifty Years Of Display Technology”

Faux Stained Glass Effect, With 3D Printing And Epoxy

Like the looks of stained glass, but not the amount of work, skill, and materials involved? Well, [Northern Geometry] shows how to sidestep all that nonsense and use a 3D printed frame, epoxy, and some alcohol-based inks to create a pretty good fake stained-glass effect piece of art.

A smooth polypropylene board is the key to a glassy smooth back.

[Northern Geometry] has played with this idea before, but shares some refinements and tips on getting the best results. One suggestion is to begin by securely taping the 3D printed frame to a smooth polypropylene board as a backer. Giving the cured resin a smooth surface is important to get the right look, and since resin will not bond to the polypropylene, it can be used as a backer to get that done.

Once the frame is mounted, pour a small amount of epoxy into each cavity and ensure it gets into every corner, then let it cure. The thin bottom layer of resin will seal things as well as create a glassy-smooth backing that is the perfect foundation for finishing the piece with colored resin as needed.

Once that is done, and everything has had plenty of time to cure fully, just pop the piece off the board. Check it out in the video embedded below, where [Northern Geometry] shows the process from start to finish.

Continue reading “Faux Stained Glass Effect, With 3D Printing And Epoxy”

Antique Map Of Paris With Modern Tech

There’s plenty to love about antiques, from cars, furniture, to art. While it might be a little bit of survivorship bias, it’s easy to appreciate these older things for superior quality materials, craftsmanship, or even simplicity. They are missing out on all of our modern technology, though, so performing “restomods” on classics is a popular activity nowadays. This antique map of Paris, for example, is made of a beautiful hardwood but has been enhanced by some modern amenities as well.

At first the creator of this project, [Marc], just wanted to give it some ambient lighting, but it eventually progressed over the course of two years to have a series of Neopixels hidden behind it that illuminate according to the current sun and moon positions. The Neopixels get their instructions from an ESP8266 which calculates these positions using code [Marc] wrote himself based on the current date. Due to the limitations of the ESP8266 it’s not particularly precise, but it gets the job done to great effect.

To improve on the accuracy, [Marc] notes that an ESP32 could be used instead, but we can give the ESP8266 a pass for now since the whole project is an excellent art installation even if it is slightly off on its calculations. If you need higher accuracy for tracking celestial objects, you can always grab a Raspberry Pi too.

Liquid Lite Brite Robot

Liquid handling workstations are commonly used in drug development, and look like small CNC machines with droppers on the ends which can dispense liquid into any container in a grid array. They are also extraordinarily expensive, as is most specialty medical research equipment. This liquid handling workstation doesn’t create novel drugs, though, it creates art, and performs similar functions to its professional counterparts at a much lower cost in exchange for a lot of calibration and math.

The art is created by pumping a small amount of CMYK-colored liquids into a 24×16 grid, with each space in the grid able to hold a small amount of the colored liquid. The result looks similar to a Lite-Brite using liquids instead of small pieces of plastic. The creator [Zach Frew] created the robot essentially from scratch using an array of 3D printers, waterjets, and CNC machines. He was able to use less expensive parts, compared to medical-grade equipment, by using servo-controlled valves and peristaltic pumps, but makes up for their inaccuracies with some detailed math and calibration.

The results of the project are striking, especially when considering that a lot of hurdles needed to be cleared to get this kind of quality, including some physical limitations on the way that the liquids behave in the first place. It’s worth checking out not just for the art but for the amount of detail involved as well. And, for those still looking to scratch the 90s nostalgia itch, there are plenty of other projects using the Lite Brite as inspiration.

Thanks to [Thane Hunt] for the tip!

Dynamic Map Of Italy On A PCB

While most PCBs stick to tried-and-true methods of passing electrons through their layers of carefully-etched copper, modern construction methods allow for a large degree of customization of most aspects of these boards. From solder mask to number of layers, and even the shape of the board itself, everything is open for artistic license and experimentation now. [Luca] shows off some of these features with his PCB which acts as a live map of Italy.

The PCB is cut out in the shape of the famous boot, with an LED strategically placed in each of 20 regions in the country. This turns the PCB into a map with the RGB LEDs having the ability to be programmed to show any data that one might want. It’s powered by a Wemos D1 Mini (based on an ESP8266) which makes programming it straightforward. [Luca] has some sample programs which fetch live data from various sources, with it currently gathering daily COVID infection rates reported for each of the 20 regions.

The ability to turn a seemingly boring way to easily attach electronic parts together into a work of art without needing too much specialized equipment is a fantastic development in PCBs. We’ve seen them turned into full-color art installations with all the mask colors available, too, so the possibilities for interesting-looking (as well as interesting-behaving) circuits are really opening up.

Continue reading “Dynamic Map Of Italy On A PCB”