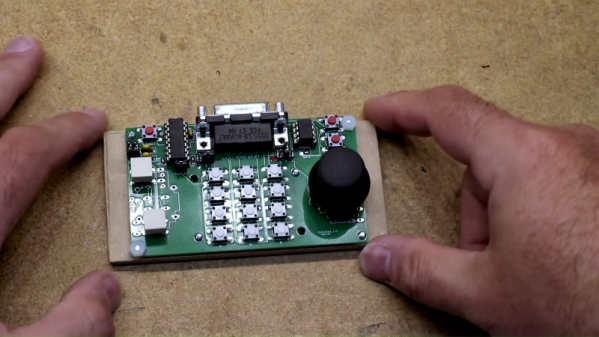
Thumbs Up For This Custom Atari 5200 Controller

It may be nearly 40 years old, but the Atari 5200 still inspires legions of fans to relive the 8-bit glory days of their youth. There was much to love about the game console, but the joystick-and-keypad controllers were not among its many charms. The joystick didn’t auto-center, the buttons were mushy, and the ergonomics were nonexistent.

Retro-aficionados need not suffer in silence, though, thanks to this replacement controller for the Atari 5200. [Scott Baker] didn’t want to settle for one of the commercial replacements or, horrors, an adapter for the old PC-style joystick, so he rolled his own. Working from the original Atari schematics, [Scott] devised a plan for using a readily available thumbstick controller as the basis for his build. The essential problem was how to adapt the 10k pots on the new joystick to work in an environment expecting 500k pots, which he solved using an analog to digital and back to analog approach. The ADCs on an ATtiny85 convert each joystick pot’s voltage to a digital value between 0 and 255, which is sent to a 100K digital potentiometer. A little fiddling with RC constants brings it back in line with what the console expects. The thumbstick and buttons live on a custom PCB – kudos to [Scott] for designing an ambidextrous board. The video below shows the design and the finished product in action.

[Scott] is on a bit of a 5200 kick these days; he just finished up a Raspberry Pi multi-cartridge for the venerable console. His controller should make retro-gameplay on the console a little easier on the hands.

Continue reading “Thumbs Up For This Custom Atari 5200 Controller”

Custom ATTiny85 Board Powers Kids’ Light Show

We’ve often said that kids with hackers and makers for parents must be some of the luckiest kids in the world. While all the other children have to settle for some mass produced drivel from Toys“R”Us Amazon, they’ve got some of the most thoughtfully engineered and built toys and gadgets on the planet. After all, there’s no way any hacker worth their salt is going to give anything less than 110% for their own child.

A case in point is this RGB star nightlight that [Unexpected Maker] built for his children. The star itself is simple enough, just a basic shape printed in transparent PLA on his Prusa i3. The impressive part is how he lights it up. Rather than stick an Arduino or ESP8266 in there as we have seen plenty of times before, he’s put together his own custom ATTiny85 board specifically for controlling the RGB LED strips.

The board, which he calls TinyDev, is designed to be the same thickness as NeoPixel style LED strips so it can fit inside tight spaces. He solders it onto the tail end of his LED strip, adds a photoresistor so the star can tell when it’s time to light up, and then snakes the whole arrangement through a channel printed in the star itself. There’s a battery pack in the middle, but that’s about it. It really does allow for a remarkably clean LED strip implementation, and the mind can’t help but start thinking of interesting possibilities when you can tuck the controller into the same space as the lights themselves.

[Unexpected Maker] has made the TinyDev completely open source for anyone who wants to build their own, but it’s also available on Tindie if you want to get one to play with quickly. If you’re looking to light up the little one’s room with somewhat more mainstream methods, we’ve got that covered too.

Continue reading “Custom ATTiny85 Board Powers Kids’ Light Show”

Simple RC To USB Interface

With the radio control hobby arguably larger now than it ever has been in the past, there’s a growing demand for high-fidelity PC simulators. Whether you want to be able to “fly” when it’s raining out or you just want to practice your moves before taking that expensive quadcopter up for real, a good simulator on your computer is the next best thing. But the simulator won’t do you much good if it doesn’t feel the same; you really need to hook your normal RC transmitter up to the computer for the best experience.

[Patricio] writes in to share with us his simple hack for interfacing his RC hardware to his computer over USB. Rather than plugging the transmitter into the computer, his approach allows the receiver to mimic a USB joystick. Not only is this more convenient since you can use the simulator without wires, but it will make sure that the minutiae of your radio hardware (such as response lag) is represented in the simulation.

The setup is actually very simple. [Patricio] used the ATtiny85 based Digispark development board because it’s what he had on hand, but the principle would be the same on other microcontrollers. Simply connect the various channels from the RC receiver to the digital input pins. RC receivers are 5 VDC and draw very little current, so it’s even possible to power the whole arrangement from the USB port.

On the software side, the Arduino sketch does about what you expect. It loops through listening for PWM signals on the input pins, and maps that to USB joystick position information. The current code only supports three channels for a simple airplane setup (X and Y for joystick, plus throttle), but it should be easy enough to follow along and add more channels if you needed them for more complex aircraft.

For more information on the intricacies of RC transmitter and receiver interaction, check out this fascinating research on receiver latency.

Energy Harvesting Design Doesn’t Need Sleep

Every scrap of power is precious when it comes to power harvesting, and working with such designs usually means getting cozy with a microcontroller’s low-power tricks and sleep modes. But in the case of the Ultra Low Power Energy Harvester design by [bobricius], the attached microcontroller doesn’t need to worry about managing power at all — as long as it can finish its job fast enough.

The idea is to use solar energy to fill a capacitor, then turn on the microcontroller and let it run normally until the power runs out. As a result, a microcontroller may only have a runtime in the range of dozens of microseconds, but that’s just fine if it’s enough time to, for example, read a sensor and transmit a packet. In early tests, [bobricius] was able to reliably transmit a 16-bit value wirelessly every 30 minutes using a small array of photodiodes as the power supply. That’s the other interesting thing; [bobricius] uses an array of BPW34 photodiodes to gather solar power. The datasheet describes them as silicon photodiodes, but they can be effectively used as tiny plastic-enclosed solar cells. They are readily available and can be arranged in a variety of configurations, while also being fairly durable.

Charging a capacitor then running a load for a short amount of time is one of the simplest ways to manage solar energy, and it requires no unusual components or fancy charge controllers. As long as the load doesn’t mind a short runtime, it can be an effective way to turn even indoor light into a figuratively free power source.

Minimum Viable 1-D PONG

What makes a game a game? Like, how do we know that we’re looking at a variation of PONG when confronted with one? And how do we know how to play it? [Bertho] sought to answer this question as he designed what is probably the smallest-ever 1-D PONG game. His answer involves charlieplexing LEDs, using a voltage divider to save I/O pins, and a couple of AAAs that should last for a long, long time.

[Bertho]’s Minimum 1-D PONG, or m1dp for short, puts an ATTiny85 through its paces as gameplay quickly progresses from ‘I got this’ to ‘no one could possibly keep this up’. This state machine sleeps until one of the two buttons is pressed, at which time a wait animation starts. The action begins with the next button press.

Game play across only five LEDs makes for some pretty intense action, too. Fortunately, the buzzer is a big part of the experience. It sounds one tone for each LED when the ball is in play, and a different tone to confirm button presses. [Bertho] saved so many I/O pins with charlieplexing that he added a green LED that lights up when it’s OK to return the ball. If we were playing, we’d keep our eye on this LED instead of trying to watch the ball. We’re serving the demo after the break point, so don’t let it get past you.

For a study in minimalism, there sure is a lot going on here with all the different tones and animations. If you’d prefer maximalist 1-D PONG, there’s always LED strips. If dungeon crawlers with satisfying hardware are more your thing, you really need to check out Twang.

Continue reading “Minimum Viable 1-D PONG”

Tiny Sideways Tetris On A Business Card

Everyone recognizes Tetris, even when it’s tiny Tetris played sideways on a business card. [Michael Teeuw] designed these PCBs and they sport small OLED screens to display contact info. The Tetris game is actually a hidden easter egg; a long press on one of the buttons starts it up.

It turns out that getting a playable Tetris onto the ATtiny85 microcontroller was a challenge. Drawing lines and shapes is easy with resources like TinyOLED or Adafruit’s SSD1306 library, but to draw those realtime graphics onto the 128×32 OLED using that method requires a buffer size that wouldn’t fit the ATtiny85’s available RAM.

To solve this problem, [Michael] avoids the need for a screen buffer by calculating the data to be written to the OLED on the fly. In addition, the fact that the smallest possible element is a 4×4 pixel square reduces the overall memory needed to track the screen contents. As a result, the usual required chunk of memory to use as a screen buffer is avoided. [Michael] also detailed the PCB design and board assembly phases for those of you interested in the process of putting together the cards using a combination of hot air reflow and hand soldering.

PCB business cards showcase all kinds of cleverness. The Magic 8-Ball Business Card is refreshingly concise, and the project that became the Arduboy had milled cutouts to better fit components, keeping everything super slim.

Stylish Business Card With A Stylophone Built In

If you’re in the electronics business, PCB business cards seem like a natural fit. They may be impractical and expensive, but they can really set you apart from that boring paper card from Vistaprint crowd. But they need to make sense for what you do, so for a musician and MIDI pro, this MIDI-controller stylophone business card is a real eye- and ear-catcher.

This business card is an idea that [Mitxela] has been kicking around for a while, and he even built a prototype a couple of years ago. The homebrew card, made using the spray paint, laser etching, and ferric chloride method, worked well enough as a proof of concept, but it was a little rough around the edges and needed the professional touch of a PCB fabricator. We’ve got to say that the finished cards are pretty darn sexy, with the black resist contrasting nicely against the gold-immersion pads. He selected a 1-mm thick board and made the USB connector as a separate small board; snapped off of the main board and reflowed back on, it builds up the edge connector to the proper thickness. The parts count is low — just an ATtiny85 and a resistor ladder to encode each key, with a simple jumper used as the stylus. The device itself is just a MIDI controller and makes no music on its own, but we still think this is a pretty creative way to hang out a shingle.

[Mitxela] has quite a few interesting builds, and is no stranger to our pages. Check out his recent servo-plucked MIDI music box, or these amazing miniature LED earrings.

Continue reading “Stylish Business Card With A Stylophone Built In”