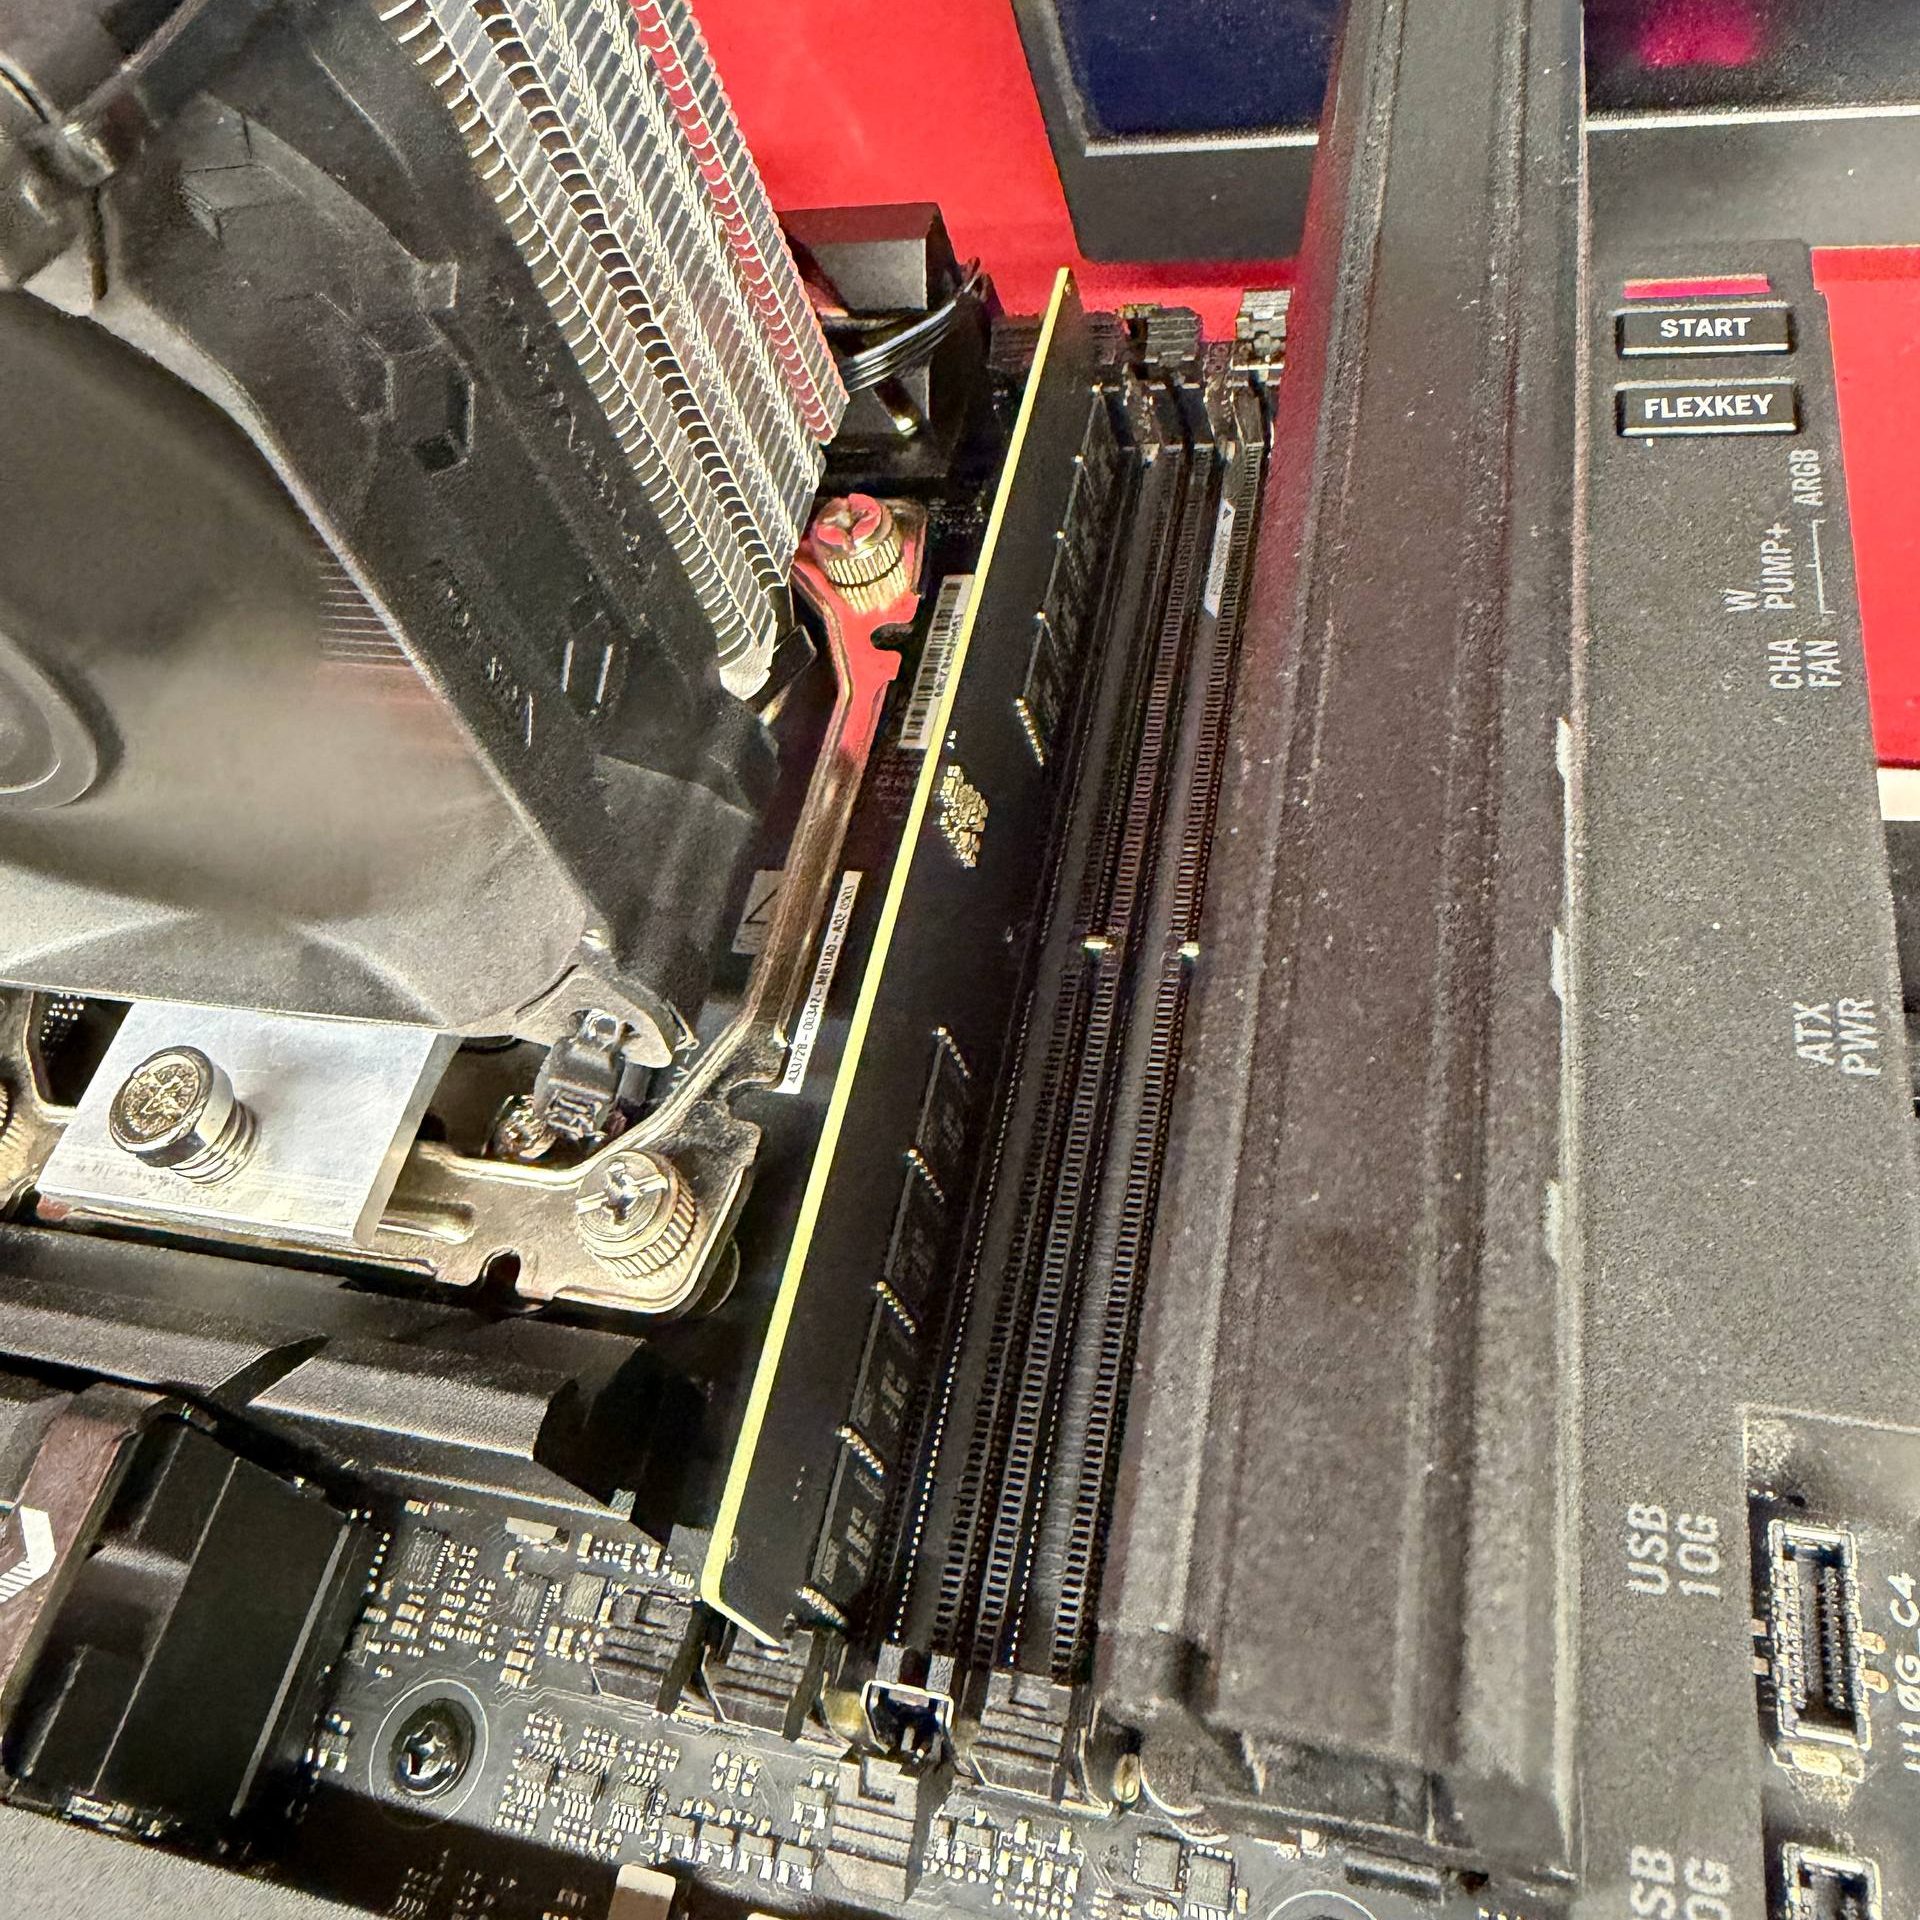
When you can buy something at a low price in one location, and sell it at a higher price somewhere else, you’re engaged in what economists call “arbitrage”. We’re not sure if desoldering DDR5 chips from laptop SO-DIMMs to populate a custom PCB to create much-more-expensive desktop memory counts as arbitrage, but it certainly counts as a hack. [VIK-on], who built the cards, claims he’s getting DDR5 performance at almost DDR3 prices. Nice!
Installed, the RAM apparently works well, though [VIK-on] has not shared benchmarks.Specifically, he’s put together a 32 GB UDIMM from donor chips from two 16 GB SO-DIMMs. The memory chips themselves aren’t enough to make a stick of RAM, however: the part where we wish we had more details was in the firmware. The firmware identifies this DIY DIMM as an ADATA AX5U6500C3232G-DCLARWH, specifically. [VIK-on] is still performing stability tests, if those go well, we’re told to expect a how-to guide.
[VIK-on] is in Russia, so SO-DIMM rates may differ in your local market, but he claims walkaway costs of 17,015 ₽ — about $218 or €188, an astounding price for DDR5 in these dark days.
Some say soldering SIMMs seems severe, but hardly strange to Hackaday, and desperate times call for desperate measures. It’s ether that or optimize software, and who wants go to that effort?
Upgrading RAM on most computers is often quite a straightforward task: look up the supported modules, purchase them, push a couple of levers, remove the old, and install the new. However, this project submitted by [Mads Chr. Olesen] is anything but a simple.
In this project, he sets out to double the RAM on a Olimex A20-OLinuXino-LIME2 single-board computer. The Lime2 came with 1 GB of RAM soldered to the board, but he knew the A20 processor could support more and wondered if simply swapping RAM chips could double the capacity. He documents the process of selecting the candidate RAM chip for the swap and walks us through how U-Boot determines the amount of memory present in the system.
While your desktop likely has RAM on removable sticks, the RAM here is soldered to the board. Swapping the chip required learning a new skill: BGA soldering, a non-trivial technique to master. Initially, the soldering didn’t go as planned, requiring extra steps to resolve issues. After reworking the soldering, he successfully installed both new chips. The moment of truth arrived—he booted up the LIME2, and it worked! He now owns the only LIME2 with 2 GB of RAM.
Modern gaming laptops are in an uncomfortable spot – often too underpowered for newest titles, but too bulky to be genuinely portable. It doesn’t help they’re not often upgradeable, so you’re stuck with what you’ve bought – unless, say, you’re a hacker equipped some tools for PCB reflow? If that’s the case, welcome to [TechModLab]’s video showing you the process of upgrading a laptop’s soldered-on NVIDIA GPU, replacing the 3070 chip with a 3080.
You don’t need much – the most exotic tool is a BGA rework station, holding the mainboard steady&stiff and heating a specific large chip on the board with an infrared lamp from above. This one is definitely a specialty tool, but we’ve seen hackers build their own. From there, some general soldering tools like flux and solder wick, a stencil for your chip, BGA balls, and a $20 USB-C hotplate are instrumental for reballing chips – tools you ought to have.
Reballing was perhaps the hardest step of the journey – instrumental for preparing the GPU before the transplant. Afterwards, only a few steps were needed – poking a BGA ball that didn’t connect, changing board straps to adjust for the new VRAM our enterprising hacker added alongside the upgrade, and playing with the driver process install a little. Use this method to upgrade from a lower-end binned GPU you’re stuck with, or perhaps to repair your laptop if artifacts start appearing – it’s a worthwhile reminder about methods that laptop repair shops use on the daily.
Itching to learn more about BGAs? You absolutely should read this article series by our own [Robin Kearey]. We’ve mostly seen reballing used for upgrading RAM on laptop and RaspberryPi boards, but seeing it being used for an entire laptop is nice – it’s the same technique, just scaled up, and you always can start by practicing at a smaller scale. Now, it might feel like we’ve left the era of upgradable GPUs on laptops, and today’s project might not necessarily help your worries – but the Framework 16 definitely bucks the trend.
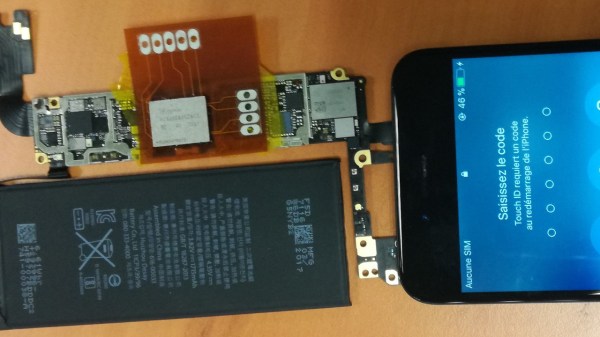
Psst! Hey kid! Want to reverse-engineer some iPhones? Well, did you know that modern iPhones use PCIe, and specifically, NVMe for their storage chips? And if so, have you ever wondered about sniffing those communications? Wonder no more, as this research team shows us how they tapped them with a flexible printed circuit (FPC) BGA interposer on an iPhone 6S, the first iPhone to use NVMe-based storage.
The research was done by [Mohamed Amine Khelif], [Jordane Lorandel], and [Olivier Romain], and it shows us all the nitty-gritty of getting at the NVMe chip — provided you’re comfortable with BGA soldering and perhaps got an X-ray machine handy to check for mistakes. As research progressed, they’ve successfully removed the memory chip dealing with underfill and BGA soldering nuances, and added an 1:1 interposer FR4 board for the first test, that proved to be successful. Then, they made an FPC interposer that also taps into the signal and data pins, soldered the flash chip on top of it, successfully booted the iPhone 6S, and scoped the data lines for us to see.
This is looking like the beginnings of a fun platform for iOS or iPhone hardware reverse-engineering, and we’re waiting for further results with bated breath! This team of researchers in particular is prolific, having already been poking at things like MITM attacks on I2C and PCIe, as well as IoT device and smartphone security research. We haven’t seen any Eagle CAD files for the interposers published, but thankfully, most of the know-how is about the soldering technique, and the paper describes plenty. Want to learn more about these chips? We’ve covered a different hacker taking a stab at reusing them before. Or perhaps, would you like to know NVMe in more depth? If so, we’ve got just the article for you.
In our previous article on Ball Grid Arrays (BGAs), we explored how to design circuit boards and how to route the signals coming out of a BGA package. But designing a board is one thing – soldering those chips onto the board is quite another. If you’ve got some experience with SMD soldering, you’ll find that any SOIC, TQFP or even QFN package can be soldered with a fine-tipped iron and a bit of practice. Not so for BGAs: we’ll need to bring out some specialized tools to solder them correctly. Today, we’ll explore how to get those chips on our board, and how to take them off again, without spending a fortune on equipment.
Tools of the Trade
For large-scale production, whether for BGA-based designs or any other kind of SMD work, reflow ovens are the tool of choice. While you can buy reflow ovens small enough to place in your workshop (or even build them yourself), they will always take up quite a bit of space. Reflow ovens are great for small-scale series production, but not so much for repairs or rework. Continue reading “Working With BGAs: Soldering, Reballing, And Rework”→
The Raspberry Pi shortage has been a meme in hacker circles for what feels like an eternity now, and the Pi 4 seems to be most affected – though, maybe it’s just its popularity. Nevertheless, if you’re looking for a Pi 4, you would need to look far and wide – and things are way worse if you need the 8 GB version specifically. Or so we thought – [MadEDoctor] shows us that refreshing online store pages isn’t the only way, having successfully upgraded the RAM chip on the Pi 4 from 1 GB to 8 GB with help of a hot air gun.
These chips are BGA, and those might feel intimidating if you’re just starting out with hot air – however, we recommend you watch this video, as [MadEDoctor]’s approach is of the kind that brings BGA replacement to hobbyist level. First off, you get a compatible RAM chip somewhere like Aliexpress – lucky for us, those come equipped with a set of balls from the factory. The default balls are made of lead-free solder, and [MadEDoctor] reballed the RAM chip with leaded solder balls to lower the melting point, but it’s by no means a requirement that you do the same.
In fact, you only need a hot air gun, flux, a soldering iron and some solder wick to perform the replacement – no reballing equipment. Put some kapton or metal tape on the board for heat shielding, get the old chip off with hot air, use an iron with wick to clean the pads, add some flux, align the chip, then use hot air to solder a new chip onto the board. Replacing this chip can get your Pi 4 to the highly-sought-after 8 GB target – as an aside, we’re surprised that there was no configuration needed, as the Pi 4 booted right up and successfully recognized the extra RAM added.
We’d personally recommend preheating for such an upgrade – that said, this sure went without a hitch, and such a RAM swap method doesn’t require any stencils, solder paste or solder ball applications. Drop by the video description for compatible RAM chip part numbers, make sure you have your tacky flux and solder wick in order, and let [MadEDoctor] walk you through upgrading your Pi 4 the hacker way. Is this hack to your liking? Take it up a notch with this laptop soldered-in RAM upgrade journey, or that one RAM upgrade for an old GPU to comply to Apple’s whims.
We’re all used to swapping RAM in our desktops and laptops. What about a GPU, though? [dosdude1] teaches us that soldered-on RAM is merely a frontier to be conquered. Of course, there’s gotta be a good reason to undertake such an effort – in his case, he couldn’t find the specific type of Nvidia GT640 that could be flashed with an Apple BIOS to have his Xserve machine output the Apple boot screen properly. All he could find were 1GB versions, and the Apple BIOS could only be flashed onto a 2GB version. Getting 2GB worth of DDR chips on Aliexpress was way too tempting!
The video goes through the entire replacement process, to the point where you could repeat it yourself — as long as you have access to a preheater, which is a must for reworking relatively large PCBs, as well as a set of regular tools for replacing BGA chips. In the end, the card booted up, and, flashed with a new BIOS, successfully displayed the Apple bootup logo that would normally be missing without the special Apple VBIOS sauce. If you ever want to try such a repair, now you have one less excuse — and, with the GT640 being a relatively old card, you don’t even risk all that much!