A Game Of Snake On A LEGO Mechanical Computer

Really, [OzzieGerff] had us at “LEGO.” But then he took it to another place entirely and built a completely mechanical, nearly 100% LEGO version of Snake. And it’s just as cool as it sounds.

Mind you, it’s a little hard to grok how this whole contraption works, which has been in the works for a while, but we’ll try to summarize as best we can. The most important aspect of this build is that there are no electronics at all — everything is done with mechanical linkages, with some Technics pneumatic components and a couple of electric motors to provide the oomph. The three main components are the input section, which consists of a two-axis joystick, a tail buffer, which keeps track of the length of the snake’s tail as gameplay progresses, and the largest component, the 16×16 display.

The joystick translates user inputs into pneumatic signals which pass through a mechanical filtering unit that prevents the head of the snake from doubling back on itself. The filtered inputs then pass into the screen reader, a complex device that probes the status of a given pixel on the display and determines the status of the snake’s head. If it touches a snake pixel, the game’s over. Hitting a blank pixel moves the head of the snake by one and takes one pixel off the end, while a food pixel extends the snake’s length.

Keeping track of the length of the snake is the job of the buffer, which uses Technics tank tracks and levers. Setting a one is done by flipping the lever to one side as it passes under the write head; a read head further down the track senses which way the lever is flipped and translates it into a pneumatic signal. The buffer has four channels, one for each possible direction the snake’s head could be moving. The signals drive a screen writer, which moves a pyramidal follower across a series of push-rods that flip the corresponding pixel on the display to show the proper icon. Simplicity itself? No, but the video below will make things a lot clearer.

It doesn’t look like [Ozzie] is quite done with this game, as he doesn’t show any actual gameplay yet. We’d love to see and hear that — we suspect it’ll make quite a racket. We’ll be keeping an eye out for this one, but while we wait, check out this rope braiding machine or watch Lego break steel.

Continue reading “A Game Of Snake On A LEGO Mechanical Computer”

This Open Source Active Probe Won’t Break The Bank

If you’re like us, the oscilloscope on your bench is nothing special. The lower end of the market is filled with cheap but capable scopes that get the job done, as long as the job doesn’t get too far up the spectrum. That’s where fancier scopes with active probes might be required, and such things are budget-busters for mere mortals.

Then again, something like this open source 2 GHz active probe might be able to change the dynamics a bit. It comes to us from [James Wilson], who began tinkering with the design back in 2022. That’s when he learned about the chip at the center of this build: the BUF802. It’s a wide-bandwidth, high-input-impedance JFET buffer that seemed perfect for the job, and designed a high-impedance, low-capacitance probe covering DC to 2 GHz probe with 10:1 attenuation around it.

[James]’ blog post on the design and build reads like a lesson in high-frequency design. The specifics are a little above our pay grade, but the overall design uses both the BUF802 and an OPA140 precision op-amp. The low-offset op-amp buffers DC and lower frequencies, leaving higher frequencies to the BUF802. A lot of care was put into the four-layer PCB design, as well as ample use of simulation to make sure everything would work. Particularly interesting was the use of openEMS to tweak the width of the output trace to hit the desired 50 ohm impedance.

Exploring The Anatomy Of A Linux Kernel Exploit

A lot of talk and discussion happens anytime a hardware manufacturer releases a new line of faster, more powerful, or more efficient computers. It’s easy to see better and better specifications and assume that’s where all the progress is made. But without improved software and algorithms, often the full potential of the hardware can’t be realized. That’s the reason for the creation of io_uring, an improved system call interface in the Linux kernel. It’s also where [chompie] went to look for exploits.

The reason for looking here, in a part of the kernel [chompie] had only recently learned about, was twofold. First, because it’s a place where user space applications interact with the kernel, and second because it’s relatively new and that means more opportunities to find bugs. The exploit involves taking advantage of a complicated asynchronous buffer system, specifically at a location where the code confuses a memory location being used by the kernel with one which is supposed to be used for user space.

To actually get this to work as an exploit, though, a much more involved process is needed to make sure the manipulation of these memory addresses results in something actually useful, but it is eventually used to gain local privilege escalation. More about it can be found in this bug report as well. Thanks to the fact that Linux is open-source, this bug can quickly be fixed and the patch rolled out to prevent malicious attackers from exploiting it. Open-source software has plenty of other benefits besides being inherently more secure, though.

MiniDisc Player Supports Full Data Transfer

Between the era of the CD and the eventual rise and domination of streaming music platforms, there was a limbo period of random MP3 players mixed in with the ubiquitous (and now officially discontinued) iPod. In certain areas, though, the digital music player of choice was the MiniDisc, a miniature re-writable CD player with some extra digital features. Among them was the ability to transfer music to the discs over USB, but they did not feature the ability to transfer the songs back to a computer. At least until now, thanks to this impressive hack from [asivery].

Although it sounds straightforward, this trick has a lot of moving parts that needed to come together just right. The MiniDisc player uses a proprietary encoding format called ATRAC, so a codec is needed for that. The MiniDisc player stores data from the disc in a 40-second buffer when playing, so the code reads the data directly from DRAM in 40-second chunks, moves the read head, repeats the process as needed, then stitches the 40-second parts back together. It can work on any Sony NetMD portable, if you are lucky enough to still have one around.

The project is a tremendous asset to the MiniDisc community, especially since the only way to recover data from a MiniDisc player prior to this was to use a specific version known as the RH-1. As [asivery] reports, used RH-1 players are going for incredibly high prices partially because of this feature. Since this new method demonstrates that it’s possible to do with other devices, perhaps its reign in the MiniDisc world will come to a close. For those still outside the loop on this esoteric piece of technology, take a look at this MiniDisc teardown.

Thanks to [Maarten] for the tip!

Active Strain Relief For 3D-Printer Filament

Buying 3D-printer filament is little like eating potato chips: you can’t stop at just one. You start with basic black PLA, then you need a particular color for a special project, then you start experimenting with different plastics, and before you know it, you’ve got dozens of reels lined up. Trouble is, unless you move the in-use reel right over the printer, the filament can get a bit unruly as the printer sucks it up. What to do?

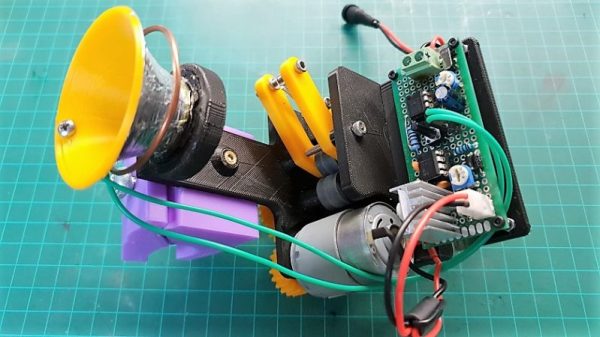
How about building an active strain relief system for your filament collection? That what [Daniel Harari] chose to do, and we have to say that it looks pretty slick. The idea is to keep the filament slack before it enters the printer’s extruder no matter where the reel is positioned relative to the printer. The active bit is a little like a low-force extruder, using a couple of pinch rollers from an old 2D-printer to pay out filament when needed. A clever sensor, consisting of a 3D-printed funnel and a copper wire contact loop, detects when the printer has taken up all the slack in the filament and triggers a payout from the feeder. In a nice touch, the feeder motor is controlled by a couple of 555s rather than a microcontroller. The short clip below shows the feeder being triggered and paying out a little more slack.

In the final analysis, this is just another in a long series of filament management projects, from dry-boxes to filament meters to end-of-spool alarms. It may be overkill, but [Daniel] put a lot of thought into it, which we always appreciate.

Continue reading “Active Strain Relief For 3D-Printer Filament”

Get Into Biohacking On The Cheap With This Electrophoresis Rig

If you want to get into electronics, it’s pretty straightforward: read up a little, buy a breadboard and some parts, and go to town. Getting into molecular biology as a hobby, however, presents some challenges. The knowledge is all out there, true, but finding the equipment can be a problem, and what’s out there tends to be fiendishly expensive.

So many would-be biohackers end up making their own equipment, like this DIY gel electrophoresis rig. Electrophoresis sorts macromolecules like DNA or proteins by size using an electric field. For DNA, a slab of agarose gel is immersed in a buffer solution and a current through the tank moves the DNA through the gel. The shorter the DNA fragment, the easier it can wiggle through the pores in the gel, and the faster it migrates down the gel. [abizar]’s first attempt at a DIY gel rig involved a lot of plastic cutting and solvent welding, so he simplified the process by using the little plastic drawers from an old parts cabinet. With nichrome and platinum wires for electrodes for the modified ATX power supply, it’s just the right size and shape for the gel, which is cast in a separate mold. The video below shows the whole build, and while [abizar] doesn’t offer much detail on recipes or techniques, there are plenty of videos online to guide you.

Need more apparatus to deck out your lab? We’ve got you covered there too.

Continue reading “Get Into Biohacking On The Cheap With This Electrophoresis Rig”

Embed With Elliot: Going ‘Round With Circular Buffers

Why Buffer? Because buffers cut you some slack.

Inevitably, in our recent series on microcontroller interrupts, the question of how to deal with actual serial data came up. In those examples, we were passing one byte at a time between the interrupt service routine (ISR) and the main body of code. That works great as long as the main routine can handle the incoming data in time but, as many people noted in the comments, if the main routine takes too long the single byte can get overwritten by a new one.

The solution? Make some storage room for multiple bytes so that they can stack up until you have time to process them. And if you couple this storage space with some simple rules for reading and writing, you’ve got yourself a buffer.

So read on to see how to implement a simple, straightforward circular buffer in C for microcontrollers (or heck, for anything). Buffers are such a handy tool to have in your programming toolkit that you owe it to yourself to get familiar with them if you’re not already.

Continue reading “Embed With Elliot: Going ‘Round With Circular Buffers”