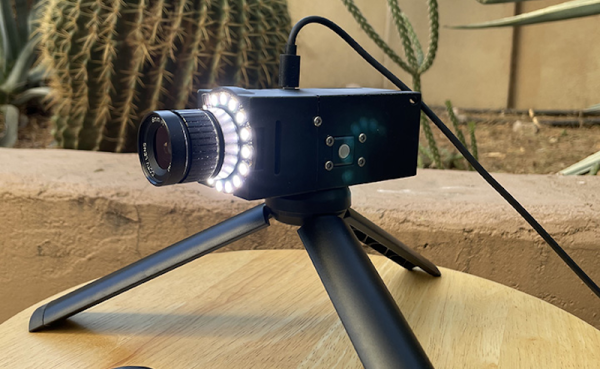
Hackaday Links Column Banner

Hackaday Links: September 22, 2019

Of all the stories we’d expect to hit our little corner of the world, we never thought that the seedy doings of a now-deceased accused pedophile billionaire would have impacted the intellectual home of the open-source software movement. But it did, and this week Richard Stallman resigned from the Computer Science and Artificial Intelligence Lab at MIT, as well as from the Free Software Foundation, which he founded and served as president. The resignations, which Stallman claims were “due to pressure on MIT and me over a series of misunderstandings and mischaracterizations”, followed the disclosure of a string of emails where he perhaps unwisely discussed what does and does not constitute sexual assault. The emails were written as a response to protests by MIT faculty and students outraged over the university’s long and deep relationship with Jeffrey Epstein, the late alleged pedophile-financier. This may be one of those stories where the less said, the better. If only Stallman had heeded that advice.

They may be the radio stations with the worst programming ever, but then again, the world’s atomic clock broadcasting stations can really keep a beat. One of the oldest of these stations, WWV, is turning 100 this year, and will be adding special messages to its usual fare of beeps and BCD-encoded time signals on a 100-Hz subcarrier. If you tune to WWV at 10 past the hour (or 50 minutes past the hour for WWVH, the time station located in Hawaii) you’ll hear a special announcement. There was also talk of an open house at the National Institute of Standards and Technology complete with a WWV birthday cake, but that has since been limited to 100 attendees who pre-registered.

For the machinists and wannabes out there, the Internet’s machine shop channels all pitched in this week on something called #tipblitz19, where everyone with a lathe or mill posted a short video of their favorite shop tip. There’s a ton of great tip out there now, with the likes of This Old Tony, Abom79, Stefan Gotteswinter, and even our own Quinn Dunki contributing timesaving – and finger saving – tips. Don’t stop there though – there’s a playlist with 77 videos at last count, many of them by smaller channels that should be getting more love. Check them out and then start making chips.

Most of us know that DLP chips, which lie behind the lens of the projectors that lull us to sleep in conference rooms with their white noise and warm exhaust, are a series of tiny mirrors that wiggle around to project images. But have you ever seen them work? Now you can: Huygens Optics has posted a fascinating video deep-dive into the workings of digital light processors. With a stroboscopic camera and a lot of fussy work, the video reveals the microscopic movements of these mirrors and how that syncs up with the rotation of a color filter wheel. It’s really fascinating stuff, and hats off to Huygens for pulling off the setup needed to capture this.

And speaking of tiny optics, get a load of these minuscule digital cameras, aptly described by tipster David Gustafik as “disturbingly small.” We know we shouldn’t be amazed by things like this anymore, but c’mon – they’re ridiculously tiny! According to the datasheet, the smaller one will occupy 1 mm² on a PCB; the larger stereo camera requires 2.2 mm². Dubbed NanEye, the diminutive cameras are aimed at the medical market – think endoscopy – and at wearables manufacturers. These would be a lot of fun to play with – just don’t drop one.

Pan And Tilt To A New 3D Printed Business Model

When shooting video, an easy way to get buttery smooth panning and tracking is to use a mechanical device like a rail to literally slide the camera side to side. These range from what is essentially a skateboard to incredible programmable multi-axis industrial robots, a wide variety of which have been visible in the backgrounds of Youtuber’s sets for years. But even the “low end” devices can run hundreds of dollars (all that anodized aluminum doesn’t come cheap!). Edelkrone has been building lust worthy professional (read, pricey) motion setups for a decade. But in the last year they’ve started something pretty unusual; lowering prices with their Ortak series of 3D printed equipment. But this time, you do the printing.

In the FlexTILT Head 3D, everything in red is printed at home

Since the RepRap we’ve been excited about the future of democratized at home manufacturing, but to a large extent that dream hasn’t materialized. Printers are much more useful now than in the early days but you can’t buy a new mug from Starbucks and print it at home. But maybe that’s changing with Edelkrone’s offering.

When you buy an Ortak product you get one thing: all the fasteners and hardware. So the final product is more durable and appears more finished than what would pop out of your Prusa unaided. What about the rest of the device? That’s free. Seriously. Edelkrone freely provides STLs (including print setting recommendations) with detailed step-by-step assembly instructions and videos (sample after the break). Nice hack to avoid piracy, isn’t it?

Why choose the do-it-at-home style product? A significant price reduction of course! The Ortak line currently includes two products, the FlexTILT head you see above, and a skateboard-style slide called the SKATER 3D. Both of these were sold fully finished before making it to the DIY scene. The FlexTILT Head 2 comes in at $149 when you buy it whole. And when the PocketSKATER 2 was for sale, it included a FlexTILT Head and came to $249. Now? Each hardware kit is just $29.

So is this it? Have we hit the artisanal DIY micro-manufactured utopian dream? Not yet, but maybe we’re a little closer. Edelkrone is a real company which is really selling these as products, right there on their website along with everything else. They refer to it as “co-manufacturing” which we think is a clever name, and talk about expanding the program to include electronics. We can’t wait to see how the experiment goes!

Continue reading “Pan And Tilt To A New 3D Printed Business Model”

A Teeny Tiny 3D Printed Macro Extension Tube

When you hear the term “extension tube”, you probably think of something fairly long, right? But when [Loudifier] needed an extension tube to do extreme close-ups with a wide-angle lens on a Canon EF-M camera, it needed to be small…really small. The final 3D printed extension provides an adjustable length between 0 and 10 millimeters.

But it’s not just an extension tube, that would be too easy. According to [Loudifier], the ideal extension distance would be somewhere around 3 mm, but unfortunately the mounting bayonet for an EF-M lens is a little over 5 mm. To get around this, the extension tube also adapts to an EF/EF-S lens, which has a shorter mount and allows bringing it in closer than would be physically possible under otherwise.

[Loudifier] says the addition of electrical connections between the camera and the lens (for functions like auto focus) would be ideal, but the logistics of pulling that off are a bit daunting. For now, the most reasonable upgrades on the horizon are the addition of some colored dots on the outside to help align the camera, adapter, and lens. As the STLs and Fusion design file are released under the Creative Commons, perhaps the community will even take on the challenge of adapting it to other lens types.

For the polar opposite of this project, check out the 300 mm long 3D printed extension tube we covered a few weeks back that inspired [Loudifier] to send this project our way.

FiberGrid: An Inexpensive Optical Sensor Framework

When building robots, or indeed other complex mechanical systems, it’s often the case that more and more limit switches, light gates and sensors are amassed as the project evolves. Each addition brings more IO pin usage, cost, potentially new interfacing requirements and accompanying microcontrollers or ADCs. If you don’t have much electronics experience, that’s not ideal. With this in mind, for a Hackaday prize entry [rand3289] is working on FiberGrid, a clever shortcut for interfacing multiple sensors without complex hardware. It doesn’t completely solve the problems above, but it aims to be a cheap, foolproof way to easily add sensors with minimal hardware needed.

The idea is simple: make your sensors from light gates using fiber optics, feed the ends of the plastic fibers into a grid, then film the grid with a camera. After calibrating the software, built with OpenCV, you can “sample” the sensors through a neat abstraction layer. This approach is easier and cheaper than you might think and makes it very easy to add new sensors.

Naturally, it’s not fantastic for sample rates, unless you want to splash out on a fancy high-framerate camera, and even then you likely have to rely on an OS being able to process the frames in time. It’s also not very compact, but fortunately you can connect quite a few sensors to one camera – up to 216 in [rand3289]’s prototype.

There are many novel uses for this kind of setup, for example, rotation sensors made with polarising filters. We’ve even written about optical flex sensors before.

Take Pictures Around A Corner

One of the core lessons any physics student will come to realize is that the more you know about physics, the less intuitive it seems. Take the nature of light, for example. Is it a wave? A particle? Both? Neither? Whatever the answer to the question, scientists are at least able to exploit some of its characteristics, like its ability to bend and bounce off of obstacles. This camera, for example, is able to image a room without a direct light-of-sight as a result.

The process works by pointing a camera through an opening in the room and then strobing a laser at the exposed wall. The laser light bounces off of the wall, into the room, off of the objects on the hidden side of the room, and then back to the camera. This concept isn’t new, but the interesting thing that this group has done is lift the curtain on the image processing underpinnings. Before, the process required a research team and often the backing of the university, but this project shows off the technique using just a few lines of code.

This project’s page documents everything extensively, including all of the algorithms used for reconstructing an image of the room. And by the way, it’s not a simple 2D image, but a 3D model that the camera can capture. So there should be some good information for anyone working in the 3D modeling world as well.

Thanks to [Chris] for the tip!

660 FPS Raspberry Pi Video Captures The Moment In Extreme Slo-Mo

Filming in slow-motion has long become a standard feature on the higher end of the smartphone spectrum, and can turn the most trivial physical activity into a majestic action shot to share on social media. It also unveils some little wonders of nature that are otherwise hidden to our eyes: the formation of a lightning flash during a thunderstorm, a hummingbird flapping its wings, or an avocado reaching that perfect moment of ripeness. Altogether, it’s a fun way of recording videos, and as [Robert Elder] shows, something you can do with a few dollars worth of Raspberry Pi equipment at a whopping rate of 660 FPS, if you can live with some limitations.

Taking the classic 24 FPS, this will turn a one-second video into a nearly half-minute long slo-mo-fest. To achieve such a frame rate in the first place, [Robert] uses [Hermann-SW]’s modified version of raspiraw to get raw image data straight from the camera sensor to the Pi’s memory, leaving all the heavy lifting of processing it into an actual video for after all the frames are retrieved. RAM size is of course one limiting factor for recording length, but memory bandwidth is the bigger problem, restricting the resolution to 64×640 pixels on the cheaper $6 camera model he uses. Yes, sixty-four pixels height — but hey, look at that super wide-screen aspect ratio!

While you won’t get the highest quality out of this, it’s still an exciting and inexpensive way to play around with slow motion. You can always step up your game though, and have a look at this DIY high-speed camera instead. And well, here’s one mounted on a lawnmower blade destroying anything but a printer.

Continue reading “660 FPS Raspberry Pi Video Captures The Moment In Extreme Slo-Mo”

Recreating Space Cameras

[Cole Price] describes himself as a photographer and a space nerd. We’ll give that to him since his web site clearly shows a love of cameras and a love of the NASA programs from the 1960s. [Cole] has painstakingly made replicas of cameras used in the space program including a Hasselblad 500C used on a Mercury flight and another Hasselblad used during Apollo 11. His work is on display in several venues — for example, the 500C is in the Carl Zeiss headquarters building.

[Cole’s] only made a detailed post about 500C and a teaser about the Apollo 11 camera. However, there’s a lot of detail about what NASA — and an RCA technician named [Red Williams] — did to get the camera space-ready.

Continue reading “Recreating Space Cameras”