The Clock, Another Way To Modify The Sound Of A Synth Chip

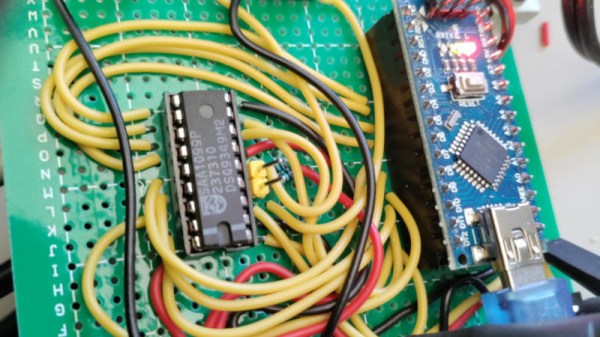
The Philips SAA1099 is perhaps one of the lesser-known among the crop of 1980s-era 8-bit sound generator chips, but with three stereo voices onboard it makes a capable instrument for chiptune experimentation. It’s attracted the attention of [Folkert van Heusden], who’s tried the novel experiment of seeing what happens when a sound chip’s clock is varied.

A quick search of the internet reveals that the chip, which appeared in early Sound Blaster cards, is intended to have an 8 MHz clock. He’s hooked it up to an Arduino as a variable clock source, which surprised us but it seems an ATmega328’s timer is faster than we expected.

There are a couple of WAV files, and as expected the clock frequency has a significant effect on the pitch. The samples just sweep up and down without much attempt at making a sound you’d want to hear, but it does raise an interesting possibility of adding a further pitch bending ability to the capabilities already in the chip. When these circuits were new we couldn’t control a clock on a whim with the 8-bit processors of the day, so of course none of us thought to try this at the time. He’s tried it, so you don’t have to.

The SAA1099 has been mentioned in these pages only once, as a chip used in peripherals for 1980s Czech computers.

Spiffy Summer Project Sources Solar Sounds From Scraps

[Gijs Gieskes] has a long history of producing electronic art and sound contraptions, and his Zonneliedjes (sunsongs) project is certainly an entertaining perpetuation of his sonic creations. With the stated goal of making music from sunlight, the sunsongs most prominent feature is solar panels.

Although It’s not clear how the photons transform into the rhythmic crashes and random beep-boop sounds, the results are quite satisfying. We have a strong suspicion that the same principals that turn random junk into BEAM robots are at work, maybe with some circuit bending sprinkled on for good measure. One detail we were able to glean from a picture of the device he calls “mobile” was a 40106 oscillator, which [Gijs] has used in previous projects.

The construction style that [Gijs] uses reminds us of the “Manhattan” construction style the amateur radio homebrewing community favors. Squares of copper PCB are glued directly to the back of the solar cells and the circuits are built atop them. Looking carefully at the pictures we can also see what look like cutoff leads, suggesting a healthy amount of experimentation to get the desired results, which we can all relate to.

Be sure to check out the video after the break, and also [Gijs] website. He’s been hacking away at projects such as these for a very long time, and we’ve even featured his projects going back more than 15 years. Thanks for the continued hacks, [Gijs]. We look forward to seeing what you come up with next!

If the terms “BEAM robotics” and “circuit bending” are unfamiliar to your ears (or if a refresh is due), be sure to check out our recent re-introduction to BEAM robotics and our classic “Intro to Circuit Bending” to get acquainted. Continue reading “Spiffy Summer Project Sources Solar Sounds From Scraps”

RAM Fiddling Turns VGA Converter Into Video Synth

If you’re interested in circuit bent video but not sure where to start, the excellent guide [LoFi Future] has come up with for modifying the cheap and readily available GBS-8100 VGA to composite converter would be a great first step. While we wouldn’t call it an easy modification, the circuit documentation and demonstration video below go a long way to making it as accessible as possible to new players.

Some soldering will be required…

While other video converters have all-in-one chipsets that are much harder to work with, [LoFi Future] explains that the separate EM636165TS DRAM chip on the GBS-8100 provides an ideal spot to tap in and wreak some technicolor havoc. By mapping out the pins and studying how the video output is corrupted by grounding them out or connecting them to each other, he’s been able to come up with fairly repeatable “recipes” for different effects.

In the most basic form, once you’ve soldered the pins of the DRAM chip up to the plug board interface, you’d technically be done. But [LoFi Future] takes it a step further and pairs the GBS-8100 with a separate composite to VGA converter. This provides some additional effects in the form of feedback loops and hue adjustment, but more practically, allows the device to handle composite on both the input and output. It’s a lot of hardware to cram into the enclosure, but thanks to little touches like the printed panel graphics, the final product does looks very professional.

Aside from the occasional modified NES Zapper, most of the circuit bent hardware we see is of the audio variety. But with projects like this one and the MIDI controlled SNES we covered last year as inspiration, we might see a balancing of the scales. Continue reading “RAM Fiddling Turns VGA Converter Into Video Synth”

Controlling A Broken Super Nintendo With MIDI

A Super Nintendo that has trouble showing sprites doesn’t make for a very good game system. As it turns out, Super Mario World is a lot less fun when the titular hero is invisible. So it’s no surprise that [jwotto] ended up tossing this partially functional SNES into the parts bin a few years back.

But he recently came up with a project that may actually benefit from its unusual graphical issues; turning the glitched console into a circuit bent video synthesizer. The system was already displaying corrupted visuals, so [jwotto] figured he’d just help things along by poking around inside and identifying pins that created interesting visual effects when shorted out.

Installing the new electronics into the SNES.

Once he mapped out the pins, he wired them all up to a transistor switching board that he’d come up with for a previous project. That would let an Arduino short out the pins on command while still keeping the microcontroller relatively isolated from the SNES. Then it was just a matter of writing some code that would fire off the transistors based on MIDI input.

The end result is a SNES that creates visual glitches along with the music, which [jwotto] can hook up to a projector when he does live shows. A particularly neat feature is that each game responds in its own way, so he can swap out the cartridge to show completely different visuals without having to change any of the MIDI sequencing.

A project like this serves as a nice introduction to both circuit bending and MIDI hacking for anyone looking to get their digital feet wet, and should pair nicely with the MIDI Game Boy Advance.

Continue reading “Controlling A Broken Super Nintendo With MIDI”

Hacked Tape Player Makes For A Unique Instrument

[Gijs Gieskes] is certainly no stranger to hacked cassette players, but his latest triumph may well be the most approachable project for anyone looking to explore the world of unorthodox tape unspooling. By attaching a fairly simple add-on PCB to a modern portable cassette player, the user is able to modify the playback speed of the tape at will. The skillful application of such temporal distortions leads to wonderfully abstract results.

The board that [Gijs] has come up with uses four potentiometers and matching push buttons to allow the user to set different playback speeds that they can engage with the push of the button. There’s also a fifth potentiometer to augment the “global” speed as well as an override switch. During playback, these controls can be used to arbitrarily tweak and augment the sound of samples contained on a the looping cassette.

If that’s a little hard to conceptualize, don’t worry. [Gijs] has provided some examples of how the the rapid adjustment of playback speed offered by this “Zachtkind” can add a fascinating level of complexity to sounds and melodies. The assembled player is available for purchase ready to go, but he also provides kits and a detailed installation guide for those who’d rather build it themselves.

Going all the way back to 2005, [Gijs] and his incredible creations have been a staple of Hackaday. From the Arduino video sampler to the array of oddly musical analog clocks, we never cease to be in awe of this exceptionally prolific hacker.

A Baby Named DJ

Some of us are guilty of picking up questionable hardware from garage sales, fleamarkets, and well-meaning relatives. There is a balance between turning down a good investment and hoarding, and if we figure out how to tell the difference you will be the first to know. [Clem Mayer] may start on the side of unwise acquisition, but he pushes a broken fetal detector into the realm of awesome by converting it to an analog synthesizer, born to headline at an Eastern European dance party.

He starts with a basic teardown, and we get to see how old hardware was serviceable with only two standard screws. It is a good thing too, because the nickel-cadmium batteries are older than some of you and they are in need of replacement. New nickel-metal hydride batteries got it up and running but [Clem] does not have a baby bump so its functionality turned to Pink Floyd era synthesizer circuit bending. Circuit bending involves modifying a circuit for sound it was not intended to make.

Continue reading “A Baby Named DJ”

Circuit Bending Those Adorable Voices

Leapfrog make some pretty awesome kids electronics. Especially admirable is the low cost, the battery life, and the audio quality of these devices. This circuit bending hack takes advantage of those audio circuits by turning the Alphabet Pal into your lead vocalist. The performance in the demo video begins with some impressive tricks, but just wait for it because by the end the little purple caterpillar proves itself an instrument worthy of a position beside that fancy Eurorack you’ve been assembling.

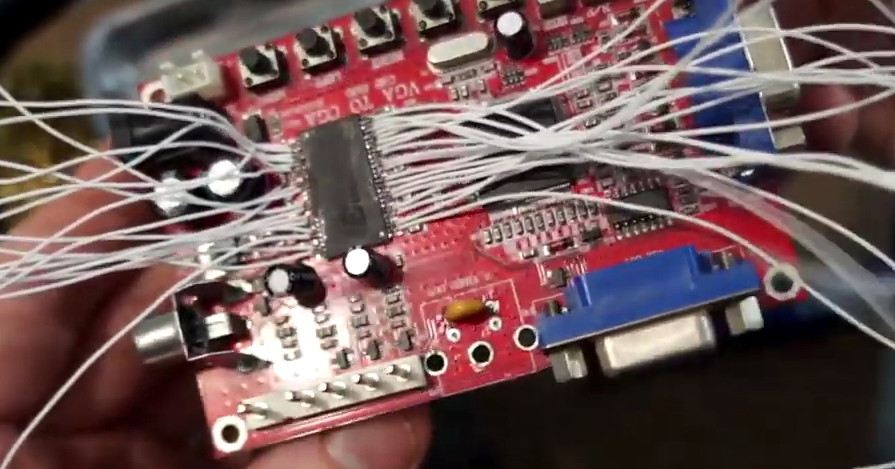
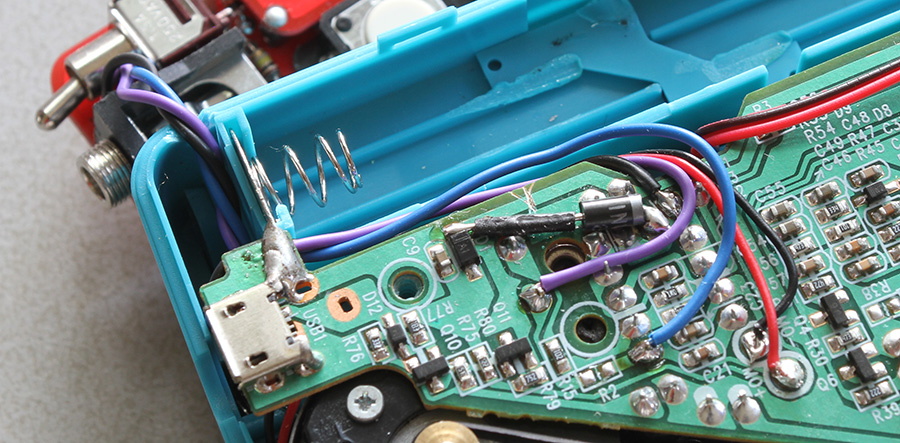
The image above provides a great look inside the beastie. [Jason Hotchkiss] mentions he’s impressed by the build quality, and we have to agree. Plus, look at all of those inputs — this is begging to leave toyland and join the band. With an intuitive sense that can only be gained through lots of circuit-bending experience, he guessed that the single through-hole resistor on the PCB was used to dial in the clock speed. That made it easy to throw in a trimpot for pitch-bending and he moved on to figure out individual note control.

All of those caterpillar feet are arranged in a keyboard matrix to detect button presses. After pulling out the oscilloscope for a bit of reverse engineering, [Jason] grabbed a PIC microcontroller and added it to the same solder points as the stock ribbon connector. The result is that the buttons on the feet still work, but now the Alphabet Pal also has MIDI control.

Take a look at the writeup for full details, and the video after the break to hear it in action. If you’re a fan of circuit-bent toys, this pretty pink keyboard hack always impressed us, especially the spring reverb that was added!

Continue reading “Circuit Bending Those Adorable Voices”