Quick And Easy NTP Clock

[Danman] got an ESP32 with built-in OLED display, and in the process of getting a clock up and running and trying to get a couple of NodeMCU binaries installed on it, thought he’d try rolling his own.

[Danman] used PlatformIO to write the code to his ESP. PlatformIO allowed [Danman] to browse for a NTP library and load it into his project. After finding the NTP library, [Danman] wrote a bit of code and was able to upload it to the ESP. When that was uploaded [Danman] noticed that nothing was being displayed on the OLED, but that was just a simple matter of tracking down the right address to use when setting up the library for his OLED. Lastly, [Danman] created a large font to display the time with and his mini-clock was done!

It’s always nice to see someone be able to go from buying a board to having a demo put together, and it’s getting easier and easier. Check out this OLED watch, and this pocket watch doesn’t use OLEDs, but it still looks pretty cool.

Solar Tide Clock Keeps Track Of The Moon

Old fashioned tide clocks were an attempt to predict high tide by timing the rising and setting of the moon. When you looked at one you could see how many hours until the next high tide. [rabbitcreek] wanted to make his own version of the tide clock that does a better job of predicting the actual high tide than those old clocks, which were essentially glorified timers tuned to the moon’s phases.

[rabbitcreek] based his the tide prediction software off of [Luke Miller’s] Tide Clock, which applies location-specific adjustments to the standard lunar clock, taking into consideration such factors as the geographic features (basin depth, etc.) that modify the default timing. [Miller]’s Arduino code includes a library of common locations organized by NOAA station number.

[rabbitcreek]’s project consists of a Adafruit Feather board hooked up to a DS3231 RTC breakout and a HS-225BB servo, which turns the clock’s hand. It’s an 180-degree servo, attached to a hacked-down Actobotics gearbox gearing the servo down 2:1 to permit 360 degrees of movement.

He also wanted his creation to be left to operate unattended for years, theoretically — so solar power was a natch. The face of the clock consists of individual wavers of solar panel glued into a huge clock-like array. The solar cells feed into an Adafruit PowerBoost 500, a TPL5111 low power timer breakout, and a LiPo battery for when it’s dark out.

If you’re looking for more solar clocks check out this one that uses capacitors as hour markers.

FPGA Clocks For Software Developers (or Anyone)

It used to be that designing hardware required schematics and designing software required code. Sure, a lot of people could jump back and forth, but it was clearly a different discipline. Today, a lot of substantial digital design occurs using a hardware description language (HDL) like Verilog or VHDL. These look like software, but as we’ve pointed out many times, it isn’t really the same. [Zipcpu] has a really clear blog post that explains how it is different and why.

[Zipcpu] notes something we’ve seen all too often on the web. Some neophytes will write sequential code using Verilog or VHDL as if it was a conventional programming language. Code like that may even simulate. However, the resulting hardware will — at best — be very inefficient and at worst will not even work.

Continue reading “FPGA Clocks For Software Developers (or Anyone)”

Word Clock Five Minutes At A Time

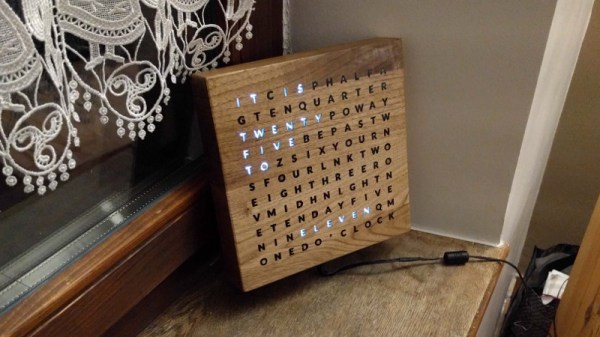
As this clock’s creator admits, it took far more than five minutes to put together, but it does display the time in five minute increments.

After acquiring five 4-character, 16 segment display modules that were too good to pass up, they were promptly deposited in the parts pile until [JF] was cajoled into building something by a friend. Given that each display’s pins were in parallel, there was a lot of soldering to connect these displays to the clock’s ATMega328P brain. On the back of the clock’s perfboard skeleton, a DS1307 real-time clock and coin cell keep things ticking along smoothly. The case is laser cut out of acrylic with an added red filter to up the contrast of the display, presenting a crisp, crimson glow.

Troubleshooting — as well as procrastination — proved to be the major stumbling block here. Each of the displays required extensive troubleshooting because — like Christmas lights of yore — one bad connection would cause all the other displays to fail. Furthermore, there isn’t any easy way to change the time, so the clock needs to be reprogrammed once in a while

We love word clocks because there are so many ways to configure them and for the oddities. That isn’t to say radial clocks are any less creative.

Continue reading “Word Clock Five Minutes At A Time”

A Detailed Guide For 3D Printing Enclosures

We’ve all have projects that are done, but not complete. They work, but they’re just a few PCBs wired together precariously on our desks. But fear not! A true maker’s blog has gifted us with a detailed step-by-step guide on how to make a project enclosure.

Having purchased an MP Select Mini 3D Printer, there was little to do but find something practical to print. What better than an enclosure for a recently finished Time/Date/Temperature display Arduino based device?

The enclosure in this guide, while quite nice, isn’t the main attraction here. The real feature is the incredibly detailed instructions for how to design, model and print an enclosure for any project. For the veterans out there, it seems simple. Sketch something on the back of a napkin and take a nap on your keyboard with OpenSCAD open. When you wake, BAM: perfect 3D model. However, for newcomers, the process can seem daunting. With incredibly specific instructions (an example is “Open up a new workspace by clicking CREATE NEW DESIGN,” notice the accurate capitalization!), it should ease the barrier of the first enclosure, turning the inexperienced into the kind-of-experienced.

If you’ve been printing enclosures since the dawn of time or plastic simply isn’t your style, boy, do we have you covered. Why not check out FR4 (aka PCB) enclosures? Or what about laser cut enclosures from eagle files? Maybe two-piece boxes are more your thing.

Get Inside A TCXO Clock Chip

[Pete] wondered how real-time clock modules could be selling on eBay for $1.50 when the main component, the Maxim DS3231 RTC/TCXO chip, cost him more like $4 apiece. Could the cheap modules contain counterfeit chips?

Well, sure they could. But in this case, they didn’t, and [Pete] has the die shots to prove it. He started off by clipping the SOIC leads rather than desoldering — he’s not going to be reusing this chip after he’s cut it in half. Next was a stage of embrittling the case by heating it up with a lighter and dunking it in water. Then he went at it with sandpaper.

It’s cool. You can see the watch crystal inside, and all of the circuitry. The DS3231 includes a TCXO — temperature-corrected crystal oscillator — and it seems to have a bank of capacitors that it connects and disconnects depending on the chip’s temperature to keep the oscillator running at the right speed. [Pete] used one in an offline situation, and it only lost sixteen seconds over a year, so we’d say that they work fine.

If you’d like to know more about how crystals are used to keep time, check out [Jenny]’s excellent article. And if sixteen second per year is way too much for you, tune up your rubidium standard and welcome to the world of the time nuts.

Steampunk-Inspired Art Clock!

Getting paid to do what you enjoy is a special treat. A machinist and fabricator by trade — hobbyist hacker by design — [spdltd] was commissioned to build a mechanical art installation with a steampunk twist. Having complete creative control, he convinced his client to let him make something useful: a giant electro-mechanical clock.

Pieced together from copper, brass, steel, aluminium, and stainless steel, this outlandish design uses an Arduino Yun — a combination Linux and Arduino microcontroller board — to control the stepper motor and query the internet for the local time. Upon boot, the clock auto-calibrates by rotating the clock face until a sensor detects an extra peg and uses that to zero on twelve o’clock; the Yun then grabs the local time over the WiFi and sends the stepper motor a-spinning ’till the correct time is displayed.

At first glance, you may find it hard to get an accurate read of what time it is, but an accent piece’s pegs denote the quarter hour once it lines up with the notch above each hour. At least this one doesn’t require you to match colours or do much math to check the time.

Continue reading “Steampunk-Inspired Art Clock!”