Hackaday Prize Semifinalist: Picking Up Litter With Robots

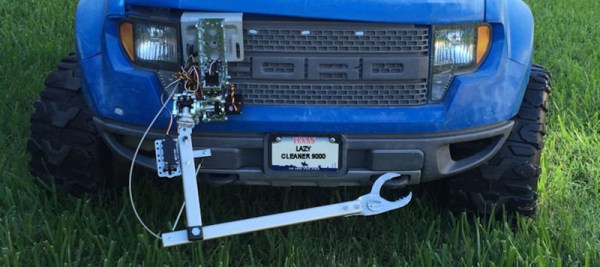
On beaches, in parks, and in [BDM]’s back yard, there’s a lot of liter everywhere. The normal solution to this problem is to hire someone or find some volunteers to pick up all this trash. We’re living in the future, though, and that means robots. For his Hackaday Prize entry, [BDM] is building a robot that picks up trash.

A robot that picks up litter is a very, very interesting problem. It can’t be controlled by a person, or else it would be more efficient to just get out there and kill your back picking up bottles. This means it must work autonomously, and that means identifying litter, picking it up, and disposing of it.

For the identification part of the problem, [BDM] is using computer vision that captures an RGB image and discriminates against natural objects. Right now the computer vision is far from perfect, but it does a very good job, all things considering.

The next biggest problem is picking the trash up and disposing of it. For this, [BDM] has repurposed a Power Wheels and attached a DIY robot arm. It’s not a very powerful arm, and a children’s toy probably isn’t the best platform, but it is the start of something very, very cool.

You can check out [BDM]’s video for the project below.

The 2015 Hackaday Prize is sponsored by:

Continue reading “Hackaday Prize Semifinalist: Picking Up Litter With Robots”

A Handheld CNC Router

Over the last few years, the state of the art in handheld routers has been tucked away in the back of our minds. It was at SIGGRAPH in 2012 and we caught up to it at Makerfair last year. Now, it’s getting ready for production.

Originally called Taktia, the Shaper router looks a lot like a normal, handheld router. This router is smart, though, with the ability to look at a work piece marked with a tape designed for computer vision and slightly reposition the cutter in response to how the user is moving it. A simple description doesn’t do this tool justice, so check out the video the Shaper team recently uploaded.

With the user moving the Shaper router over a work piece and motors moving the cutter head, this tool is able to make precision cuts – wooden gears and outlines of the United States – quickly, easily, and accurately. Cutting any shape is as easy as loading a file into Shaper, calling that file up on a touch screen display, and turning on the cutter. Move the router around the table, and the Shaper takes care of the rest.

Accuracy, at least in earlier versions, is said to be on the order of a hundredth of an inch. That’s good enough for wood, like this very interesting bit of joinery that would be pretty hard with traditional tools. Video below.

Thanks [martin] for the tip.

Continue reading “A Handheld CNC Router”

What You See Is What You (Laser) Cut

WYSIWYG editors revolutionized content management systems, will WYSIWYC interfaces do the same for laser cutters? Unlikely, but we still appreciate the concepts shown here. Chalkaat uses computer vision to trace lines drawn in ink with the cutting power of a laser.

At its core, you simply draw on your work piece with a colored marker and the camera system will ensure the laser traces this line exactly. There is even a proof of concept here for different behavior based on different line color, and the technique is not limited to white paper but can also identify and cut printed materials.

This is a spin on [Anirudh’s] first version which used computer vision with a projector to create a virtual interface for a laser cutter. This time around we can think of a few different uses for this. The obvious is the ability for anyone to use a laser cutter by drawing their designs by hand. Imagine introducing grade-school children to this type of technology by having them draw paper puppets and scenery in advance and have it cut in shop class for use in art projects.

A red arrow indicates cut line, but a pink arrow is used for indicating positioning on a work piece. The example shows a design from a cellphone etched next to a positioning marker. But we could see this used to position expensive things (like a Macbook) for etching. We also think the red marker could be used to make slight adjustments to cut pieces by scribing a work piece with the marker and having the laser cut it away.

This concept is a product of [Nitesh Kadyan] and [Anirudh Sharma] at the Fluid Interfaces group at the MIT Media Lab and is something we could see being built into future laser cutter models. What do you think?

Continue reading “What You See Is What You (Laser) Cut”

Reading Resistors With OpenCV

Here’s a tip from a wizened engineer I’ve heard several times. If you’re poking around a circuit that has failed, look at the resistor color codes. Sometimes, if a resistor overheats, the color code bands will change color – orange to brown, blue to black, and so forth. If you know your preferred numbers for resistors, you might find a resistor with a value that isn’t made. This is where the circuit was overheating, and you’re probably very close to discovering the problem.

The problem with this technique is that you have to look at and decode all the resistors. If automation and computer vision is more your thing, [Parth] made an Android app that will automatically tell you the value of a resistor by pointing a camera at it.

The code uses OpenCV to scan a small line of pixels in the middle of the screen. Colors are extracted from this, and the value of the resistor is displayed on the screen. It’s perfect for scanning through a few hundred through hole resistors, if you don’t want to learn the politically correct mnemonic they’re teaching these days.

Video below, and the app is available for free on the Google Play store.

Continue reading “Reading Resistors With OpenCV”

A self powered camera, showing output video

Self Powered Camera Powers Itself

Cameras sense light to create images, and solar cells turn light into energy. Why not mash the two together and create a self-powered camera?

The Computer Vision Laboratory at Columbia built this unique camera, which harvests power from its photodiode sensors. These photodiodes also act as an array of pixels that can recover an image. The result is a black and white video camera that needs no external power supply.

The energy harvester circuit charges up a supercap that provides power to the system. The frame rate of the camera is limited by the energy that can be harvested: higher frame rates require more juice. For this reason, the team developed an algorithm that varies the frame rate based on available energy.

The MC13226V microcontroller that was used for this build features an internal 2.4 GHz radio. The group mentions wireless functionality as a possibility feature in the future, which would make for a completely untethered, battery free camera.

RasPi Garage Door

A Raspberry Pi Garage Door Opener

We can never seem to get enough garage door hacks around here. [Tanner’s] project is the most recent entry into this category. He’s managed to hook up a Raspberry Pi to his garage door opener. This greatly extends his range to… well anywhere with an Internet connection.

His hack is relatively simple. He started with the garage door opener remote. He removed the momentary switch that was normally used to active the door. He bridged the electrical connection to create a circuit that was always closed. This meant that as long as the remote had power, the switch would be activated. Now all [Tanner] had to do was remove the battery and hook up the power connectors to his Raspberry Pi. Since the remote works on 3.3V and draws little current, he is able to power the remote directly from the Pi. The Pi just has to turn its pin high momentarily to activate the remote.

The ability to toggle the state of your garage door from anywhere in the world also comes with paranoia. [Tanner] wanted to be able to tell if the door is up, down, or stopped somewhere in the middle while he was away from home. He also wanted to use as little equipment as possible. Since he already had an IP camera in the garage, he decided to use computer vision to do the detection.

He printed off two large, black shapes onto ordinary white computer paper. One was taped to the top of the door and one to the bottom. A custom script runs on the Pi that grabs the latest image from the camera and uses OpenCV to detect the shapes. If both shapes are visible, then the script can assume the door is closed. Otherwise, it’s likely open. This makes it easier for [Tanner] to know if the door is opened or closed without having to check the camera himself.

Can’t get enough garage door hacks? Try these on for size. Continue reading “A Raspberry Pi Garage Door Opener”

A DIY Pick And Place You Can Build Right Now

There have been quite a few DIY pick and place projects popping up recently, but most of them are limited to conceptual designs or just partially working prototypes. [Juha] wrote in to let us know about his project, LitePlacer, which is a fully functional DIY pick and place machine with working vision that can actually import BOMs and place parts as small as 0402 with pretty good accuracy.

LitePlacer UIWhile some other DIY pick and place setups we’ve featured use fairly exotic setups like delta bots, this machine is built around typical grooved bearings and extruded aluminum. The end effector includes a rotating vacuum tip and a camera mounted alongside the tip. The camera provides feedback for locating fiducials and for finding the position of parts. Instead of using feeders for his machine, [Juha] opted to pick parts directly from pieces of cut tape. While this might be inconvenient if you’re placing large quantities of a single part, it helps keep the design simple.

The software that runs the machine is pretty sophisticated. After a bit of configuration it’s able to import a BOM with X/Y information and start placing within seconds. It also uses the camera to calibrate the needle, measure the PCB  using the fiducials, and pinpoint the location of cut tape sections.

If you want to build your own machine, [Juha] published detailed instructions that walk you through the entire assembly process. He’s also selling a kit of parts if you don’t want to source everything yourself. Check out the video after the break to see the machine import a BOM and place some parts (all the way down to 0402).

Continue reading “A DIY Pick And Place You Can Build Right Now”