Witch’s Staff Build Is A Rad Glowing Costume Prop

Let’s say you’re going to a music festival. You could just take water, sunscreen, and a hat. Or, you could take a rad glowing witch’s staff to really draw some eyes and have some fun. [MZandtheRaspberryPi] recently undertook just such a build for a friend and we love how it turned out.

The concept was to build a staff or cane with a big glowing orb on top. The aim was to 3D print the top as a very thin part so that LEDs inside could glow through it. Eventually, after much trial and error, the right combination of design and printer settings made this idea work. A Pi Pico W was then employed as the brains of the operation, driving a number of through-hole Neopixel LEDs sourced from Adafruit.

Power was courtesy of a long cable running out of the cane and to a USB power bank in the wielder’s pocket. Eventually, it was revealed this wasn’t ideal for dancing with the staff. Thus, an upgrade came in the form of an Adafruit Feather microcontroller and a 2,000 mAh lithium-polymer battery tucked inside the orb. The Feather’s onboard hardware made managing the lithium cell a cinch, and there were no more long cables to worry about.

The result? A neat costume prop that looks fantastic. A bit of 3D printing and basic electronics is all you need these days to build fun glowing projects, and we always love to see them. Halloween is right around the corner — if you’re building something awesome for your costume, don’t hesitate to let us know!

Upgraded Toy Guitar Plays Music

Getting the finishing details on a Halloween costume completed is the key to impressing friends and strangers alike on the trick-or-treat rounds. Especially when it comes to things like props, these details can push a good Halloween costume to great with the right touches. [Jonathan]’s friend’s daughter will be well ahead of the game thanks to these additions to a toy guitar which is part of her costume this year.

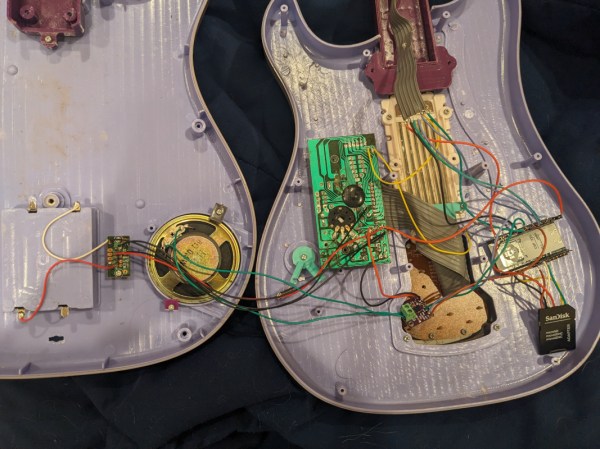
The toy guitar as it was when it arrived had the capability to play a few lackluster sound effects. The goal here was to get it to play a much more impressive set of songs instead, and to make a couple upgrades along the way as well. To that end, [Jonathan] started by dismantling the toy and investigating the PCBs for potential reuse. He decided to keep the buttons in the neck of the guitar despite their non-standard wiring configuration, but toss out the main board in favor of an ESP32. The ESP32 is tasked with reading the buttons, playing a corresponding song loaded on an SD card, and handling the digital to analog conversion when sending it out to be played on the speaker.

The project doesn’t stop there, though. [Jonathan] also did some custom mixing for the songs to account for the lack of stereo sound and a working volume knob, plus he used the ESP32’s wireless capabilities to set the guitar up as a local file server so that songs can be sent to and from the device without any wires. He also released the source code on the project’s GitHub page for anyone looking to use any parts of this project. Don’t forget there’s a Halloween contest going on right now, so be sure to submit the final version of projects like these there!

Continue reading “Upgraded Toy Guitar Plays Music”

A two picture montage of a boy wearing a sonic the hedgehog costume with LEDs in them. The left picture is at night with the boy wearing sunglasses and a face mask with the sonic costume head piece lit up. The right picture is during the day with the boy wearing a face mask, holding a plastic pu mpkin bucket for candy and wearing a lit up sonic the hedgehog costume in the front yard of a house.

LEDs Put New Spin On A Sonic The Hedgehog Costume

[Wentworthm] couldn’t say no to his son’s plea for a Sonic the Hedgehog costume for Halloween but also couldn’t resist sprucing it up with LEDs either. The end result is a surprisingly cool light up Sonic the Hedgehog costume.

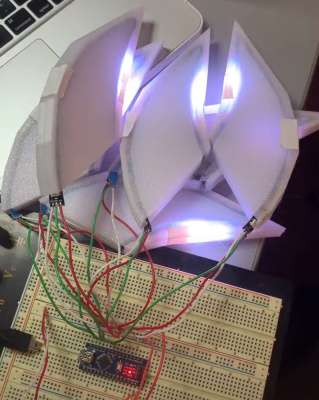
a picture of a breadboard with an Arduino Nano on it, with wires going out to 3d printed tear dropped shapes that have LED strips in them, with some LED strips on.

After some experimentation, [Wentworthm] ordered two costumes and ended up mixing and matching the head piece of one with the body suit of the other. For the head, [Wentworthm] created six 3D printed “quills” that had slots for the WS2812B LED strips to slide into and diffuse out the sides, with each quill sliding into the folds of the Sonic head “spikes”. Sewn strips of cloth were used to house the LED strips that were placed down the sides of the costume. An additional 3D printed switch housing was created to allow for a more robust interface to the two push buttons to activate the LEDs. An Arduino Nano, soldered to a protoboard, was used to drive the LED strips with a USB battery pack powering the whole project.

[Wentworthm] goes into more detail about the trials and errors, so the post is definitely worth checking out for more detail on the build. Halloween is always a great source of cool costumes and we’ve featured some great ones before, like a light up crosswalk costume to making a giant Gameboy colour costume.

Video after the break!

Continue reading “LEDs Put New Spin On A Sonic The Hedgehog Costume”

This Crosswalk Sign Costume Is A Halloween Hit

Halloween costumes can be anything from an expensive authentic recreation of a character’s garb, to a cheap knockoff bought from one of those overcrowded pop-up stores. Alternatively, you can get creative and conceptual about things, such as by building yourself a crosswalk sign costume.

The creation of [jared531], the build uses a large piece of cardboard painted black as the base. This sits behind the wearer, and is given a yellow outline to emulate the crosswalk signals common in the US. Red fairy lights are then laid out on half of the cardboard in a pattern emulating the “STOP” hand signal.

The wearer should then dress in all-black garb, and attach the flat cardboard panel to themselves with elastic straps. A black mesh face covering helps to complete the look by blending in the wearer’s face. They are then outfitted with white fairy lights around their body, emulating the “WALK” signal.

It’s a simple concept, but quite accurately replicates a typical crosswalk sign. It’s something we certainly haven’t seen before, which is impressive in this Internet era when anything new is old again mere minutes later.

If your tastes are more avant-garde, though, consider going the TV head route next year. If you’ve built your own high-tech, high-concept costume, hit us up on the tips line!

Announcing: The 2022 Hackaday.io Sci-Fi Contest

Ladies and Gentlemen, Sentient robots, Travellers from the distant future, or Aliens from the outer rim, it’s time to enter the 2022 Hackaday.io Sci-Fi Contest!

We last ran the Sci-Fi contest in the far, far past — before the Voigt-Kampff machine was detecting replicants on the gritty streets of 2019’s LA. Back then, we had some out-of-this-world entries. It’s time for the sequel.

Thanks to Digi-Key, the contest’s sponsor, your best blaster, your coolest costume, or your most righteous robot could win you one of three $150 shopping sprees in their parts warehouse. Create a Hackaday.io project, enter it in the contest, and you’re set. You might as well do that right now, but the contest closes on April 25th.
Sci-Fi is all about the looks, so if it’s purely decorative, be sure to blind us with science (fiction). If your project actually functions, so much the better! Of course we’d like to know how it works and how you made it, so documentation of the project is the other big scoring category. Whatever it is, it’s got to be sci-fi, and it’s got to have some electronics in it.

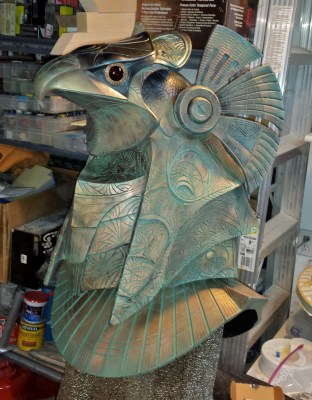
If you’re looking for inspiration, you could do a lot worse than to check out [Jerome Kelty]’s Animatronic Stargate Helmet, that not coincidentally took the grand prize last time around. It’s an artistic and engineering masterpiece all rolled into one, and the description of how it’s made is just as extensive. [Jochen Alt]’s “Paul” robot isn’t out of any particular sci-fi franchise that we know, but of rolling on one ball and reciting robot poetry, it absolutely should be.

Honorable Mentions

In addition to the overall prizes, we’ll be recognizing the best projects in the following honorable mention categories:

  • Star Star: Whether you’re “beam me up” or “use the force”, fans of either of the “Star” franchises are eligible for this honorable mention.
  • ExoSuit: This category recognizes sci-fi creations that you can wear. Costumes and armor fit in here.
  • Stolen off the Set: If your blaster looks exactly like Han Solo’s, you’re a winner here.  This is the category for your best prop replica.
  • Living in the Future: If your sci-fi device was purely fantasy when imagined, but now it’s realizable, you’re living in the future. A working tricorder or a functioning robot companion would fit in fine here.
  • The Most Important Device: Has no function, but it certainly looks like it does. Just blinking lights that blink back and forth, yet the government spent millions of dollars on it.

You don’t have to tell us where your project fits in. We’ve got you covered.

Engage!

Get started now by creating a project page on Hackaday.io. In the left sidebar of your project page, use the “Submit Project To” button to enter in the 2022 Sci-Fi Contest.

You have from now until April 25, 2022 to get it finished. Of course, if your time machine actually works, you can finish it whenever. Check out the Hackaday.io contest page for all the fine print.

Remoticon Video: How To 3D Print Onto Fabric With Billie Ruben

We’re impressed to see the continued flow of new and interesting ways to utilize 3D printing despite its years in the hacker limelight. At the 2020 Hackaday Remoticon [Billie Ruben] came to us from across the sea to demonstrate how to use 3D printing and fabric, or other flexible materials, to fabricate new and interesting creations. Check out her workshop below, and read on for more detail about what you’ll find.

The workshop is divided into two parts, a hands-on portion where participants execute a fabric print at home on their own printer, and a lecture while the printers whirr away describing ways this technique can be used to produce strong, flexible structures.

The technique described in the hands on portion can be clumsily summarized as “print a few layers, add the flexible material, then resume the printing process”. Of course the actual explanation and discussion of how to know when to insert the material, configure your slicer, and select material is significantly more complex! For the entire process make sure to follow along with [Billie]’s clear instructions in the video.

The lecture portion of the workshop was a whirlwind tour of the ways which embedded materials can be used to enhance your prints. The most glamourous examples might be printing scales, spikes, and other accoutrement for cosplay, but beyond that it has a variety of other uses both practical and fashionable. Embedded fabric can add composite strength to large structural elements, durable flexibility to a living hinge, or a substrate for new kinds of jewelry. [Billie] has deep experience in this realm and she brings it to bear in a comprehensive exposition of the possibilities. We’re looking forward to seeing a flurry of new composite prints!

TV Head Is Great Replacement For Your Real Head

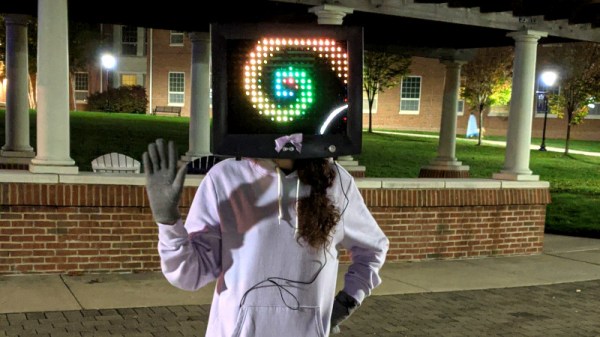
The head is one of the few parts of the body that it seems impossible to live without. Many people are, of course, not happy with the one they’ve been given. For those dreaming of a more digital replacement, [Vivian’s] TV Head might be just the accessory to meet those needs.

The build starts with an old CRT, which [Vivian] promptly gutted to make room for her head. In place of the original tube, a thin polycarbonate sheet was installed with window tint applied. Behind this, rows of WS2812B are set up in a grid, spaced apart just enough to allow the wearer to see through.  The setup is controlled by a Circuit Playground Express. A small PS/2 keyboard is used to control the light show, and the onboard accelerometer can be used for gravity reactive animations.

For some reason, screens as heads are remarkably emotive, and we kind of want one for daily wear. We can imagine it making a great Halloween costume, too. If you’ve always wanted to cosplay as one of those colorful robots from the Opening Ceremony of the 2002 World Cup, here’s your chance. You will not be surprised that this isn’t the first TV head we’ve featured. Video after the break.

Continue reading “TV Head Is Great Replacement For Your Real Head”