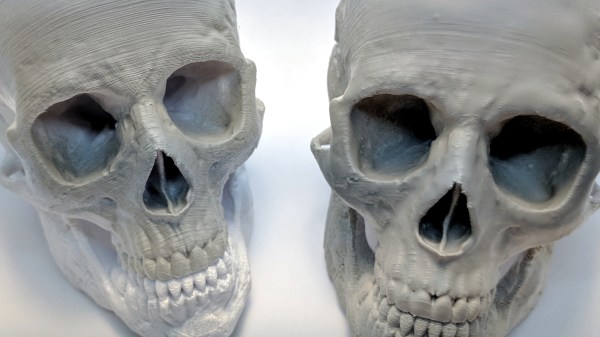
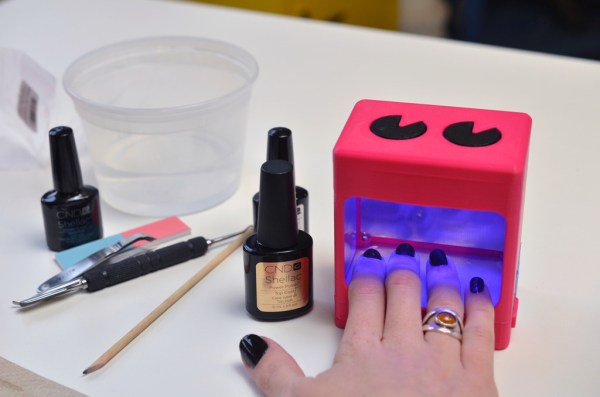
How To Make Bisected Pine Cones Look Great, Step-by-Step

[Black Beard Projects] sealed some pine cones in colored resin, then cut them in half and polished them up. The results look great, but what’s really good about this project is that it clearly demonstrates the necessary steps and techniques from beginning to end. He even employs some homemade equipment, to boot.

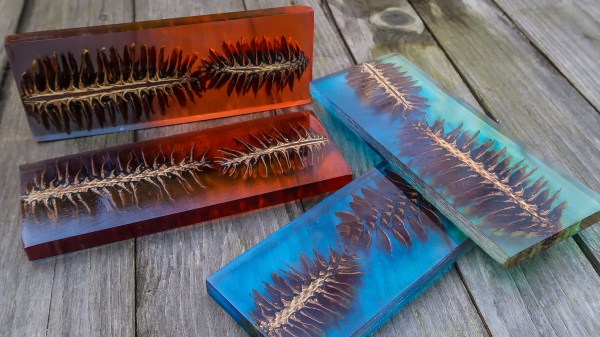
Briefly, the process is to first bake the pine cones to remove any moisture. Then they get coated in a heat-activated resin for stabilizing, which is a process that infuses and pre-seals the pine cones for better casting results. The prepped pine cones go into molds, clear resin is mixed with coloring and poured in. The resin cures inside a pressure chamber, which helps ensure that it gets into every nook and cranny while also causing any small air bubbles introduced during mixing and pouring to shrink so small that they can’t really be seen. After that is cutting, then sanding and polishing. It’s an excellent overview of the entire process.

The video (which is embedded below) also has an outstanding depth of information in the details section. Not only is there an overview of the process and links to related information, but there’s a complete time-coded index to every action taken in the entire video. Now that’s some attention to detail.

Continue reading “How To Make Bisected Pine Cones Look Great, Step-by-Step”

3D Printering: Print Smoothing Tests With UV Resin

Smoothing the layer lines out of filament-based 3D prints is a common desire, and there are various methods for doing it. Besides good old sanding, another method is to apply a liquid coating of some kind that fills in irregularities and creates a smooth surface. There’s even a product specifically for this purpose: XTC-3D by Smooth-on. However, I happened to have access to the syrup-thick UV resin from an SLA printer and it occurred to me to see whether I could smooth a 3D print by brushing the resin on, then curing it. I didn’t see any reason it shouldn’t work, and it might even bring its own advantages. Filament printers and resin-based printers don’t normally have anything to do with one another, but since I had access to both I decided to cross the streams a little.

The UV-curable resin I tested is Clear Standard resin from a Formlabs printer. Other UV resins should work similarly from what I understand, but I haven’t tested them.

Continue reading “3D Printering: Print Smoothing Tests With UV Resin”

Meet The Modern Meat Man’s Modified Meat-Safe

Charcuterie is delicious — but is it hackable? When talking about the salty preserved meats, one might be more inclined to indulge in the concept of bacon before pondering a way to integrate an electrical monitoring system into the process. However, [Danzetto] decided to do both when he did not have anywhere to cure his meats. He made his own fully automatic meat curing chamber lovingly called the curebOS with the aid of a raspberry pi. It is basically a beefed up mini fridge with all of the bells and whistles.

This baby has everything.  Sitting on top is a control system containing the Pi. There are 5 relays used for the lights, circulating fan, ventilating fans, refrigerator, and humidifier all powered by a 5 amp supply — minus the fridge. Down below that is the 3D printed cover with a damper for one of the many ventilation fans that regulate the internal temperature.  To the right is a touchscreen for viewing and potentially controlling the system if necessary. The control program was written in Python for viewing the different trends. And below that, of course, is a viewing window. On the inside are temperature and humidity probes that can be monitored from the front screen. These readings help determine when to activate the compressor, any of the fans, or the humidifier for optimal settings. For a final touch, there are also some LEDs placed above the hanging meat to cast a glowing effect upon the prized possessions.

Continue reading “Meet The Modern Meat Man’s Modified Meat-Safe”

Hackaday’s Omaha Mini Maker Faire Roundup

The 2nd annual Omaha Mini Maker Faire wasn’t our first rodeo, but it was nonetheless a bit surprising . Before we even made it inside to pay our admission to the Omaha Children’s Museum, I took the opportunity to pet a Transylvanian Naked Neck chicken at one of the outdoor booths. The amiable fowl lives at City Sprouts, an Omaha community farming collective in its 20th year of operation. There seemed to be a theme of bootstrappy sustainability among the makers this year, and that’s great to see.

Just a few feet away sat a mustard-colored 1975 Chevy pickup with a food garden growing in its bed. This is Omaha’s truck farm, an initiative that seeks to educate the city’s kids in the ways of eating locally and growing food at home.  On a carnivorous note, [Chad] from Cure Cooking showed my companion and me the correct way to dry-cure meats using time-honored methods.

Continue reading “Hackaday’s Omaha Mini Maker Faire Roundup”

DIY UV Lamp Is The Cure For Nails And More

We must admit to wondering how Adafruit’s [Becky Stern] gets anything done with those fingernails of hers. They’re always long and beautifully painted without any chips, dings, or dents. As it turns out, she uses UV gel nail polish. It’s much more durable than standard air-dry polishes, but it requires UV light to cure. [Becky] bought a lamp to use at home, but it’s very bulky and must be plugged into the wall. She knew there was a better way and devised her DIY UV mini manicure lamp.

She really thought of everything. The open source 3D-printed enclosure includes a small compartment in the top for cuticle sticks, emery boards, and tweezers. The Li-poly battery is rechargeable over USB in conjunction with Adafruit’s PowerBoost 500c. The lamp itself is made from 30 UV LEDs and 100Ω resistors. [Becky] lined the inside of hers with silver sticky paper to help distribute the UV light evenly.

You know, this can also be used to erase EPROMs or to cure small DLP 3D prints. Do you have another use for it? Tell us in the comments. Introductory and partially hyperlapsed video after the break.

Continue reading “DIY UV Lamp Is The Cure For Nails And More”