Hackers really like their tools. This leads to holy wars over languages, editors, keyboards, and even laptops. The problem with laptops is that they age, and not always gracefully. [Syonyk] likes his ThinkPad T430S, except for one thing, its TN display wasn’t really very good. These flat screens use an older technology and show color changes with different viewing angles among other problems. So he managed to upgrade the device’s screen to IPS with the help of a replacement screen and an adapter (see right). Apparently, many similar ThinkPads can take the same sort of upgrade.
The problem is that the laptop uses LVDS to talk to the TN screen, while newer screens are likely to use Embedded DisplayPort (eDP) which is a different protocol entirely. However, there’s now a converter that [Syonyk] found on eBay (from China, of course). For about $70, the motherboard’s LVDS output can transform to eDP. Of course, you also need an IPS display panel.
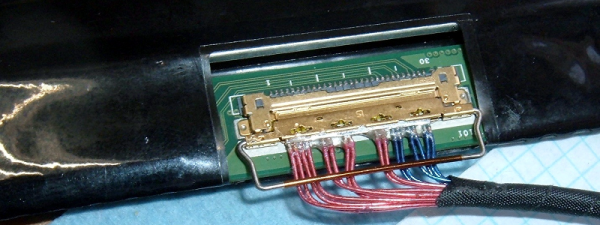
[Mike Harrison] produces so much quality content that sometimes excellent material slips through the editorial cracks. This time we noticed that one such lost gem was [Mike]’s reverse engineering of the 6th generation iPod Nano display from 2013, as caught when the also prolific [Greg Davill] used one on a recent board. Despite the march of progress in mobile device displays, small screens which are easy to connect to hobbyist style devices are still typically fairly low quality. It’s easy to find fancier displays as salvage but interfacing with them electrically can be brutal, never mind the reverse engineering required to figure out what signal goes where. Suffice to say you probably won’t find a manufacturer data sheet, and it won’t conveniently speak SPI or I2C.
After a few generations of strange form factor exploration Apple has all but abandoned the stand-alone portable media player market; witness the sole surviving member of that once mighty species, the woefully outdated iPod Touch. Luckily thanks to vibrant sales, replacement parts for the little square sixth generation Nano are still inexpensive and easily available. If only there was a convenient interface this would be a great source of comparatively very high quality displays. Enter [Mike].
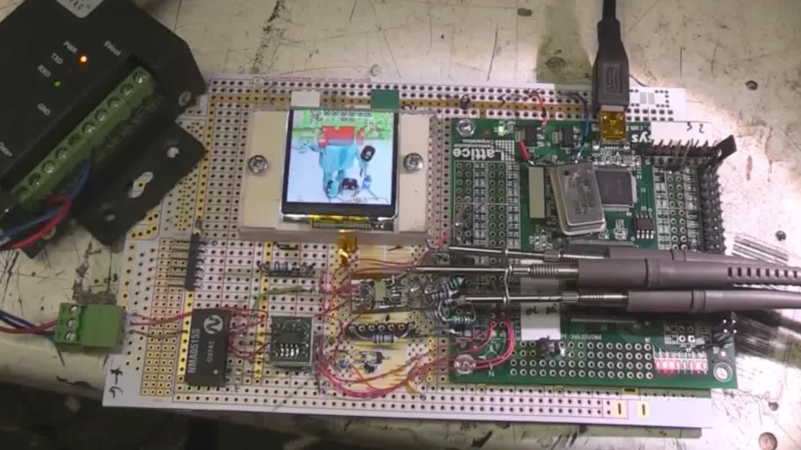
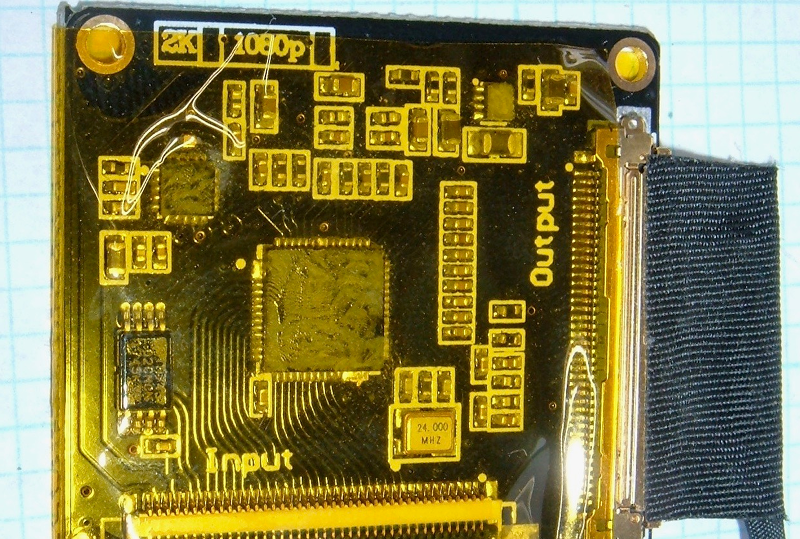
Outer edge of FPGA and circuit
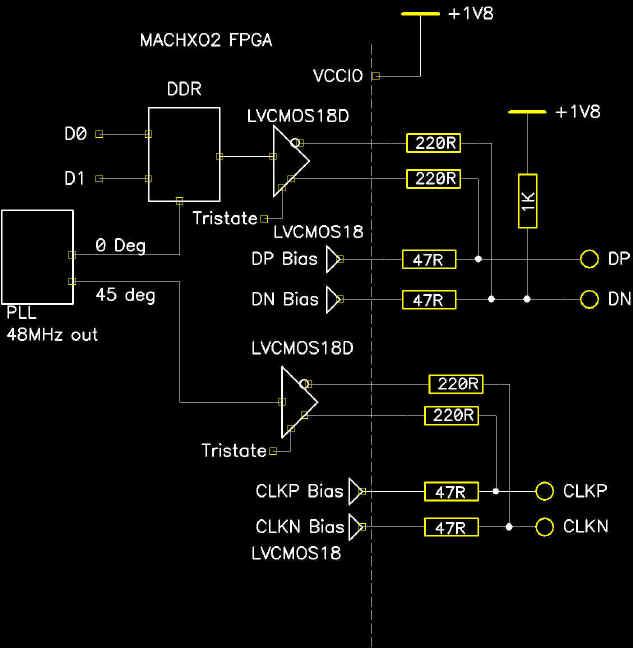
This particular display speaks a protocol called DSI over a low voltage differential MIPI interface, which is a common combination which is still used to drive big, rich, modern displays. The specifications are somewhat available…if you’re an employee of a company who is a member of the working group that standardizes them — there are membership discounts for companies with yearly revenue below $250 million, and dues are thousands of dollars a quarter.
Fortunately for us, after some experiments [Mike] figured out enough of the command set and signaling to generate easily reproduced schematics and references for the data packets, checksums, etc. The project page has a smattering of information, but the circuit includes some unusual provisions to adjust signal levels and other goodies so try watching the videos for a great explanation of what’s going on and why. At the time [Mike] was using an FPGA to drive the display and that’s certainly only gotten cheaper and easier, but we suspect that his suggestion about using a fast micro and clever tricks would work well too.
It turns out we made incidental mention of this display when covering [Mike]’s tiny thermal imager but it hasn’t turned up much since them. As always, thanks for the accidental tip [Greg]! We’re waiting to see the final result of your experiments with this.
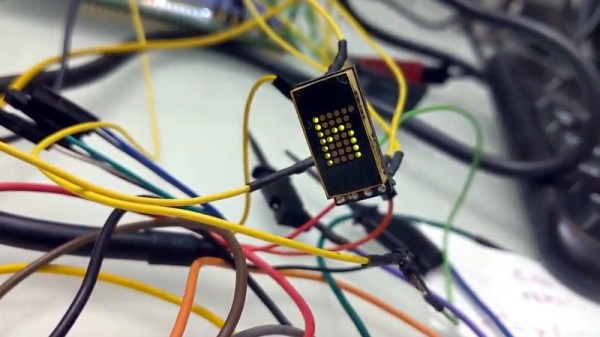
Used in everything from calculators to military hardware, the 3LS363A is an interesting piece of vintage hardware. With a resolution of 5 x 7 (plus a decimal point), the Soviet-made displays contain no electronics and are simply an array of 36 green LEDs. It’s not hard to drive one of them in a pinch, but [Dmitry Grinberg] thought this classic device deserved a bit better than the minimum.
He’s developed a small board that sits behind the 3LS363A and allows you to control it over I2C for a much more modern experience when working with these vintage displays. Powered by the ATtiny406, his adapter board makes it easy to chain the modules together and even handles niceties like flipping the displayed image to account for different mounting positions. While most of us probably won’t have the chance to play around with these relatively rare displays, there’s still plenty of useful information here if you’re thinking of creating your own I2C gadgets.
In his write-up, [Dmitry] explains his rationale behind the design and some of the quirks of working with the display. For example he explains how he gave each column of the display its own FET, but to save space on the board ended up running the single decimal point (technically its own column) directly off of a spare GPIO pin. Relying on the low duty cycle, he even left current limiting resistors off the design. The end result is a tiny board that keeps the same footprint of the 3LS363A itself.
[Dmitry] went all out with developing the firmware for his new “smart” 3LS363A displays, and has written up documentation for the different commands he has implemented. From re-configuring the I2C address to updating the firmware, he’s made sure no stone was left unturned for this project. We’re not ones to shy away from a quick and dirty code, but it’s always nice to see when somebody has really put some thought into the software side of a project.
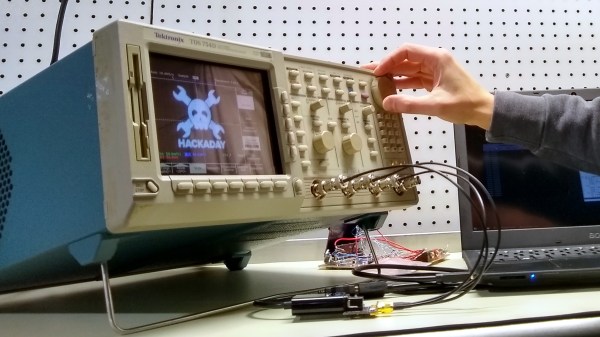
I recently came across the most peculiar way to make a color CRT monitor. More than a few oscilloscopes have found their way on to my bench over the years, but I was particularly struck with a find from eBay. A quick look at the display reveals something a little alien. The sharpness is fantastic: each pixel is a perfect, uniform-colored little dot, a feat unequaled even by today’s best LCDs. The designers seem to have chosen a somewhat odd set of pastels for the UI though, and if you move your head just right, you can catch flashes of pure red, green, and blue. It turns out, this Tektronix TDS-754D sports a very peculiar display technology called NuColor — an evolutionary dead-end that was once touted as a superior alternative to traditional color CRTs.
Join me for a look inside to figure out what’s different from those old, heavy TVs that have gone the way of the dodo.
We’ve seen loads of persistence of vision displays before, but this sky-writing POV display seems as though it may be a first. And we have to agree with its creators that it’s pretty cool.
The idea man on this was [Ivan Miranda], who conceived of a flying POV as a twist on his robotic dot-matrix beach printer. But without any experience in RC flight, he turned to fellow YouTuber [Tom Stanton], whose recent aerial builds include this air-powered plane, for a collaboration. [Ivan]’s original concept was a long strip of Neopixels that would be attached to the underside of a wide-wingspread plane. WIthout much regard for the payload limits of most RC planes, he came up with a working display that was 3 meters long. His video below shows it in use in his shop, with some pretty impressive long exposure images.
[Tom]’s part was to make the POV display flyable. He cut the length down to 2 meters and trimmed the weight enough to mount it to a quadcopter. Ungainly as the machine was, he was able to master its control enough to start painting pictures across the twilight sky. The images at the end of his video are actually stunning – we’re especially fond of Thunderbird 2, which takes us back to our childhood.
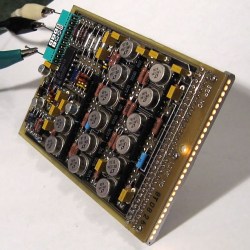
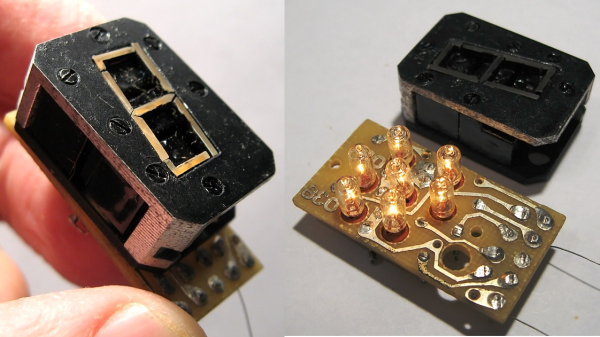
The driver board with display attached; the row of lamps is visible on the right hand side.
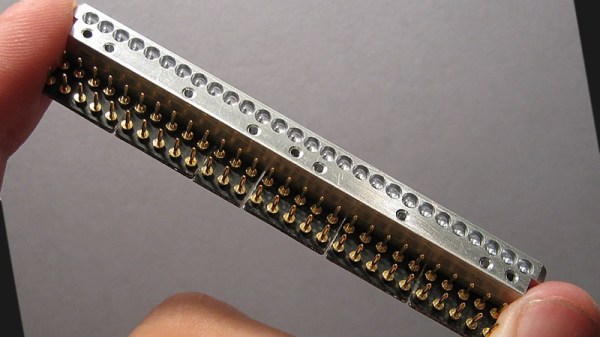
LEDs weren’t always an easy solution to displays and indicators. The fine folks at [Industrial Alchemy] shared pictures of a device that shows what kind of effort and cost went into making a high brightness bar graph display in the 70s, back when LEDs were both expensive and not particularly bright. There are no strange materials or methods involved in making the display daylight-readable, but it’s a peek at how solving problems we take for granted today sometimes took a lot of expense and effort.
The display is a row of 28 small incandescent bulbs, mounted in a PCB and housed in a machined aluminum frame. Holes through which to view the bulbs are on both the top and front of the metal housing, which allows the unit to be mounted in different orientations. It was made as a swappable module, its 56 machined gold pins mate to sockets on the driver board. The driver board itself consists of 14 LM119 dual comparators, each of which controls two bulbs on the display.
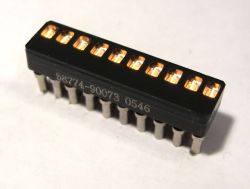
An example of a Wamco minitron bar graph display. Each window contains an incandescent filament. [Source: industrialalchemy.org][Industrial Alchemy] believes that the display unit itself may have been a bit of a hack in its own way. Based on the pin spacing and dimensions of the driver board, they feel that it was probably designed to host a row of modular units known as the Wamco minitron bar graph display. An example is pictured here; they resembled DIP chips and could be stacked side-by-side to make a display of any length. Each window contained an incandescent filament in a reflective well, and each light could be individually controlled.
These minitron bar graph units could only be viewed from the top, and were apparently high in cost and low in availability. Getting around these limitations may have been worth creating this compatible unit despite the work involved.
Display technology has taken many different turns over the years, and you can see examples of many of them in one place in the Circus Clock, which tells the time with a different technology for each digit: a nixie, a numitron, a 7-segment thyratron tube, a VFD, an LED dot display, and a rear projection display.
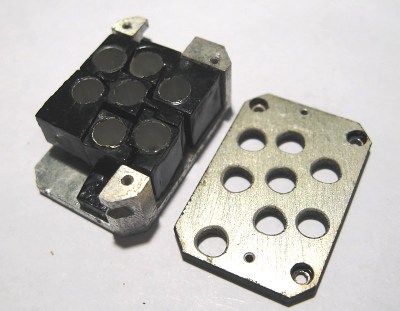
In a way, all 7-segment displays are alike; at least from the outside looking in. On the inside it can be quite another story, and that’s certainly the case with the construction of this Soviet-era 7-segment numerical display. From the outside it may look a bit sturdier than usual, but it’s still instantly recognizable for what it is. On the inside is an unusual mixture of incandescent bulbs and plastic light guides.
The black-coated blocks of plastic on the left (shown from the rear) act as light guides. The holes are for nesting the incandescent bulbs. Note the puzzle-like arrangement of the uniquely shaped pieces.
The rear of the display is a PCB with a vaguely hexagonal pattern of low-voltage incandescent bulbs, and each bulb mates to one segment of the display. The display segments themselves are solid blocks of plastic, one for each bulb, and each a separate piece. These are painted black, with the only paint-free areas being a thin segment at the top for the display, and a hole in the back for the mating bulb.
The result is that each plastic piece acts as a light guide, ensuring that a lit bulb on the PCB results in one of the seven thin segments on the face being lit as well. An interesting thing is that the black paint is the only thing preventing unwanted light from showing out the front, or leaking from one segment to another; usually some kind of baffle is used for this purpose in displays from this era.
More curiously, each plastic segment is a unique shape apparently unrelated to its function. We think this was probably done to ensure foolproof assembly; it forms a puzzle that can only fit together one way. The result is a compact and remarkably sturdy unit that shows how older and rugged tech isn’t necessarily bulky. Another example of small display tech from the Soviet era is this tiny 7-segment display of a completely different manufacture, which was usually used with an integrated bubble lens to magnify the minuscule display.
 Hackers really like their tools. This leads to holy wars over languages, editors, keyboards, and even laptops. The problem with laptops is that they age, and not always gracefully. [Syonyk] likes his ThinkPad T430S, except for one thing, its TN display wasn’t really very good. These flat screens use an older technology and show color changes with different viewing angles among other problems. So he managed to upgrade the device’s screen to IPS with the help of a replacement screen and an adapter (see right). Apparently, many similar ThinkPads can take the same sort of upgrade.