Adding WiFi To The Acorn Electron

In the continuing quest by countless hobbyists to allow every 1980s 8-bit home computer to experience the joys of an online experience that doesn’t involve a 9600 baud modem, [Roland Leurs] has created a cartridge-based module for the Acorn Electron that adds WiFi, which he showed off at the virtual ABug conference in September 2020.

The Acorn Electron is a Synertek 6502-based computer that was released in the UK in August of 1983. It’s a budget version of the well-known BBC Micro educational/home computer, with 32 kB of RAM and featuring BBC BASIC v2 in its ROM. [Roland]’s ElkWiFi card slots into an available cartridge slot, after which the onboard ESP8266 (ESP-1 module) can be enabled and used as a WiFi modem.

Acorn Electron with Plus 1 expansion, ElkWiFi and additional expansion card inserted.

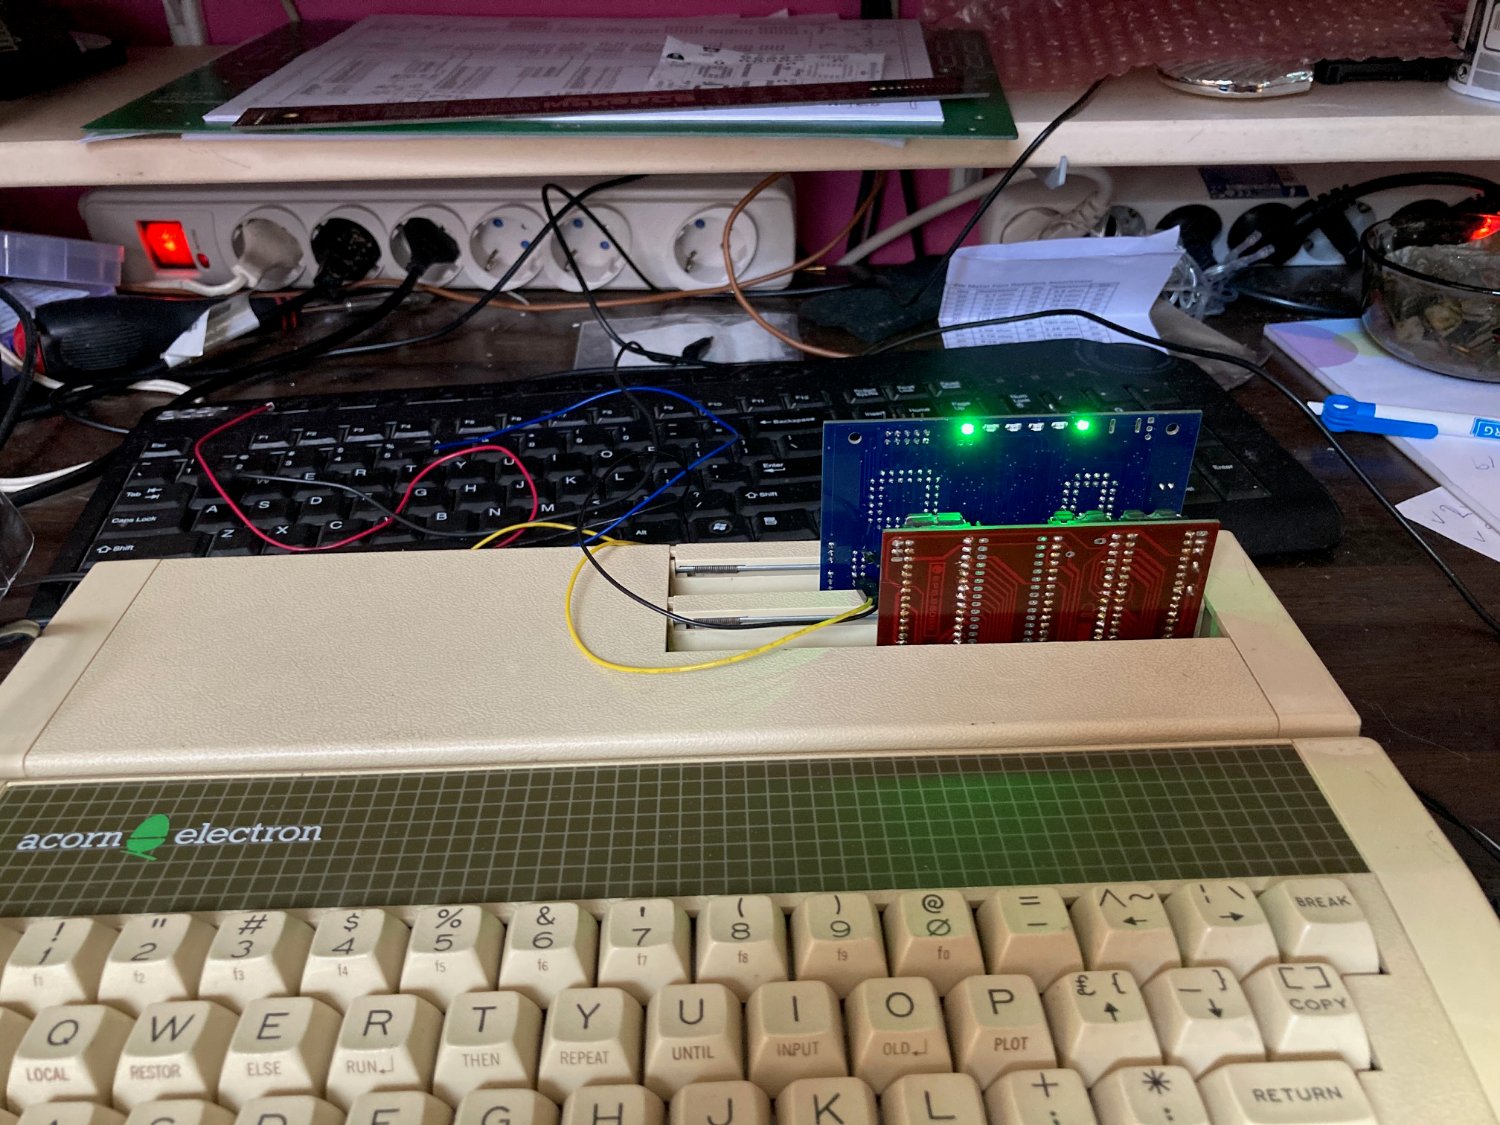
The board features the Exar ST16C2552CJ dual UART chip, one channel of which connects to the ESP-1 module, with the other channel used as an uncommitted UART header. The control logic is implemented in VHDL and flashed to the onboard Xilinx CPLD, and a 128 kB RAM module is used as WiFi data buffer.

Although a definite niche product, reading through the forum thread makes one really appreciate the technical complexity and joy once things are beginning to work reliably. It also shows one of the few cases where an ESP-1 module is used for its original purpose: as an easy way to add WiFi functionality with full WiFi and TCP stack, without burdening the main CPU.

(Thanks, BaldPower)

Don’t Slack Off On Updating Your Status

Displaying an accurate status in Slack (or whatever other employer-provided collaboration program you may be forced to run) is crucial in 2020. If you need to make a sandwich or take the dog out real quick, but you don’t update your status to show yourself as away, you might come back to a string of increasingly concerned or frustrated messages with lots of annoying question marks and the occasional interrobang.

[Becky Stern] decided that a physical interface would be a far more fun way to keep tabs on her status, and an excellent visual reminder to actually do it. We totally agree. Inside the box is a NodeMCU which is using [Brian Lough]’s Slack API library for Arduino. This made it easy for [Becky] to create a switch/case selector of statuses, and in each of these she can set the presence token as auto or away, and show a custom message with an appropriate emoji. These of course match the emoji semi-circling the selector, which is a rotary switch with a really nice knob.

While we’re on the subject of Slack notifiers, how about a companion cat to wave when you’ve been mentioned?

Continue reading “Don’t Slack Off On Updating Your Status”

Slack Off From Home With A Networked Jam Session

Those of you who were regular office dwellers before the pandemic: do you miss being with your coworkers at all? Maybe just a couple of them? There’s only so much fun you can have through a chat window or a videoconference. Even if you all happen to be musicians with instruments at the ready, your jam will likely be soured by latency issues.

[Eden Bar-Tov] and some fellow students had a better idea for breaking up the work-from-home monotony — a collaborative sequencer built for 2020 and beyond. Instead of everyone mashing buttons at once and hoping for the best, the group takes turns building up a melody. Each person is assigned a random instrument at the beginning, and the first to go is responsible for laying down the beat.

Inside each music box is an ESP8266 that communicates with a NodeRed server over MQTT, sending each melody as a string of digits. Before each person’s turn begins, the LED matrix shows a three second countdown, and then scrolls the current state of the song. Your turn is over when the LED strip around the edge goes crazy.

Music can be frustrating if you don’t know what you’re doing, but this instrument is built with the non-musician in mind. There are only five possible notes to play, and they’re always from the same scale to avoid dissonance. Loops are always in 4/4, which makes things easy. Players don’t even have to worry about staying in time, because their contributions are automatically matched to the beat. Check it out after the break.

Tired of sitting indoors all day, but still want to make music? Build a modular synth into a bike and you’ve solved two problems.

Continue reading “Slack Off From Home With A Networked Jam Session”

Get Creative With This ESP8266 Photography Light

In today’s fast-paced world of social media, if you want your photos to grab attention, you’ve got to have an edge. Whether it’s a deft touch in Photoshop or an amazing lens, it’s important to stand apart. Another great way is to experiment with lighting and color. To do just that, [Andrei] built a pocket RGB photo light for the home studio.

[Andrei]’s cat models for the camera.
This is a project that any experienced maker should be able to whip up in a weekend. Not that there’s anything wrong with that, of course. The basic enclosure is 3D printed and readily reproducible on any FDM printer. Lighting is provided via the venerable WS2812B LED, 68 of them, to be exact. Finally there’s an ESP8266 running WLED, a webserver for the platform that’s dedicated to controlling LED strips. This makes it easy to tweak the LEDs with your smartphone.

Thanks to the WS2812Bs LEDs, a full range of RGB colors are available for [Andrei] to experiment with. He’s done a great job showing off the light with a few choice cat pics that serve to show its capabilities. While we wouldn’t expect to use such a device for clean white lighting in a serious photographic sense, it’s a perfect tool for art photography.

We’ve covered other studio light builds before, too. Video after the break.

Continue reading “Get Creative With This ESP8266 Photography Light”

Automating Mini Blinds The Rental-Friendly Way

[Chris Mullins] wanted to automate opening and closing the slats of mini blinds in his apartment, and came up with a system to do it as a fun project. Manually opening and closing the slats means twisting a rod. Seems straightforward to automate that, but as usual when having to work around something that already exists, making no permanent alterations, complications arose.

The blinds are only 1 inch wide, leaving little room for mounting any sort of hardware. While there is a lot of prior art when it comes to automating blinds, nothing he found actually fit the situation [Chris] had, so he rolled his own.

The rod that is normally twisted to control the blinds is removed, and the shaft of a stepper motor takes its place. [Chris]’ mounting solution is made to fit blinds with narrow 1 inch tracks (existing projects he found relied on 2 inch tracks) and the 3D printed mount is fully adjustable, so the 28BYJ stepper motor can be moved into exactly the right position. Speaking of the stepper motor, the 28BYJ motor is unipolar but the A4988 driver he wanted to use is for bipolar steppers only. Luckily, cutting a trace on the motor’s PCB is all it takes to turn a unipolar motor into bipolar.

To drive the motor and provide wireless functionality, the whole thing works with a Wemos D1 ESP8266, an A4988 stepper driver, and a buck converter. While it worked fine as a one-off on a perfboard, [Chris] used the project as an opportunity to learn how to make a PCB using KiCad; the PCB project is here on GitHub and the ESP8266 runs the ESPHome firmware. Be sure to check out the project page on his blog for all the details; [Chris] links to all the resources there, and covers everything from a bill of materials to walking through configuration of ESPHome with integration into the open-source Home Assistant project.

Looking to control natural light but blinds aren’t your thing? Maybe consider automated curtains.

RGB LED Shutter Shades

[splat238] is back at it again with another cool RGB LED display project. We were contemplating whether or not our readers have had enough of these over the last few weeks, but we’ve learned over the years that you can never have too many LED projects.

Instead of making a cool mask like we’ve covered before, [splat238] decided to trick-out some shutter shades. What’s really cool is he used the PCB itself as the frame, similar to another hack we’ve seen, which we’re sure also made his design process that much more convenient.

[splat238] got his boards pre-assembled since it would be really difficult to solder all those LEDs by hand. There are 76 of them in this design. It’s pretty helpful that he walks the reader through how to get the boards assembled, providing information on reliable fabrication and assembly houses that he’s had good experiences with. Pretty solid information if you don’t already have a go-to one-stop-house or have never designed for assembly before.

The glasses use an ESP8266-based microcontroller since it has plenty of space for storing LED patterns and has the potential benefit of including WiFi control in later revisions. However, we think you’ll be pretty happy with simply toggling through the patterns with a simple pushbutton.

The LEDs use a whopping 2.5 A at maximum and rely on an external power bank, so you’ll probably want to be really careful wearing this over an extended period of time. Maybe consider doing a bit of PWM to help reduce power consumption.

Another cool project [splat238]! Keep them coming. Continue reading “RGB LED Shutter Shades”

You’ve Got Rat!

If you home has never been subject to a rodent invasion then you are fortunate. Our world is full of rats and mice, and despite the best efforts of humanity to keep them at bay it is inevitable that a few will find their way through. For [Marius Taciuc] this became a problem, as his traps needed constant checking to avoid the prospect of a festering rat carcass. His solution? A humane trap equipped with an ESP8266, that notifies him when the rodent is incarcerated.

The tech behind it is about as simple as it’s possible to get, the trap’s door activates a switch, that powers on an ESP8266 module. The ESP’s code simply wakes it up, connects to a wireless network, and sends a query to IFTTT with a call to a service that sends him an email alert. There’s no need to monitor any GPIO lines or have any code running to keep an eye on the trap, it’s all purely a function of the power switch.

The trap itself is interesting, in that it’s a home-made one constructed from soldered copper wire. Sadly there are few details of its construction, but you can see more of it including a live rat inside it, in the video below the break. And if making a trap catches your interest, we can help you there.

Continue reading “You’ve Got Rat!”