Hijacking The Sonoff OTA Mechanism

ITEAD’s Sonoff line is a range of Internet-of-Things devices based around the ESP8266. This makes them popular for hacking due to their accessibility. Past projects have figured out how to reflash the Sonoff devices, but for [mirko], that wasn’t enough – it was time to reverse engineer the Sonoff Over-The-Air update protocol.

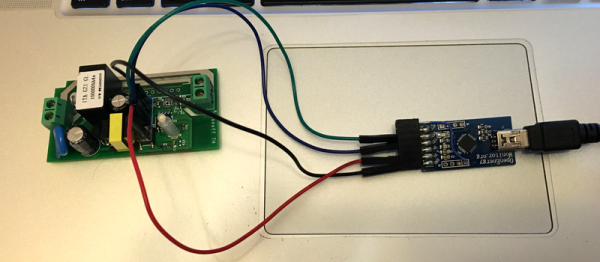
[mirko]’s motivation is simple enough – a desire for IoT devices that don’t need to phone home to the corporate mothership, combined with wanting to avoid the labor of cracking open every Sonoff device to reflash it with wires like a Neanderthal. The first step involved connecting the Sonoff device to WiFi and capturing the traffic. This quickly turned up an SSL connection to a remote URL. This was easily intercepted as the device doesn’t do any certificate validation – but a lack of security is sadly never a surprise on the Internet of Things.

After capturing the network traffic, [mirko] set about piecing together the protocol used to execute the OTA updates. After a basic handshake between client and server, the server can ask the client to take various actions – such as downloading an updated firmware image.  After determining the messaging format, [mirko] sought to create a webserver in Python to replicate this behaviour.

There are some pitfalls – firmware images need to be formatted slightly differently for OTA updates versus the usual serial upload method, as this process leaves the stock bootloader intact. There’s also the split-partition flash storage system to deal with, which [mirko] is still working on.

Nevertheless, it’s great to see hackers doing what they do best – taking control over hardware and software to serve their own purposes. To learn more, why not check out how to flash your Sonoff devices over serial? They’re just an ESP8266 inside, after all.

Digital Clock Goes With The Grain

This good-looking clock appears to be made out of a block of wood with LED digits floating underneath. In reality, it is a block of PLA plastic covered with wood veneer (well, [androkavo] calls it veneer, but we think it might just be a contact paper or vinyl with a wood pattern). It makes for a striking effect, and we can think of other projects that might make use of the technique, especially since the wood surface looks much more finished than the usual 3D-printed part.

You can see a video of the clock in operation below. The clock circuit itself is nothing exceptional. Just a MAX7218 LED driver and a display along with an STM32 ARM processor. The clock has a DHT22 temperature and humidity sensor, as well as a speaker for an alarm.

Continue reading “Digital Clock Goes With The Grain”

Google Home Meets ESP8266

[Luc Volders] is building his own smart house with the help of Google Home and an ESP-8266. Inspired by the house computers from the TV show, Eureka [Luc] created an IoT ecosystem using a mix of off the shelf devices and open source software.

There are about a thousand ways to create a DIY smart home these days. All of them involve setting up a command receiver (like Amazon’s Echo or Google Home), some sort of cloud connection, and an end device controller. This can get complex for the beginner. [Luc’s] article is great because he walks is through each step tutorial style. He even keeps things simple by programming the ESP8266 using BASIC with ESP-BASIC.

[Luc] uses If This Then That (IFTT) as his cloud service. IFTT is the glue between Google’s cloud service and the ESP8266 connected to his home WiFi network. Speaking of which, [Luc] shows how to set up port forwarding on the router so all accesses to port 8085 go to the ESP8266. Not exactly strong security – but it’s better than opening the entire home network.

You don’t need a real Google home device for this hack. You can build your own with a Raspberry Pi. Once that is set up you can do everything from turning on lights to watering your lawn.

Continue reading “Google Home Meets ESP8266”

Bitcoin Price Ticker

Are you a Bitcoin miner or trader, but find yourself lacking the compulsive need to check exchange rates like the drug-fuelled daytraders of Wall Street? Fear not – you too can adorn your home or office with a Bitcoin Price Ticker! The post is in Italian but you can read a translated version here.

It’s a straightforward enough build – an Arduino compatible board with an onboard ESP8266 is hooked up with an HD44780-compatible LCD. It’s then a simple matter of scraping the Bitcoin price from the web and displaying it on the LCD. It’s a combination of all the maker staples, tied together with some off-the-shelf libraries – it’s quick, and it works.

[Ed: Oh boo!  The images of the LCD were photoshopped.  Please ignore the next paragraph.]

What makes the build extra nice is the use of custom characters on the LCD. The HD44780 is a character based display, and this project appears to use a screen with two lines of sixteen characters each. However, a custom character set has been implemented in the display which uses several “characters” on the screen to create a single number. It’s a great way to make the display more legible from a distance, as the numbers are much larger, and the Bitcoin logo has been faithfully recreated as well. It’s small touches like this that can really set a project apart. We’d love to see this expanded to display other financial market information and finished off in a nice case.

If you’re wondering what you can actually do with Bitcoin, check out the exploits of this robotic darknet shopper. Oh, and Microsoft will take them, too.

Multipurpose ESP8266 Keychain

One of the best feature of the ESP8266 is its ability to self-host a web server, allowing for fairly complicated user interactions. The dEEbugger by [S-March] is a nifty little ESP8266 based device with a plethora of features in a small package.

The USB-powered device has a web user interface that enables it to be used as a low-bandwidth oscilloscope, I2C terminal, or UART terminal. As a scope, you may connect to it via your tablet and then use it as a remote voltage monitor. There is a peak detection feature which is a nice touch and gives the entire project a premium feel.

The serial terminal on an ESP8266 is not something new yet it is helpful in disconnecting the console window from the bench. The I2C terminal is where the device really shines as it can scan for connected devices on the connected bus. This Bus-Pirate like feature is useful for beginners as the software can scan the registers addresses of the devices as well.

[S-March] has made the schematic in PDF format as well as the entire code for the project available on GitHub so go right ahead and make it your own. We have had an ESP8266 based VT Terminal device in the past and merging the two would make for an excellent maker tool.

Thanks for the tip [René Arts]

Wireless Terminal Over ESP8266

From debug messages to the fundamental ‘hello world’, serial communication does it all over three little wires. Now imagine being able to cut the cord to your next microcontroller project and use your phone as a VT100 terminal. This was the premise of [Ondřej Hruška]’s Wireless Terminal Project where he took an ESP8266  and added an in-browser terminal emulator which can be accessed over WiFi. The final hardware uses an ESP-01 module mounted atop a breadboard adapter with a 3.3V LDO, protection circuitry for the pins and under-voltage disable.

The firmware is based on [SpriteTM]’s libesphttpd code which was modified to include the VT100 escape sequence parser. The parser, in turn, was coded as a state machine and compiled using Ragel which simplifies such projects greatly. When you access the tiny web server, the loaded webpage starts to communicate over web sockets to the ESP-01. Key-presses from the terminal are sent to the buffer and onto the parser and control logic. The characters are then passed to the hardware UART lines at 115200bps and if an escape sequence is detected, the corresponding action is executed instead.

[Ondřej Hruška] shares the code as well as a user manual in PDF for anyone who would like to try it out and help improve the project. With a little inspiration on learning about state machines, you could extend the project to your own use case as well.

Thanks for the tip [Marco Saarloos]

Son Of Sonoff

We’ve covered the Sonoff a few times–a very inexpensive box with an ESP8266, a power supply, and an AC relay along with a way to tap into a power cord. Very inexpensive means $5 or $6. The supplied software will work with several systems (including, recently, Alexa). But what self-respecting hacker wants to run the stock firmware on something with an ESP8266 inside?

[Tzapu] certainly didn’t. But he also knew he didn’t want to start from scratch every time he wanted to deploy a switch. So he built SonoffBoilerplate and put the code on GitHub. The code manages taking configuration (including network settings) using a web-portal, can update itself over the air, and integrates with Blynk and MQTT. If you don’t like that code base, there are other choices including one that has a failsafe reconfiguration mode.

Continue reading “Son Of Sonoff”