Federico Musto Of Arduino SRL Shows Off New ARM-based Arduino Boards

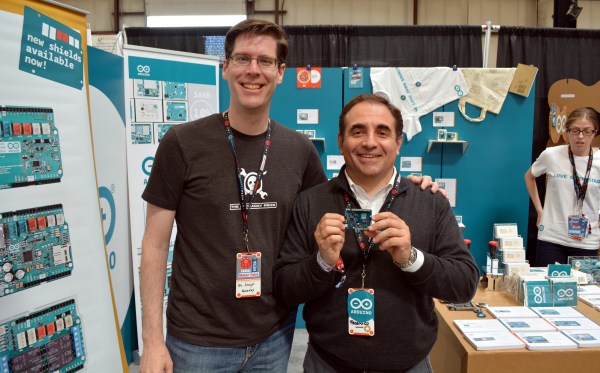
I caught up with Federico Musto, President and CEO of Arduino SRL, at the 2016 Bay Area Maker Faire. Their company is showing off several new boards being prepared for release as early as next month. In partnership with Nordic Semi and ST Microelectronics they have put together some very powerful offerings which we discuss in the video below.

arduino-primo-core-alicepad-star-otto-lcdThe new boards are called Arduino Primo, Arduino Core, Arduino Alicepad, and Arduino Otto.

The first up is the Primo, a board built to adhere to the UNO form factor. This one is packing an interesting punch. The main micro is not an Atmel chip, but a Nordic nRF52832 ARM Cortex-M4F chip. Besides being a significantly fast CPU with floating-point support, the Nordic IC also has built-in Bluetooth LE and NFC capabilities, and the board has a PCB antenna built in.

On an UNO this is where the silicon would end. But on the Primo you get two more controllers: an ESP8266 and an STM32F103. The former is obvious, it brings WiFi to the party (including over-the-air programming). The STM32 chip is there to provide peripheral control and debugging. Debugging is an interesting development and is hard to come by in the Arduino-sphere. This will use the OpenOCD standard, with platformio.org as the recommended GUI.

Continue reading “Federico Musto Of Arduino SRL Shows Off New ARM-based Arduino Boards”

Minimal MQTT: Control And Clients

So you’ve built a central server and filled your house with WiFi-connected nodes all speaking to each other using the MQTT protocol. In short, you’ve got the machine-to-machine side of things entirely squared away. Now it’s time to bring the humans into the loop! We’re going to explore a couple graphical user interfaces.

You could build a physical knob and/or LED display for every little aspect of your entire system, but honestly, this is where GUIs really shine. In this installment of Minimal MQTT, we’re going to look at human-friendly ways of consuming and producing data to interact with your connected sensors, switches, and displays. There are a ton of frameworks out there that use MQTT to build something like this, but we’re going to cut out the middle-man and go straight for some GUI MQTT clients.

Continue reading “Minimal MQTT: Control And Clients”

Tiny Matchbox WiFi Weather Station

Sometimes a project doesn’t have to be technically amazing to win over our hearts. [Malte]’s ESP8266-based weather station is so cute, and so nicely executed, that it’s easily worth a look. It could totally be a commercial product, and it’s smaller than a matchbox.

It combines temperature, humidity, and barometric pressure sensors on one side of a PCB, with pads for soldering a pre-built ESP8266 module on the other side. Solder it all together and flash the firmware and you’re almost all set.

The final step is to configure it to work with the network. For this, [Malte] built in a nice web-based configuration (and display) application. It also can log its data to an MQTT system, so there’s a bunch more configuration (which we’re trying to make easier) needed there, and the web frontend makes that light work. Everything, from the hardware to the firmware, and even a pre-compiled binary, is up on his GitHub. Very complete and very well done.

If you can read German, or are willing to run it through a translator, give his personal projects webpage a look as well. Good stuff here. Now all he needs is a matching nice display for inside.

When The Smart Hits The Fan

A fan used to be a simple device – motor rotates blades, air moves, and if you were feeling fancy, maybe the whole thing oscillates. Now fans have thermostats, timers, and IR remotes. So why not increase the complexity by making a smart fan with an IoT interface?

[Casper]’s project looks more like a proof of concept or learning platform than a serious attempt at home automation. His build log mentions an early iteration based on a Raspberry Pi. But an ESP8266 was a better choice and made it into the final build, which uses an IR LED to mimic the signals from the remote so that all the stock modes of the fan are supported. The whole thing is battery powered and sits on a breadboard on top of the fan, but we’ll bet that a little surgery could implant the interface and steal power internally. As for interfaces, take your pick – an iOS app via the SmartThings home automation platform, through their SmartTiles web client, or using an Amazon Echo. [Casper] mentions looking into MQTT as well but having some confusion; we’d suggest he check out [Elliot Williams]’ new tutorial on MQTT to get up to speed.

Continue reading “When The Smart Hits The Fan”

Minimal MQTT: Building A Broker

In this short series, we’re going to get you set up with a completely DIY home automation system using MQTT. Why? Because it’s just about the easiest thing under the sun, and it’s something that many of you out there will be able to do with material on-hand: a Raspberry Pi as a server and an ESP8266 node as a sensor client. Expanding out to something more complicated is left as an exercise to the motivated reader, or can be simply left to mission creep.

We’ll do this in four baby steps. Each one should take you only fifteen minutes and is completely self-contained. There’s a bunch more that you can learn and explore, but we’re going to get you a taste of the power with the absolute minimal hassle.

In this installment, we’re going to build a broker on a Raspberry Pi, which is the hub of your MQTT network. Next time, we’ll get an ESP8266 up and running and start logging some data. After that, we’ll do some back-end scripting in Python to make the data speak, and in the last installment, we’ll explore some of the useful frills and fancy bits. Let’s get started!

Continue reading “Minimal MQTT: Building A Broker”

Thinking Of You: IoT Style

Do you have loved ones who live far away? Or do you just want an interesting starter ESP8266 project to get your feet wet? If the answer to either of these questions is “yes”, we’ve got just the project for you. [Craig Lindley] built a “thinking of you” button-and-LED display device that helps people keep in touch, in a very simple way.

We like the minimalism of the design. One party presses their button, electrons flow, WiFis WiFi, data travels through a set of tubes, and an LED far away glows a pre-arranged color. The other side can signal back to say “hi” as well. It’s a cute item to have on your desk, or wherever you spend the most time. If you’re new to all of this, you can hardly beat the circuit for its simplicity.

Yeah, you could totally just send the other person a text message or an e-mail. But then you don’t get an excuse to play around with NodeMCU, and it just lacks the personal hacker touch. The code is available in a zip file here, and if you want to stay in touch with someone other than [Craig]’s sisters, you’ll probably want to customize it a bit.

Fail Of The Week: ESP8266 Heats Temperature Sensor

[Richard Hawthorn] sent us in this interesting fail, complete with an attempted (and yet failed) clever solution. We love learning through other people’s mistakes, so we’re passing it on to you.

First the obvious-in-retrospect fail. [Richard] built a board with a temperature sensor and an ESP8266 module to report the temperature to the Interwebs. If you’ve ever put your finger on an ESP8266 module when it’s really working, you’ll know what went wrong here: the ESP8266 heated up the board and gave a high reading on the temperature sensor.

temp2
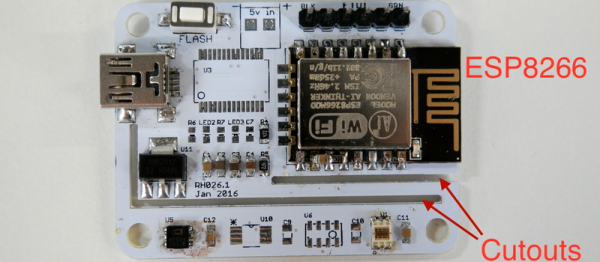
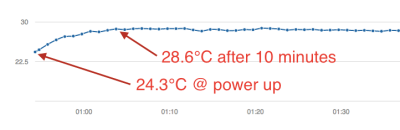
Next came the clever bit. [Richard] put cutouts into the board to hopefully stop the flow of heat from the ESP8266 module to the temperature sensor. Again, he found that the board heats up by around four degrees Celcius or nine degrees Farenheit. That’s a horrible result in any units.

What to do? [Richard’s] first ideas are to keep hammering on the thermal isolation, by maybe redoing the board again or adding a heatsink. Maybe a daughterboard for the thermal sensor? We can’t see the board design in enough detail, but we suspect that a flood ground plane may be partly to blame. Try running thin traces only to the temperature section?

[Richard]’s third suggestion is to put the ESP into sleep mode between updates to reduce waste heat and power consumption. He should be doing this anyway, in our opinion, and if it prevents scrapping the boards, so much the better. “Fix it in software!” is the hardware guy’s motto.

But we’ll put the question to you electronics-design backseat drivers loyal Hackaday readers. Have you ever noticed this effect with board-mounted temperature sensors? How did you / would you get around it?


2013-09-05-Hackaday-Fail-tips-tileFail of the Week is a Hackaday column which celebrates failure as a learning tool. Help keep the fun rolling by writing about your own failures and sending us a link to the story — or sending in links to fail write ups you find in your Internet travels.