3D-Printer Extrudes Paper Pulp Instead Of Plastic

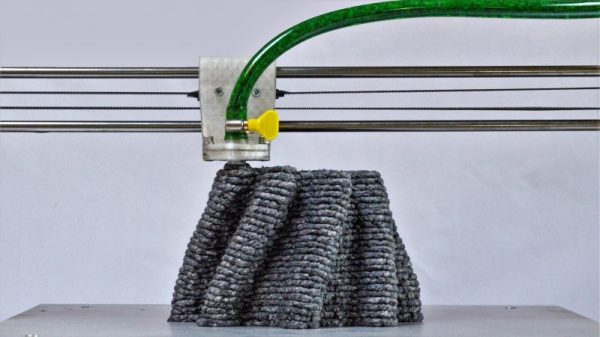
We’ve seen all sorts of 3D-printers on these pages before. From the small to the large, Cartesians and deltas, and printers that can squeeze out plastic, metal, and even concrete. But this appears to be the first time we’ve ever featured a paper-pulp extruding 3D-printer.

It’s fair to ask why the world would need such a thing, and its creator, [Beer Holthuis], has an obvious answer: the world has a lot of waste paper. Like 80 kg per person per year. Thankfully at least some of that is recycled, but that still leaves a lot of raw material that [Beer] wanted to put to work. Build details on the printer are sparse, but from the photos and the video below it seems clear how it all went together. A simple X-Y-Z gantry moves a nozzle over the build platform. The nozzle, an order of magnitude or two larger than the nozzles most of us are used to, is connected to an extruder by a plastic hose. The extruder appears to be tube with a stepper-driven screw that lowers a ram down onto the pulp, squeezing it into the hose. [Beer] notes that the pulp is mixed with a bit of “natural binder” to allow the extruded pulp to keep its shape. We found the extrusion process to be just a wee bit repulsive to watch, but fascinating nonetheless, and the items he’s creating are certainly striking in appearance.

This may be the first pulp printer to grace our pages, but it’s not the first pulp hack we’ve featured. Pulp turns out to be a great material to keep your neighbors happy and even makes a dandy fuel.

Continue reading “3D-Printer Extrudes Paper Pulp Instead Of Plastic”

Maker Faire NY: Cocoa Press Chocolate Printer

If you haven’t figured it out by now, the hype over desktop filament printers is pretty much over. But that doesn’t mean there aren’t new avenues worth exploring that use the basic FDM printer technology. If anything, the low cost and high availability of 3D printer parts and kits makes it easier to branch off into new territory. For example, experimenting with other materials which lend themselves to being “printed” layer by layer like a thermoplastic. Materials such as cement, clay, or even chocolate.

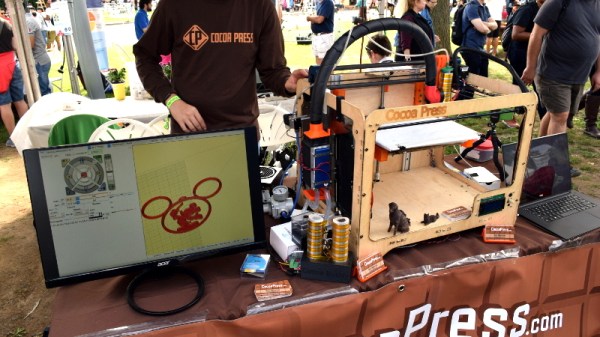
[Ellie Weinstein] brought her Cocoa Press printer to the 2018 World Maker Faire in New York, and we have to say it’s a pretty impressive piece of engineering. Hackers have been known to throw a syringe-based paste extruder onto a regular 3D printer and try their luck with squirting out an edible object from time to time, but the Cocoa Press is truly a purpose built culinary machine.

Outwardly it features the plywood case and vaguely Makerbot-looking layout that we’ve seen plenty of times before in DIY 3D printers. It even uses the same RAMPS controller running Marlin that powers your average homebrew printer. But beyond these surface similarities, the Cocoa Press has a number of purpose-built components that make it uniquely qualified to handle the challenges of building with molten chocolate.

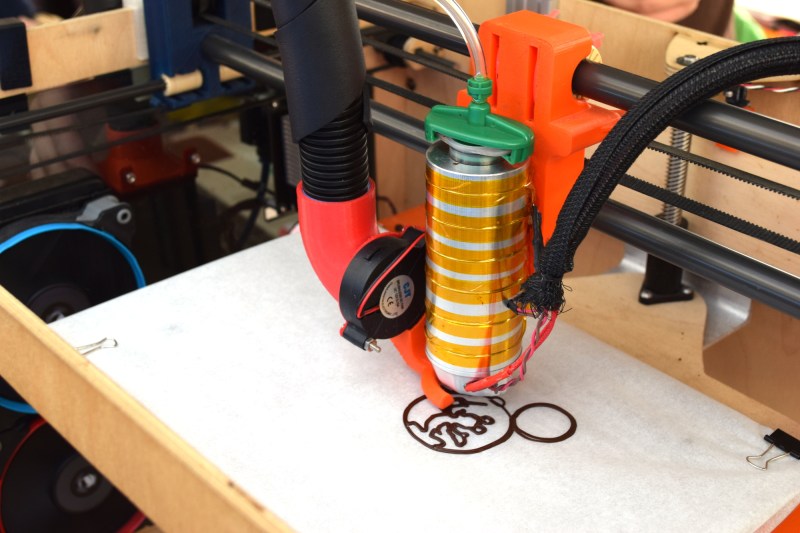
For one, beyond the nozzle and the walls of the syringe, nothing physically comes into contact with the chocolate to be printed; keeping the mess and chance of contamination to a minimum. The leadscrew actuated plunger used in common paste extruders is removed in favor of a purely air powered system: a compressor pumps up a small reservoir tank with filtered and dried air, and the Marlin commands which would normally rotate the extruder stepper motor are intercepted and used to trigger an air valve. These bursts of pressurized air fill the empty area above the chocolate and force it out of the 0.8 mm nozzle.

In a normal 3D printer, the “melt zone” is tiny, which allows for the heater itself to be relatively small. But that won’t work here; the entire chocolate load has to be liquefied. It’s a bit like having to keep a whole roll of PLA melted during the entire print. Accordingly, the heater on the Cocoa Press is huge, and [Ellie] even had a couple spare heaters loaded up with chocolate syringes next to the printer to keep them warm until they’re ready to get loaded up.

Of course, getting your working material hot in a 3D printer is only half the battle, you also need to rapidly cool it back down if you want it to hold its shape as new layers are placed on top of it. A normal 3D printer can generally get away with a little fan hanging next to the nozzle, but [Ellie] found the chocolate needed a bit of a chill to really solidify.

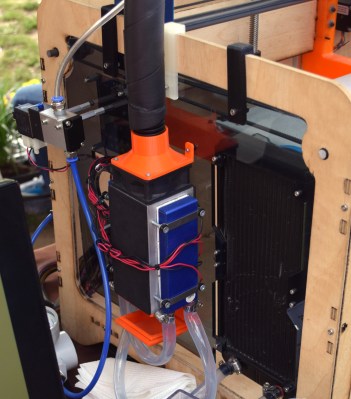
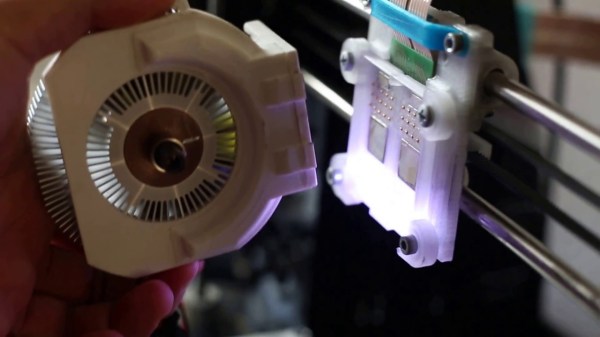
So she came up with a cooling system that makes use of water-cooled Peltier units. The cold side of the Peltier array is inside a box through which air is forced, which makes its way through an insulated hose up to the extruder, where a centrifugal fan and 3D printed manifold direct it towards the just-printed chocolate. She reports this system works well under normal circumstances, but unusually high ambient temperatures can overwhelm the cooler.

While “the man” prevented show goers from actually eating any of the machine’s creations (to give out food in New York, you must first register with the city), they certainly looked fantastic, and we’re interested in seeing where the project goes from here.

Scratch-Built 3D-Printer Goes Back To The Roots Of The Hobby

It’s so easy and so cheap to order things like CNC routers and 3D-printers off the shelf that we can be forgiven for forgetting what was once involved in owning machines such as these. It used to be that you had no choice but to build your machine from the ground up. While that’s less true today, it’s still the case if you want to push the limits of what’s commercially available, and this huge scratch-built 3D-printer is a good example of that.

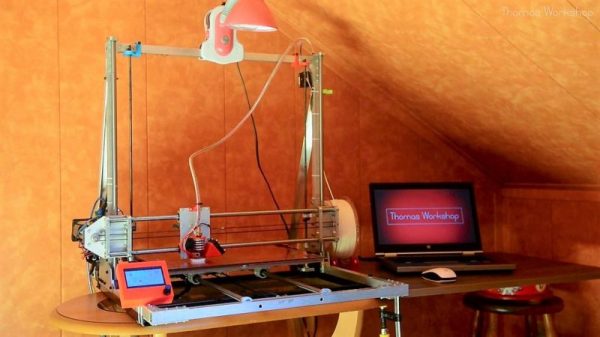
It’s not exactly a fresh build – [Thomas Workshop] posted this last year – but it escaped our notice at the time, and we think the three-part video series below that details the build deserves a look over. When we say scratch built, we mean it. This machine started off as a bundle of aluminum and steel stock. No 80/20 extrusions, no off-the-shelf linear rails – just metal and a plan. The build was helped considerably by a small CNC router, which also had that DIY look, but most of the parts were cut and finished with simple hand tools. The resulting gantry allows an enormous work volume 40 cm in each dimension, with a heated bed that uses four heat mats. We were impressed that [Thomas] got the build just far enough to print parts that were used to finish the build – that’s the hacker spirit.

It’s perhaps not the biggest 3D-printer we’ve seen – that distinction might go to this enormous 8-cubic foot machine – and it certainly can’t print a house. But it’s an impressive build that probably cost a whole lot less than a commercial machine of similar capacity, and it’s got that scratch-built cred.

Continue reading “Scratch-Built 3D-Printer Goes Back To The Roots Of The Hobby”

This Cetus Printer Is Rigged For Silent Running

The entry-level 3D-printer market is a rich one, with offerings from many vendors that are surprisingly good. But nothing is perfect, and to hit the $200 price point some compromises are inevitable. That doesn’t mean you have to live with those engineering choices, of course, which makes these cheap printers a great jumping off point for aftermarket mods.

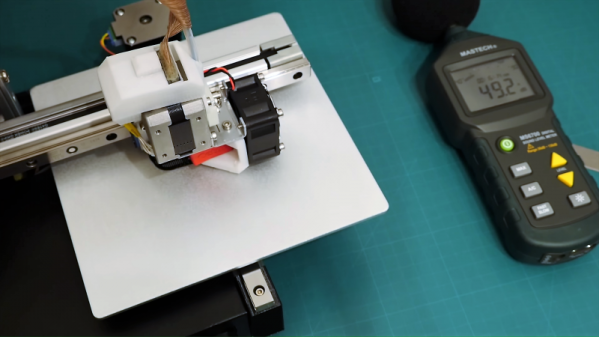
[Linas K] took this route and in the process made his Cetus 3D-printer essentially silent. The first part of the video below reviews the shortcomings of the stock machine and the mechanical changes [Linas] made, including new brackets for the Z-axis slide, relocating the WiFi antenna to someplace sensible, and adding limit switches for each slide. Inside the case, the electronics get a complete reworking, with a custom PCB to house Trinamic stepper drivers for ultraquiet operation. The new board also supports the limit switches as well as thermostatic control of the extruder fan and pads for a platform heater. As a bonus, the new PCB is much smaller than the original, leaving room to tuck the power supply into the case, which is a nice touch. It wasn’t cheap, and it meant basically gutting the printer, but the results are impressively quiet.

We’re tempted to try these silencing mods on our own Cetus, if [Linas] ever publishes the BOM and PCB designs (hint, hint). And Cetus hacking is becoming quite a thing around here. From a trio of Cetus pro-tips to turning a Cetus into a PCB machine, the little printer has a lot to offer.

Continue reading “This Cetus Printer Is Rigged For Silent Running”

3D-Printer Gets Hot-Swappable Hot-Ends

3D printers can be hacked into a multitude of useful machines, simply by replacing the filament extruder with a new attachment such as a laser engraver or plotter.

However, [geggo] was fed up with re-wiring and mounting the printhead/tool every time he wanted to try something new, and set out to design a modular printhead system for next-level convenience. The result? A magnetic base-plate, allowing a 3D printer to become a laser engraver within a matter of seconds. This new base-plate mounts onto the existing ball bearings and provides a sturdy place for attachments to snap to – with room for two at once.

Using neodymium magnets to mount the printhead to the base-plate provides enough force to keep the attachment in place and compress 30 pogo pins, which make the electrical connections. These carry the lines which are common to all attachments (heater, thermistor and fan), as well as custom connections for certain attachments – for example the extruder stepper motors.  A Flexible Flat Cable (FFC) is used to connect the pogo pin PCB to the main controller.

So far, the list of tools available for fitting includes an MK8 extruder, a E3D v6 hotend (for Bowden extrusion), a laser, a micrometer dial indicator, and a pen plotter (used for writing a batch of wedding invitations!). There was even some success milling wood.

For some automated extruder switching action we’ve shown you in the past, check out the 3d-printer tool changer.

Continue reading “3D-Printer Gets Hot-Swappable Hot-Ends”

3D Printering: Printing Sticks For A PLA Hot Glue Gun

When is a hot glue stick not a hot glue stick? When it’s PLA, of course! A glue gun that dispenses molten PLA instead of hot glue turned out to be a handy tool for joining 3D-printed objects together, once I had figured out how to print my own “glue” sticks out of PLA. The result is a bit like a plus-sized 3D-printing pen, but much simpler and capable of much heavier extrusion. But it wasn’t quite as simple as shoving scrap PLA into a hot glue gun and mashing the trigger; a few glitches needed to be ironed out.

Why Use a Glue Gun for PLA?

Some solutions come from no more than looking at two dissimilar things while in the right mindset, and realizing they can be mashed together. In this case I had recently segmented a large, hollow, 3D model into smaller 3D-printer-sized pieces and printed them all out, but found myself with a problem. I now had a large number of curved, thin-walled pieces that needed to be connected flush with one another. These were essentially butt joints on all sides — the weakest kind of joint — offering very little surface for gluing. On top of it all, the curved surfaces meant clamping was impractical, and any movement of the pieces while gluing would result in other pieces not lining up.

An advantage was that only the outside of my hollow model was a presentation surface; the inside could be ugly. A hot glue gun is worth considering for a job like this. The idea would be to hold two pieces with the presentation sides lined up properly with each other, then anchor the seams together by applying melted glue on the inside (non-presentation) side of the joint. Let the hot glue cool and harden, and repeat. It’s a workable process, but I felt that hot glue just wasn’t the right thing to use in this case. Hot glue can be slow to cool completely, and will always have a bit of flexibility to it. I wanted to work fast, and I wanted the joints to be hard and stiff. What I really wanted was melted PLA instead of glue, but I had no way to do it. Friction welding the 3D-printed pieces was a possibility but I doubted how maneuverable my rotary tool would be in awkward orientations. I was considering ordering a 3D-printing pen to use as a small PLA spot welder when I laid eyes on my cheap desktop glue gun.

Continue reading “3D Printering: Printing Sticks For A PLA Hot Glue Gun”

The Engineering Analysis Of Plastic-Dissolving Lubricant

Over the years, E3D has made a name for themselves as a manufacturer of very high-quality hotends for 3D printers and other printer ephemera. One of their more successful products is the Titan Extruder, a compact extruder for 3D printers that is mostly injection-molded plastic. The front piece of the Titan is a block of molded polycarbonate, a plastic that simply shouldn’t fail in its normal application of holding a few gears and bearings together. However, a few months back, reports of cracked polycarbonate started streaming in. This shouldn’t have happened, and necessitated a deep dive into the failure analysis of these extruders. Lucky for us, E3D is very good at doing engineering teardowns. The results of the BearingGate investigation are out, and it’s a lesson we can all learn from.

The first evidence of a problem with the Titan extruders came from users who reported cracking in the polycarbonate case where the bearing sits. The first suspect was incorrectly manufactured polycarbonate, perhaps an extruder that wasn’t purged, or an incorrect resin formulation during manufacturing. A few whacks with a hammer of each production run ruled out that possibility, so suspicion turned to the bearing itself.

After a few tests with various bearings, the culprit was found: in some of the bearings, the lubricant mixed with the polycarbonate to create a plastic-degrading toxic mixture. These results were verified by simply putting a piece of polycarbonate and the lubricant in a plastic bag. This test resulted in some seriously messed up plastic. Only some of the bearings E3D used caused this problem, a lesson for everyone to keep track of your supply chain and keep records of what parts went into products when.

The short-term fix for this problem is to replace the bearing in the Titan with IGUS solid polymer bushings. These bushings don’t need lubricant, and therefore are incapable of killing the polycarbonate shell. There are downsides to this solution, namely that the bushings need to be manufactured, and cause a slight increase in friction reducing the capability of the ‘pancake’ steppers E3D is using with this extruder.

The long-term solution for this problem is to move back to proper bearings, but changing the formulation of the polycarbonate part to something more chemical resistant. E3D settled on a polymer called Tritan from Eastman, a plastic with similar mechanical properties, but one that is much more chemically resistant. This does require a bit more up-front work than machining out a few bearings, but once E3D gets their Tritan parts in production, they will be able to move back to proper bearings with the right lubrication.

While this isn’t a story of exploding smartphones or other disastrous engineering failures, it is a great example of how your entire supply chain goes into making a product, and how one small change can ruin an entire product. This is real engineering right here, and we’re glad E3D finally figured out what was going on with those broken Titan extruders.