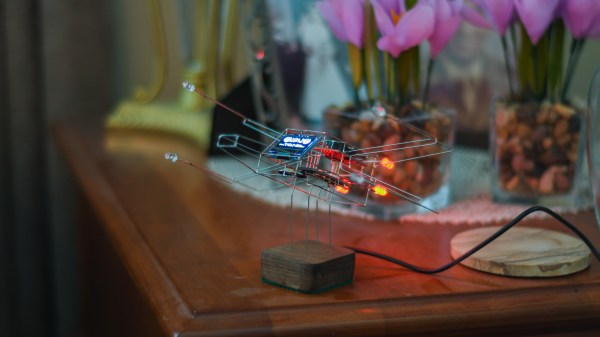
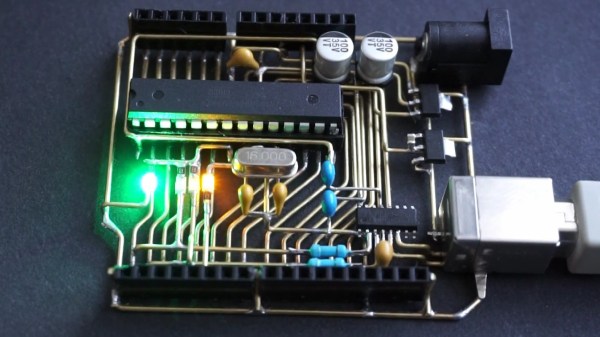
Beautiful lamp made from recycled can

Another Way To Recycle Those Empty Beverage Cans

Do you ever sit around thinking of ways to repurpose things in your house? Well [BevCanTech] found a way to recycle some of his empty beverage cans by turning them into homemade wire.

Beautiful, decorative, and functional lamp made from soda can. Also showing the positive and negative voltage terminals.

The premise is simple. He cut 2 mm thick strips of wire from the beverage can along its circumference, creating a thin, long “wire” spool. He sanded the ends of each strip to crimp pieces of his homemade wire together. He found he could get about four meters from a standard-sized beverage can, probably roughly 12 oz, as he unraveled the can. He then used crimp connectors to connect his homemade wires to the battery terminals and also to the end of a flashlight. He used a red cap from another can as a pseudo light diffuser and lampshade, creating a pretty cool, almost lava lamp-like glow.

Maybe the meat of this project won’t be as filling as your Thanksgiving meal, but hopefully, it can serve as a bit of inspiration for your next freeform circuit design. Though you’ll probably want to smooth those sharp edges along your homemade wire.

How Many Of You Are There, Really?

We’re now accustomed to hearing, “We’re all special in our own unique ways.” But what if we weren’t really aren’t all that unique? Many people think there are no more than two political opinions, maybe a handful of religious beliefs, and certainly no more than one way to characterize a hack. But despite this controversy in other aspects as life, at least we can all rely on the uniqueness of our individual names. Or can you?

You ever thought there were too many people named [insert name here]? Well, [Nicole] thought there were too many people who shared her name in her home country of Belgium and decided to make an art piece out of it.

She was able to find data on the first names of people in Belgium and wrote a Python script…er…used Excel to find the number of Nicoles in each zip code. She then created a 3D map of Belgium divided into each province with the height of each province proportional to the number of Nicoles in that area. A pretty simple print job that any standard 3D printer can probably do these days.

Not much of a “do something” hack, but could make for a cool demotivational ornament that will constantly remind us just how unique we really are.

Happy hacking!

Continue reading “How Many Of You Are There, Really?”

Circuit Sculpture Clock Goes Pew Pew

Freeform circuit sculptures are a perfect example of the realm where electronic meets art. While many of these objects only serve aesthetic purposes, [Zachary Goode]’s X-Wing clock satisfies both form and function.

He makes no secret of the fact that his project was inspired by the works of Mohit Bhoite, one of our favorite freeform circuit artists. In particular, he wanted to make an X-Wing version of Mohit’s Tie Fighter Clock.

After sketching out the design in Fusion360, he printed out a paper stencil for each part to help him bend the pieces into the right shape. Next, he assembled the wireframe by soldering before mounting the electronics, an Arduino Nano, DS3231 RTC module, and OLED display. For special effects, he added a speaker that randomly plays engine and laser sounds and some Blinkenlights.

He also decided to include some woodworking in his project by making a walnut base which includes the USB cable for power supply and two slide switches. The latter enable him to disable the sound effects and switch to daylight saving time.

Considering that this is his first foray into freeform circuits the result is astonishingly beautiful. If you share our love for these intricate objects be sure to check out our compilation of equally appealing circuit sculptures.


This Wristwatch Is A Free Form Work Of Art

Free-form circuitry built as open wire sculpture can produce beautiful pieces of electronics, but it does not always lend itself to situations in which it might be placed under physical stress. Thus the sight of [Mile]’s free-form wristwatch is something of a surprise, as a wristwatch cam be exposed to significant mechanical stress in its everyday use.

A wire Wrencher graces thewe underside.
A wire Wrencher graces the underside.

The electronic side of this watch is hardly unusual, the familiar ATmega328-AU low-power microcontroller drives a tiny OLED display. Mechanically though it is a different story, as the outline of a wristwatch shell is traced in copper wire with a very neat rendition of a Wrencher in its base, and a glass lens is installed over the screen to take the place of a watch glass. A strap completes the wristwatch, which can then be worn like any other. Power comes from a small 110 mAh lithium-polymer cell, which it is claimed gives between 6 and 7 hours of on time and over a month of standby with moderate use.

Unfortunately there does not seem to be much detail about the software in this project, but since ATmega328 clocks and watches are ten a penny we don’t think that’s a problem. The key feature is that free-form construction, and for that we like it a lot.

Dead Bug Arduino Is Lively And Shield-Compatible

Microcontroller demo boards such as the Arduino UNO are ubiquitous on Hackaday as the brains of many a project which inevitably does something impressive or unusual. Sometime someone builds a particularly tiny demo board, or an impressively large one. In the case of the board featured here, the Arduino is a gorgeous labor of love which can’t really be called a board since there is no PCB. Instead of the traditional fiberglass, [Jiří Praus] formed brass bars into the circuitry and held it together with solder.

This kind of dedication to a project leaves an impression. His notes show he saw the barest way to operate an ATMega328, built it, tested, and moved on to the power supply to make it self-sustaining, then onto the communication circuit, and finally the lights. The video below shows a fully-functional Arduino happily running the blink program. He plans to encase the brass portion in resin to toughen it up and presumably keep every bump from causing a short circuit. The components are in the same position due to a custom jig which means a standard shield will fit right into place.

The Arduino started far less flashy yet nearly as fragile, and it has grown. And shrunk.

Continue reading “Dead Bug Arduino Is Lively And Shield-Compatible”

Lateral Thinking For An Easier Charlieplex

In the practical world we live in, PCBs are often rectangles (or rectangles with rectangles, it’s just rectangles all the way down). When a designer goes to schematic capture things are put down on nice neat grid intersections; and if there isn’t a particular demand during layout the components probably go on a grid too. Routing even the nastiest fractal web of traces is mostly a matter of layers and patience. But if the layout isn’t being done in a CAD tool and needs to be hand assembled free-form this isn’t always as simple. [M Rule] had this very problem and discovered a clever solution, turning things diagonal.

They changed the fitness criteria to the optimization problem that is controlling a lot of LEDs. Instead of minimum pins to drive the goal became “easiest assembly”, which meant avoiding wires snaking back and forth across the layout, a big source of frustration in a big Charlieplexed design. The observation was that if they turned the a rectilinear LED matrix by 45° and wrapped each connection around at the edges it formed what was essentially a large multiplexed matrix. The topology is pretty mind bending, so take a minute to study the illustration and build your mental model.

It looks a little strange, but this display works the same way a normal multiplexed display does but with the added benefit that each trace flows from one side to the other without turning back on itself at any point. To light any LED set the right row/column pair as source/sink and it turns on!

What if you actually need a rectangular display? Well that’s no problem, the matrix can be bent and smooshed as desired to change its shape. At the most extreme the possible display topologies get pretty wild! We’re sure to try thinking laterally next time we need to design an unusual display, maybe there is a more efficient matrix to be found.

One More Weekend To Sculpt Your Circuits!

Drop what you’re doing and get thee to thy workshop. This is the last weekend of the Hackaday Circuit Sculpture Contest, the perfect chance for you to exercise the creative hacker within by building something artistic using stuff you already have on hand.

The concept is simple: build a sculpture where the electronic circuit is the sculpture. Wire the components up in a way that shows off that wiring, and uses it as the structure of the art piece. Seven top finishers will win prizes, but really we want to see everyone give this a try because the results are so cool! Need proof? Check out all the entries, then ooh and ah over a few we’ve picked out below. You have until this Tuesday at noon Pacific time to get in the game.

These are just three awesome examples of the different styles we’ve seen so far in the contest. Who needs a circuit board for a retro computer? Most people… but apparently not [Matseng] as this Z80 computer is freformed yet still interactive.

Really there can’t be many things more horrifying than the thought of spider robots, but somehow [Sunny] has taken away all of our fears. The 555 spider project takes “dead bug” to a whole new level. We love the angles in the legs, and the four SMD LEDs as spider eyes really finish the look of the tiny beast.

Finally, the 3D design of [Emily Valesco’s] RGB Atari Punk Console is spectacular. It’s a build that sounds great, and looks as though it will hold up to regular use. But visually, this earns a place on your desk long after the punky appeal wears off. We also like it that she added a color-coded photograph to match up the structure to the schematic, very cool!

What are you waiting for, whether it’s a mess of wires or a carefully structured electron ballet, we want to see your Circuit Sculpture!