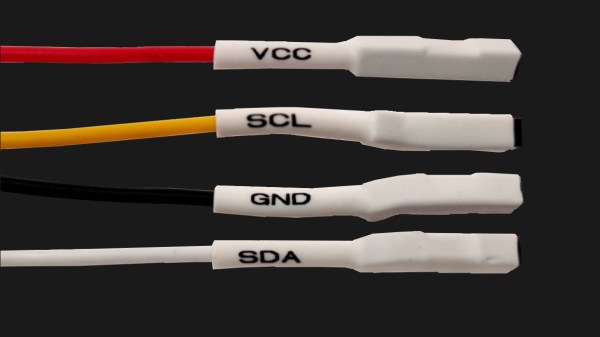
Four jumper wires with white heatshrink on them, labelled VCC, SCL, SDA and GND

The Connector Zoo: I2C Ecosystems

I2C is a wonderful interface. With four wires and only two GPIOs, you can connect a whole lot of sensors and devices – in parallel, at that! You will see I2C used basically everywhere, in every phone, laptop, desktop, and any device with more than a few ICs inside of it – and most microcontrollers have I2C support baked into their hardware. As a result, there’s a myriad of interesting and useful devices you can use I2C with. Occasionally, maker-facing companies create plug-and-play interfaces for the I2C device breakouts they produce, with standardized pinouts and connectors.

Following a standard pinout is way better than inventing your own, and your experience with inconsistent pin header pinouts on generic I2C modules from China will surely reflect that. Wouldn’t it be wonderful if you could just plug a single I2C-carrying connector into an MPU9050, MLX90614 or HMC5883L breakout you bought for a few dollars, as opposed to the usual hurdle of looking at the module’s silkscreen, soldering pin headers onto it and carefully arranging female headers onto the correct pins?

As with any standard, when it comes to I2C-on-a-connector conventions, you would correctly guess that there’s more than one, and they all have their pros and cons. There aren’t quite fifteen, but there’s definitely six-and-a-half! They’re mostly inter-compatible, and making use of them means that you can access some pretty powerful peripherals easily. Let’s start with the two ecosystems that only have minor differences, and that you’ll encounter the most! Continue reading “The Connector Zoo: I2C Ecosystems”

This Box Counts Your Blessings For You

It’s that time of year again when production in Shenzhen grinds to a halt. Lunar New Year has kicked off the annual month-long Spring Festival, and the whole country has taken time off to be with family and celebrate. One tradition of Spring Festival is that everyone gives each other red envelopes with various amounts of money in them called hongbao. The point of this ‘lucky money’ is to spread good fortune in the new year, and it’s easy to amass a whole pile of hongbao by the end of the festival.

[Makerming] made this lovely counting box for anyone looking to keep track of their hongbao in style. It probably goes without saying that this would make an awesome mailbox for Valentines (or anything else that fits in the slot), but there you go. The circuit is pretty simple thanks to a Grove connector shield meant for Arduinos. An IR break-beam module detects the incoming envelope, and the Uno increments the count on the display. The wiggly, servo-driven example hongbao on top are there to add to the fun.

We love the laser-cut decoration on the front, which is an homage to the intricate paper cut decorations. If you don’t like that one, [Makerming] included design files for several other options. Watch it wiggle after the break!

If you won’t be looking to collect valentines because you’ve already found that special someone, give them something that lasts longer than chocolate or roses.

Continue reading “This Box Counts Your Blessings For You”

Corporate Badgelife: Oracle’s Code Card

We tend to think of elaborate electronic conference badges as something limited to the hacker scene, but it looks like the badgelife movement is starting to hit the big time. Now even the “big boys” are getting into the act, and pretty soon you won’t be able to go to a stuffy professional conference without seeing a sea of RGB LEDs firing off. We’ll let the good readers of Hackaday determine if this means it’s officially post-cool or not.

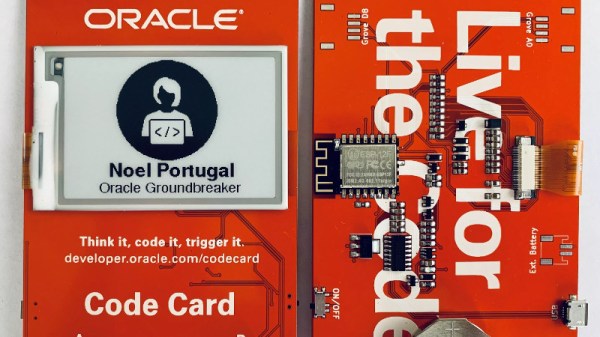
[Noel Portugal] writes in to tell us about how he created the “Code Card” during his tenure with the Oracle Groundbreakers Team. Featuring an ESP8266 and an e-ink screen, the Code Card serves not only as swanky way of identifying yourself, but as a real-world demonstration of physical devices pulling content from Oracle’s Cloud. Gotta keep those corporate overlords happy.

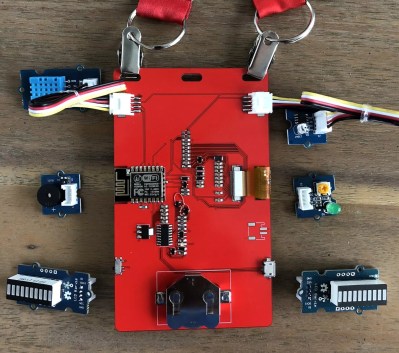
The Code Card is a fairly simple piece of hardware as far as badges go these days, but then the goal was never to be flashy. It does feature dual four-pin Grove System connectors on the backside though, so you can plug in additional sensors and gadgets for the customary badge hacking sessions.

To maximize runtime on the rechargeable coin cell battery, the Code Card only turns on the ESP after the user has pressed one of the buttons on the front. Once the ESP has finished performing whatever task the user requested, its powered back off completely rather than put into standby. Combined with the e-ink screen, power consumption while the device isn’t actively updating the display or pulling down new content is negligible.

[Noel] really went all-out on the software side, going as far as developing a web application which let conference attendees configure their Code Cards from their smartphones. Different functions could be assigned to short and long presses on the badge’s two buttons, and users could even select icons for the various functions from a list of images included in the firmware. A feature where attendees could upload their own images didn’t make the cut, but that surely won’t stop people from hacking around in the published Arduino source code and figuring out how to do it manually.

If you think the Code Card looks a bit familiar, it’s perhaps because it was designed in conjunction with Squarofumi, creators of the Badgy. So even if you aren’t hitting up any of Oracle’s upcoming conferences, you’re not completely out of luck if you want an e-ink badge to play with.

PobDuino Makes The Most Of Grove

The chassis of a toy robot serves as the base of a robot built by [Jean Noel]. Called #PobDuino, the robot features two Arduino-compatible boards under the hood.

First, a Seeeduino Lotus, a Arduino board peppered with a dozen Grove-compatible sockets. The board, which is the size of an UNO, is mounted so that the plugs project out of the front of the robot, allowing ad-hoc experimentation with the various Grove System modules. Meanwhile, a custom ATmega328 board (the PobDuino) interprets Flowcode instructions and sends commands to the various parts of the robot: servos are controlled by an Adafruit servo driver board and the DC motors are driven by a Grove I2C motor driver.

We love how easy it is to customize the robot, with both the Lotus and the Adafruit 16-channel servo driver on the exterior of the robot. Just plug and play!

Learn more about Grove-compatible plugs and a lot more in [Elliot]’s My Life in the Connector Zoo.

An Interactive Oasis At Burning Man

An oasis in the desert is the quintessential image of salvation for the wearied wayfarer. At Burning Man 2016, Grove — ten biofeedback tree sculptures — provided a similar, interactive respite from the festival. Each tree has over two thousand LEDs, dozens of feet of steel tube, two Teensy boards used by the custom breath sensors to create festival magic.

Grove works like this: at your approach — detected by dual IR sensors — a mechanical flower blooms, meant to prompt investigation. As you lean close, the breath sensors in the daffodil-like flower detect whether you’re inhaling or exhaling, translating the input into a dazzling pulse of LED light that snakes its way down the tree’s trunk and up to the bright, 3W LEDs on the tips of the branches.

Debugging and last minute soldering in the desert fixed a few issues, before setup — no project is without its hiccups. The entire grove was powered by solar-charged, deep-cycle batteries meant to least from sunset to sunrise — or close enough if somebody forgot to hook the batteries up to charge.

Continue reading “An Interactive Oasis At Burning Man”

My Life In The Connector Zoo

“The great thing about standards is that there are so many to choose from.” Truer words were never spoken, and this goes double for the hobbyist world of hardware hacking. It seems that every module, every company, and every individual hacker has a favorite way of putting the same pins in a row.

We have an entire drawer full of adapters that just go from one pinout to another, or one programmer to many different target boards. We’ll be the first to admit that it’s often our own darn fault — we decided to swap the reset and ground lines because it was convenient for one design, and now we have two adapters. But imagine a world where there was only a handful of distinct pinouts — that drawer would be only half full and many projects would simply snap together. “You may say I’m a dreamer…”

This article is about connectors and standards. We’ll try not to whine and complain, although we will editorialize. We’re going to work through some of the design tradeoffs and requirements, and maybe you’ll even find that there’s already a standard pinout that’s “close enough” for your next project. And if you’ve got a frequently used pinout or use case that we’ve missed, we encourage you to share the connector pinouts in the comments, along with its pros and cons. Let’s see if we can’t make sense of this mess.

Continue reading “My Life In The Connector Zoo”

Physical Fitness For The Truly Lazy

We’re going to get in shape around here, starting today. Well… in the United States, it is almost Thanksgiving, so we might as well wait until… but then it is going to be the end of the year and between Christmas, Hanukkah,  and New Year’s, we should put it off until then.

OK, we get it. There’s always some excuse. We know we should go on and do some push ups today. Of course, we are a lazy bunch, so not everyone’s going to do a full push up. Then we’ll all argue how many we actually did. If this sounds like you, maybe you need an Arduino-based project that counts proper push ups.

Continue reading “Physical Fitness For The Truly Lazy”