Servo Socks Is A Brilliantly Simple Solution For Quick Hacking

[Dan Kitchen] has a great solution for making servos easy to hack.

Every hacker has a drawer full of servo’s somewhere. Just about every project that uses them starts off by measuring the spacing and designing some obscure bracket to meet that unique motor’s size. However, what if you could use common wood screws and hand tools to use them right away?

[Dan]’s solution is to make a case from recycled HDPE lumber, the same sort of material you might buy for a deck. This material is sandable, carvable, and can be drilled into. The case encapsulates the servo motor completely. One side has a freewheeling wooden disk and the other side’s disk is attached to the motor.  Now when you need motion you can work with the servo as if it were just a block of wood. Very cool.

[Dan] appears to be moving to make this a commercial product and we can see why. Though we see no reason why an enterprising hacker or hackerspace couldn’t come up with their own variations on this great idea.

Spot Welding …Plastic?

Plastic milk bottles, when your project or prototype needs an urgent source of plastic, they are often the first thing to hand. Convenient and flexible, but strong at the same time and usually free, they’re the ultimate source of material in a pinch. However, when it comes to actually manipulating the HDPE plastic they’re made from, there’s often a challenge. It’s easy to cut, but not so easy to join. Conventional glues can have a hard time, making it difficult to bond.

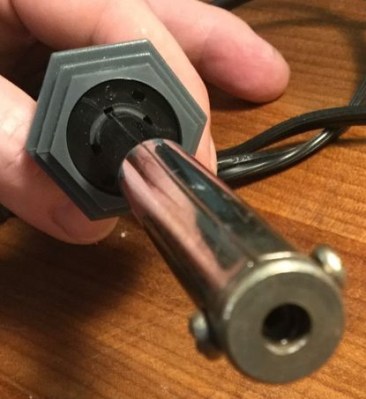
Enter [zimitt], and a spot welding solution for joining HDPE with ease. Ok, so ‘spot welding’ might be a little optimistic given the speed of this process, but it’s useful nonetheless. To heat the plastic, a cheap soldering iron is recommended. A low wattage, straight-to-the-wall one does well, especially as they commonly have the washer-style end shown in the picture. To protect the plastic from burning, a BBQ mat is used – they’re temperature resistant and usually made with a PTFE surface.

First, place the two sheets of plastic face to face and sandwich top and bottom with the BBQ mat. Apply some heat to the mat with the soldering iron then, after a few seconds, remove the iron and provide pressure with a flat object to bond the plastic. [zimitt] used an espresso tamper for this which was ideal.

The results are impressive, and [zimitt] experiments with different plastics as well. Of course, you should exercise caution when attempting anything like this, given the health risks present when heating up different types of plastic.

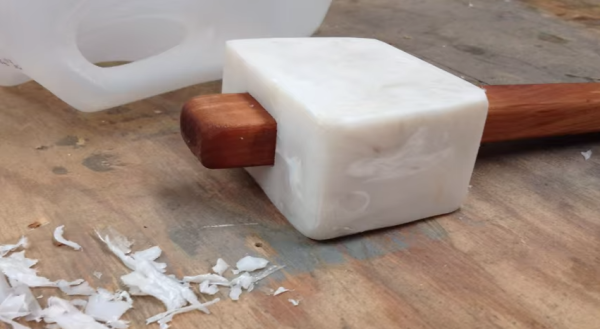
HDPE is easy to recycle at home, and we’ve seen a lot of great uses: a plastic joiner’s mallet, plastic tiles, and even a filament extruder for 3D printing.

Fresh-Baked Plastic Tiles For All!

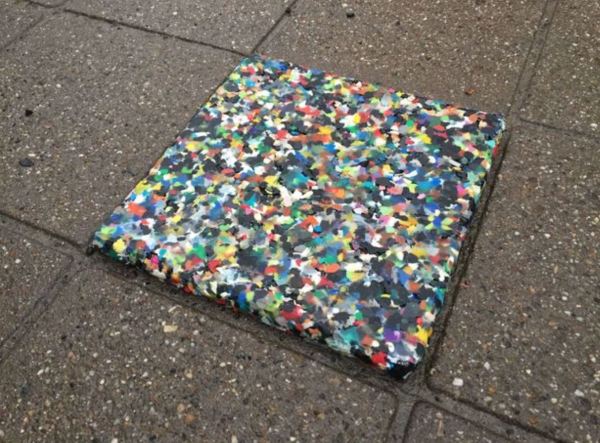
Recycling aims to better the planet, but — taken into the hands of the individual — it can be a boon for one’s home by trading trash for building materials. [fokkejongerden], a student at the [Delft University of Technology] in the Netherlands, proposes one solution for all the plastic that passes through one’s dwelling by turning HDPE into tiles.

Collecting several HDPE containers — widely used and easy enough to process at home — [fokkejongerden] cleaned them thoroughly of their previous contents, and then mulched them with a food processor. An aluminium mold of the tile was  then welded together making sure the sides were taller than the height of the tile. A second part was fabricated as a top piece to compress the tile into shape.

After preheating an oven to no hotter than 200 degrees Celsius, they lined the mold with parchment paper and baked the tile until shiny(90-120 minutes). The top piece was weighed down (clamping works too), compressing the tile until it cooled. A heat gun or a clothes iron did the trick to smooth out any rough edges.

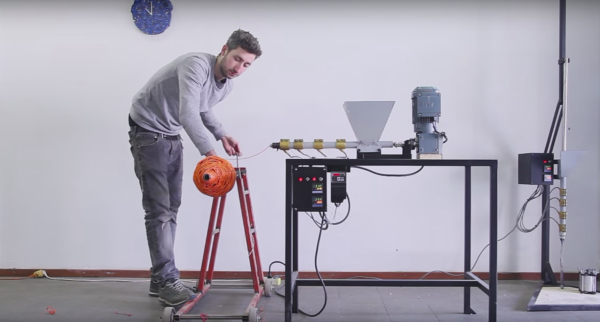
Not only does [fokkejongerden]’s tiles give the recycler plenty of artistic freedom for creating their own mosaic floor, the real gem is the adaptable plastic recycling process for home use. For another method, check out this recycled, recycling factory that turns bottles in to rope and more! There’s even the potential for fueling your 3D printer.

[Via Instructables]

Neopixels Light The Way In Pressure-Sensitive Floor

It’s got a little “Saturday Night Fever” vibe to it, but this pressure-sensitive LED floor was made for gaming, not for dancing.

Either way, [creed_bratton_]’s build looks pretty good. The floor is a 5×6 grid of thick HDPE cutting boards raised up on a 2×4 lumber frame. Each cell has a Neopixel ring and a single force-sensitive resistor to detect pressure on the pad. Two 16-channel multiplexers were needed to consolidate the inputs for the Arduino that’s running the show, and a whole bunch of wall warts power everything. The video below shows a little of the build and a look under the tiles. It’s not clear exactly what game this floor is for, but you can easily imagine a maze or some other puzzle that needs to be solved with footsteps.

Light-up floors are nothing new here, what with this swimming pool dance floor. But this interactive dance floor comes close to the gaming aspect of [creed_bratton_]’s build.

Continue reading “Neopixels Light The Way In Pressure-Sensitive Floor”

Think Globally, Build Locally With These Open-Source Recycling Machines

Walk on almost any beach or look on the side of most roads and you’ll see the bottles, bags, and cast-off scraps of a polymeric alphabet soup – HDPE, PET, ABS, PP, PS. Municipal recycling programs might help, but what would really solve the problem would be decentralized recycling, and these open-source plastics recycling machines might just jump-start that effort.

We looked at [Precious Plastic] two years back, and their open-source plans for small-scale plastic recycling machines have come a long way since then. They currently include a shredder, a compression molder, an injection molder, and a filament extruder. The plans specify some parts that need to be custom fabricated, like the shredder’s laser-cut stainless steel teeth, but most can be harvested from a scrapyard. As you can see from the videos after the break, metal and electrical fabrication skills are assumed, but the builds are well within the reach of most hackers. Plans for more machines are in the works, and there’s plenty of room to expand and improve upon the designs.

We think [Precious Plastic] is onto something here. Maybe a lot of small recyclers is a better approach than huge municipal efforts, which don’t seem to be doing much to help.  Decentralized recycling can create markets that large-scale manufacturing can’t be bothered to tap, especially in the developing world. After all, we’ve already seen a plastic recycling factory built from recycled parts making cool stuff in Brazil.

Continue reading “Think Globally, Build Locally With These Open-Source Recycling Machines”

Plastic Mallet

Turning Plastic Milk Jugs Into A Useful Tool

[Peter] obviously enjoys getting to work in his wood shop. He also likes turning things into other things. With his latest project, he combines his two hobbies by turning plastic milk jugs into a plastic joiner’s mallet.

[Peter] started out by collecting and “processing” the milk jugs. Milk jugs are commonly made with HDPE. HDPE is a petroleum-based plastic with a high strength-to-density ratio. It’s easy to recycle, which makes it perfect for this type of project. We’ve even seen this stuff recycled into 3D printer filament in the past. The “processing” routine actually just consists of cutting apart the jugs with a razor blade. [Peter] mentions in the past that he’s used a blender to do this with much success, but he’s unfortunately been banned from using the blender.

Next, all of the plastic pieces are piled up on a metal try to placed into a small toaster oven. They are melted into one relatively flat, solid chunk. This process is performed three times. The final step was to pile all three chunks on top of each other and melt them into one massive chunk of plastic.

While waiting for the plastic to melt together, [Peter] got to work on the handle. He put his woodworking skills to good use by carving out a nice wooden handle from a piece of cherry wood.  The handle was carefully shaped and sanded with a variety of tools. It is finished with some linseed oil for a nice professional look.

When the plastic was mostly melted together, [Peter] had to get to work quickly while the plastic was still soft. He pried the plastic off of the metal tray and stuffed it into a rectangular mold he made from some fiber board. He used a heat gun to soften the plastic as needed while he crammed it all into the mold. With the mold suitably stuffed, he closed it up and clamped it all shut.

Once the plastic cooled, [Peter] had to cut it into the correct shape and size. He took the solid chunk of plastic to his band saw to cut all the appropriate angles. He then used both a drill press and a chisel to cut the rectangular mounting hole for the handle. The plastic piece was then shaped into its final form using a belt sander. All that [Peter] had left to do was slide it up and only the handle. The shape of the handle and mounting hole prevent the plastic piece from flying off of the top of the handle. Check out the video below to see the whole process. Continue reading “Turning Plastic Milk Jugs Into A Useful Tool”

Building A Tornado In A Bottle

vortex-tornado-machine

Recreate the look of a tornado by building this water vortex art piece. The components that go into it are all very simple and can be found in your recycling bin with the exception of a motor and a way to drive it. The hard part is going to be getting to the point where you don’t have any leaks.

[Ixisuprflyixi] went with an empty salsa bottle to house the vortex. It’s a pleasant shape for the project since it’s both tall and narrow and it’s got a bit of a sexy curve to it. The base of the machine is a plastic bottle which looks like it might have been for Metamucil, but we’re not sure.  The important part is that it needs to be made from HDPE, as a portion of the container will be used to make the impeller. That’s the part that attaches to the motor shaft inside of the container. Give it a spin and you’ve got yourself a tornado in a bottle. See it in action after the jump.

This is a much quicker and easier version than the one we saw [Ben Krasnow] build. He ended up doing some repair work on the gasket that seals the motor shaft. It’s an interesting read if you are thinking of building one of these yourself.

Continue reading “Building A Tornado In A Bottle”