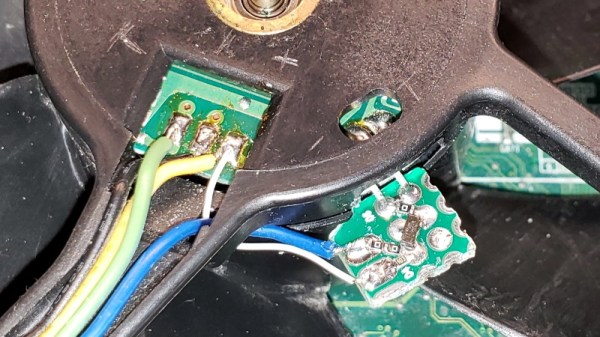
Thermal Camera Diagnoses Thermal Issue On A Sonoff Switch

No matter what your experience level with troubleshooting, there’s always at least a little apprehension when you have to start poking through a mains powered device. A little fear is a good thing; it keeps you focused. For some, though, the aversion to playing with high voltage is too much, which can cause problems when something fails. So what do you do when you’re reluctant to even open the case? Easy — diagnose the problem with an infrared camera.

[Bald Engineer]’s electrophobia started early, with some ill-advised experiments in transcutaneous conduction. So when his new Sonoff WiFi switch failed soon after deploying it to control a lamp in his studio, popping the top while it was powered up was out of the question. The piquant aroma of hot plastic was his first clue to the problem, so he whipped out his Flir One Thermal Camera and watched the device as it powered up. The GIF nearby shows that there was clearly a problem, with a bloom of heat quickly spreading out from the center of the unit. A few IR images of the top and bottom gave him some clues as to the culprits, but probing the board in those areas once power was removed revealed no obviously damaged components.

[Bald Engineer] hasn’t yet gotten to the bottom of this, but his current thinking is that the NCP1117 regulator might be bad, since it rapidly spikes to 115°C. Still, we think this is a nifty diagnostic technique to add to our toolkit, and a great excuse to buy an IR camera. Or, we could go with an open-source thermal camera instead.

[via Dangerous Prototypes]

Fire Hazard Testing

How do you know that new appliance you bought won’t burn your house down? Take a look at any electrical appliance, and you’ll find it marked with at least one, and most often, several safety certification marks such as UL, DIN, VDE, CSA or BSI. Practically every electrical product that plugs into utility supply needs to go through a mandatory certification process to ensure it meets these conformity test requirements. Some examples include domestic and industrial electrical appliances, tools, electrical accessories, consumer electronics and medical electronics.

When you look through a typical safety test standard, you’ll notice it breaks down the various tests in two categories. “Type” tests are conducted on prototypes and samples of the final product or its individual parts and components, and are not generally repeated unless there are changes in design or materials. “Acceptance” tests are routine verification tests conducted on 100% of the products produced. For example, a typical Type test would be used to check the fire retardant properties of the plastics used in the manufacture of the product during development, while a Routine test would be carried out to check for high voltage breakdown or leakage and touch currents on the production line.

Nowadays, a majority of countries around the world adopt standards created by international organizations such as IEC, ISO, and ITU, then fine tune them to suit local requirements. The IEC works by distributing its work across almost 170 Technical Committees and Subcommittees which are entrusted with the job of creating and maintaining standards. One of these committees is “TC89 Fire hazard testing” whose job is to provide “Guidance and test methods for assessing fire hazards of electro-technical equipment, their parts (including components) and electrical insulating materials”. These tests are why we feel safe enough to plug something in and still sleep at night.

Practically all electrical products need to confirm to this set of tests as part of their “Type” test routine. This committee produces fire hazard testing documents in the IEC 60695 series of standards. These documents range from general guidelines on several fire hazard topics to specific instructions on how to build the test equipment needed to perform the tests. It’s interesting to see how some of these tests are carried out and the equipment used. Join me after the break as we take a look at that process.

Continue reading “Fire Hazard Testing”

3D Printer Enclosure Is Pleasant On The Eyes And Ears

There’s a lot going on in the 3D printing world. Huge printing beds, unique materials like concrete, and more accessible, inexpensive printers for us regular folk. The only thing that’s often overlooked with these smaller printers is the ruckus that they can make. The sounds of all those motors can get tiresome after a while, which was likely the inspiration for [Fabien]’s home 3D printer workstation. (Google Translate from French)
After acquiring a new printer, [Fabien] needed a place to put it and created his own piece of furniture for it. The stand is made out of spruce and is lined with insulation. He uses a combination of cork, foam, and recycled rubber tile to help with heat, sound, and vibration respectively. Don’t worry, though, he did install a ventilation system for the fumes! After the printer housing is squared away, he place a webcam inside so that the user can monitor the print without disturbing it. Everything, including the current print, is managed with a computer on the top of the cabinet.
Having a good workspace is just as important as having a quality tool, and [Fabien] has certainly accomplished that for his new 3D printer. There have been a lot of good workspace builds over the years, too, including electronics labs in a portable box and this masterpiece workbench. If you’ve ever experienced the frustration of working in an area that wasn’t designed for the task at hand, you’ll easily be able to appreciate any of these custom solutions.

Fail Of The Week: ESP8266 Heats Temperature Sensor

[Richard Hawthorn] sent us in this interesting fail, complete with an attempted (and yet failed) clever solution. We love learning through other people’s mistakes, so we’re passing it on to you.

First the obvious-in-retrospect fail. [Richard] built a board with a temperature sensor and an ESP8266 module to report the temperature to the Interwebs. If you’ve ever put your finger on an ESP8266 module when it’s really working, you’ll know what went wrong here: the ESP8266 heated up the board and gave a high reading on the temperature sensor.

temp2Next came the clever bit. [Richard] put cutouts into the board to hopefully stop the flow of heat from the ESP8266 module to the temperature sensor. Again, he found that the board heats up by around four degrees Celcius or nine degrees Farenheit. That’s a horrible result in any units.

What to do? [Richard’s] first ideas are to keep hammering on the thermal isolation, by maybe redoing the board again or adding a heatsink. Maybe a daughterboard for the thermal sensor? We can’t see the board design in enough detail, but we suspect that a flood ground plane may be partly to blame. Try running thin traces only to the temperature section?

[Richard]’s third suggestion is to put the ESP into sleep mode between updates to reduce waste heat and power consumption. He should be doing this anyway, in our opinion, and if it prevents scrapping the boards, so much the better. “Fix it in software!” is the hardware guy’s motto.

But we’ll put the question to you electronics-design backseat drivers loyal Hackaday readers. Have you ever noticed this effect with board-mounted temperature sensors? How did you / would you get around it?


2013-09-05-Hackaday-Fail-tips-tileFail of the Week is a Hackaday column which celebrates failure as a learning tool. Help keep the fun rolling by writing about your own failures and sending us a link to the story — or sending in links to fail write ups you find in your Internet travels.

The Mystery Of The Boiled Batteries

While debugging a strange battery failure in a manufacturing process, [Josh] discovered a new (to us) LiPo battery failure mode.

Different battery chemistries react differently to temperature. We’ve used lithium exclusively in high-altitude ballooning, for instance, because of their decent performance when cold. Lithium batteries generally don’t like high temperatures, on the other hand, but besides the risk of bursting into flames, we had no idea that heat could kill them. When the battery’s voltage is already low, though, it turns out it can.

[Josh]’s process required molding plastic with the battery inside, and this meant heating the batteries up. After the fact, he noticed an unreasonably high failure rate in the batteries, and decided to test them out. He put the batteries, each in a different initial charge, into a plastic bag and tortured them all with ice and fire. (OK, boiling water.)

When the batteries got hot, their voltage sagged a little bit, but they recovered afterwards. And while the voltage sagged a little bit more for the batteries with lower initial charge, that’s nothing compared to the complete failure of the battery that entered the hot water with under 1V on it — see they yellow line in the graphs.

battery_voltages

There’s a million ways to kill a battery, and lithium batteries are known not to like being completely discharged, but it looks like the combination of deep discharge and heat is entirely deadly. Now you know.

Heat Duct Rover Explores Stink, Rescues Flashlight

It all started with a bad smell coming from the heat register. [CuddleBurrito] recalled a time when something stinky ended up in the ductwork of his folks’ house which ended up costing them big bucks to explore. The hacker mindset shies away from those expenditures and toward literally rolling your own solution to investigating the funk. In the process [CuddleBurrito] takes us on a journey into the bowels of his house.

Continue reading “Heat Duct Rover Explores Stink, Rescues Flashlight”

Too Hot For Fido? Get Alerted!

Meet project Oro, the temperature monitoring watchdog. Err… the watchdog monitoring temperature probe. Well, it’s both actually!

[Richard Deininger] built the project after having the AC system go down in his company’s server room. That environmental cooling is imperative if you don’t want your server hardware turned to slag. The idea is a separate piece of hardware that monitors the room temperature and will alert the on-call staff if it climbs too high. He was successful, and showing the hacked hardware around the office came up with a second idea: a temperature sensor for your car to ensure it’s not too hot for your dog.

Anyone who has a canine friend living with them knows you don’t utter the word “ride” out loud lest a barking, whimpering, whining frenzy ensue. But jingle those keys and they’ll be at the door in no time. During the summer you can still take them with you for short errands thanks to the peace of mind [Richard’s] build provides. It’s simply an Arduino, DHT22 temp/humidity probe, and a SIM900 GSM modem. Set your temperature threshold and you’ll get an alert if temperatures are climbing to unsafe levels for Fido.

While you have your tools out, we recommend building auto-watering and auto-feeding systems for the family pets. What’s that? You hate domesticated animals? There’s a hack you can use to chase them from your yard.