PixMob units are wearable LED devices intended for crowds of attendees at events like concerts. These devices allow synchronized LED effects throughout the crowd. [yeokm1] did a teardown of one obtained from a preview for the 2019 Singapore National Day Parade (NDP), and in the process learned about the devices and their infrastructure.
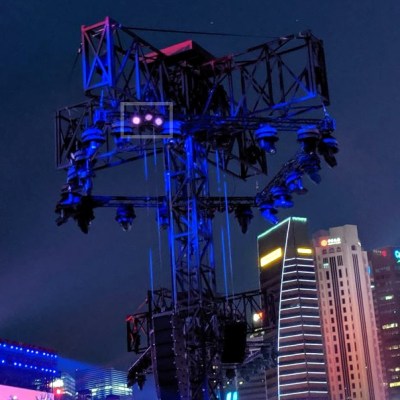
Suspected IR emitter for the PixMob units, mounted on a lighting tower (marked here in white).
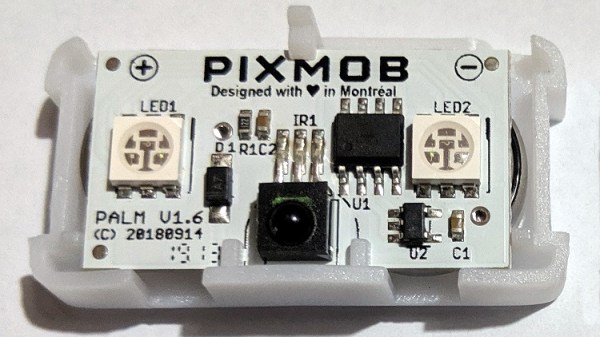
PixMob hardware has been known to change over time. This version has two RGB LEDs (an earlier version had only one), an unmarked EEPROM, an unmarked microcontroller (suspected to be the Abov MC81F4104), and an IR receiver module. Two CR1632 coin cells in series power the device. [yeokm1] has made the schematic and other source files available on the teardown’s GitHub repository for anyone interested in a closer look.
One interesting thing that [yeokm1] discovered during the event was the apparent source of the infrared emitter controlling the devices. Knowing what to look for and reasoning that such an emitter would be mounted with a good view of the crowd, [yeokm1] suspected that the IR transmitter was mounted on a lighting tower. Viewing the tower through a smartphone’s camera revealed a purplish glow not visible to the naked eye, which is exactly the way one would expect an IR emitter to look.
Sadly, there wasn’t any opportunity to record or otherwise analyze the IR signals for later analysis but it’s possible that the IR protocol might be made public at some point. After all, running custom code on an earlier PixMob board was made possible in part by asking the right people for help.
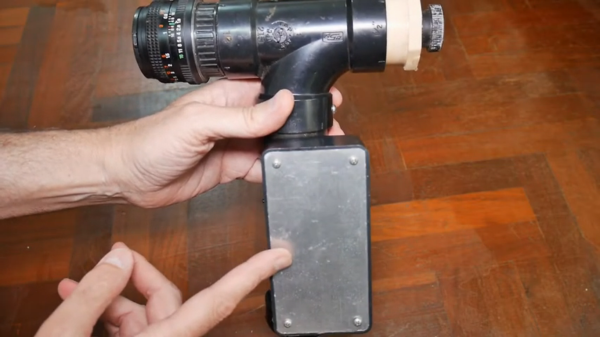
Old military equipment can sometimes be found in places like flea markets and eBay for pennies, often because people don’t always know what they have. While [tsbrownie] knew exactly what he was getting when he ordered this mystery device, we’re not sure we could say the same thing if we stumbled upon it ourselves. What looks like a vacuum tube of some sort turns out to be an infrared sensor from an old submarine periscope that was repurposed as a night vision device. (Video, embedded below.)
Of course, getting a tube like this to work requires high voltage. This one specifically needs 3500V in order to work properly, but this was taken care of with a small circuit housed in a PVC-like enclosure. The enclosure houses the tube in the center, with an eye piece at one end and a camera lens at the other, attached presumably by a 3D-printed mount. The electronics are housed in the “grip” and the whole thing looks like a small sightglass with a handle. Once powered up, the device is able to show a classic green night vision scene.
Old analog equipment like this is pretty rare, as are people with the expertise to find these devices and get them working again in some capacity. This is a great video for anyone with an interest in tubes, old military gear, or even if you already built a more modern night vision system a while back.
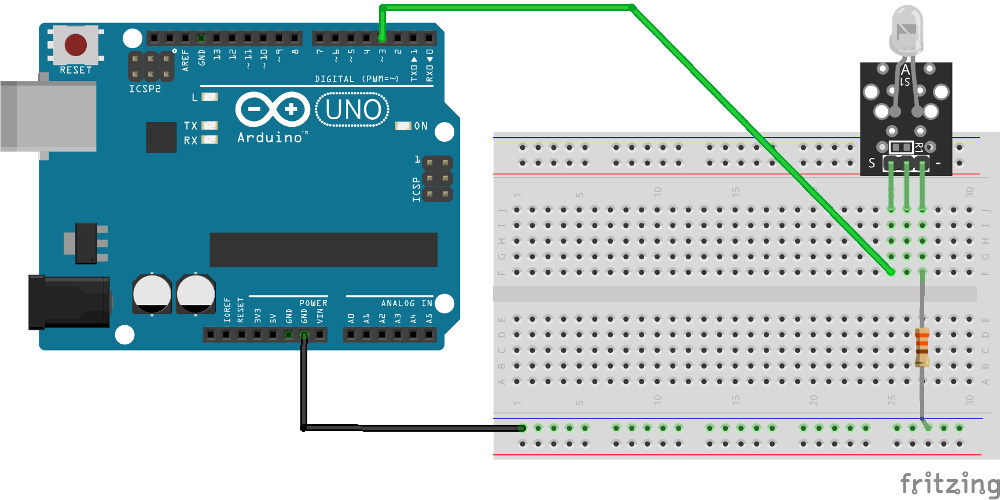
There are truisms about dice that you’ve probably already heard: if you have just one of them it’s called a “die”, opposite faces of each die always add up to seven, and those dots that you’re adding together are known as “pips”. But what about the infrared properties of those pips? It turns out they reflect less IR than the white body of the die and that trait can be used to build an automatic die reader.
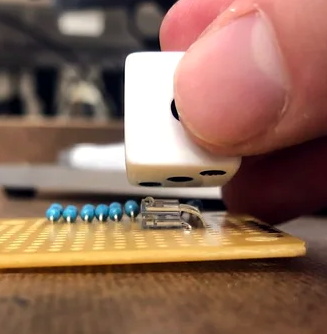
Great projects have a way of bubbling to the surface. The proof of concept comes from way back in 2009, and while the source blog is now defunct, it’s thankfully been preserved by the Internet Archive. In recreating the project based on that barebones description, [Calvin] reached for a set of five IR transmitter/receiver pairs. Take a close look and you’ll see each transmitter is hidden under its partnered receiver. The light shines up through the receiver and the presence of the pip is detected by measuring how much of it bounces back.
This board is only the sensor portion of the design. A 595 shift register provides the ability to control which IR pair is powered, plus five more signals heading out to the analog pins of an Arduino Uno to monitor how much light is being detected by the receivers. Hey, that’s another interesting fact about dice, you only need to read five different pips to establish the value shown!
We wish there were a demo video showing this in action, but alas we couldn’t find one. We were amused to hear [Calvin] mentioned this was a sorting assignment at University and the team didn’t want to build yet another candy sorter. Look, we love an epic M&M sorter just as much as the next electronic geek, but it’s pretty hard to one-up this dice-based random number generator which rolls 1.3 million times each day.
In the hacker and DIY community, there are people who have exceptional knowledge and fantastic tools. These people are able to do what others could only dream about, and that others can only browse eBay looking for that one tool they need to do the job. One of these such people is [John McMaster]. He is the resident expert on looking inside integrated circuits. He drops acid on a chip, and he can tell you exactly how it works on the inside.
At the hardwear.io conference, [John] shared one of his techniques for reverse-engineering intgrated circuits. He’s doing this by simply looking at the transistors, and looking at the light they give off. He’s also looking at the wrong side of the die.
The technique [John] is using is properly called backside analysis, or looking at the infrared emissions of electron recombinations. This happens at the junction of every transistor when it’s active, and these photons are emitted at the bandgap of silicon, or about 1088 nm, far into the infrared. This sort of thing has been done before by [nedos] at CCC in 2013, but rarely have we seen a deep dive into the tools and techniques needed to look at the reverse side of an IC and see the photons coming off.
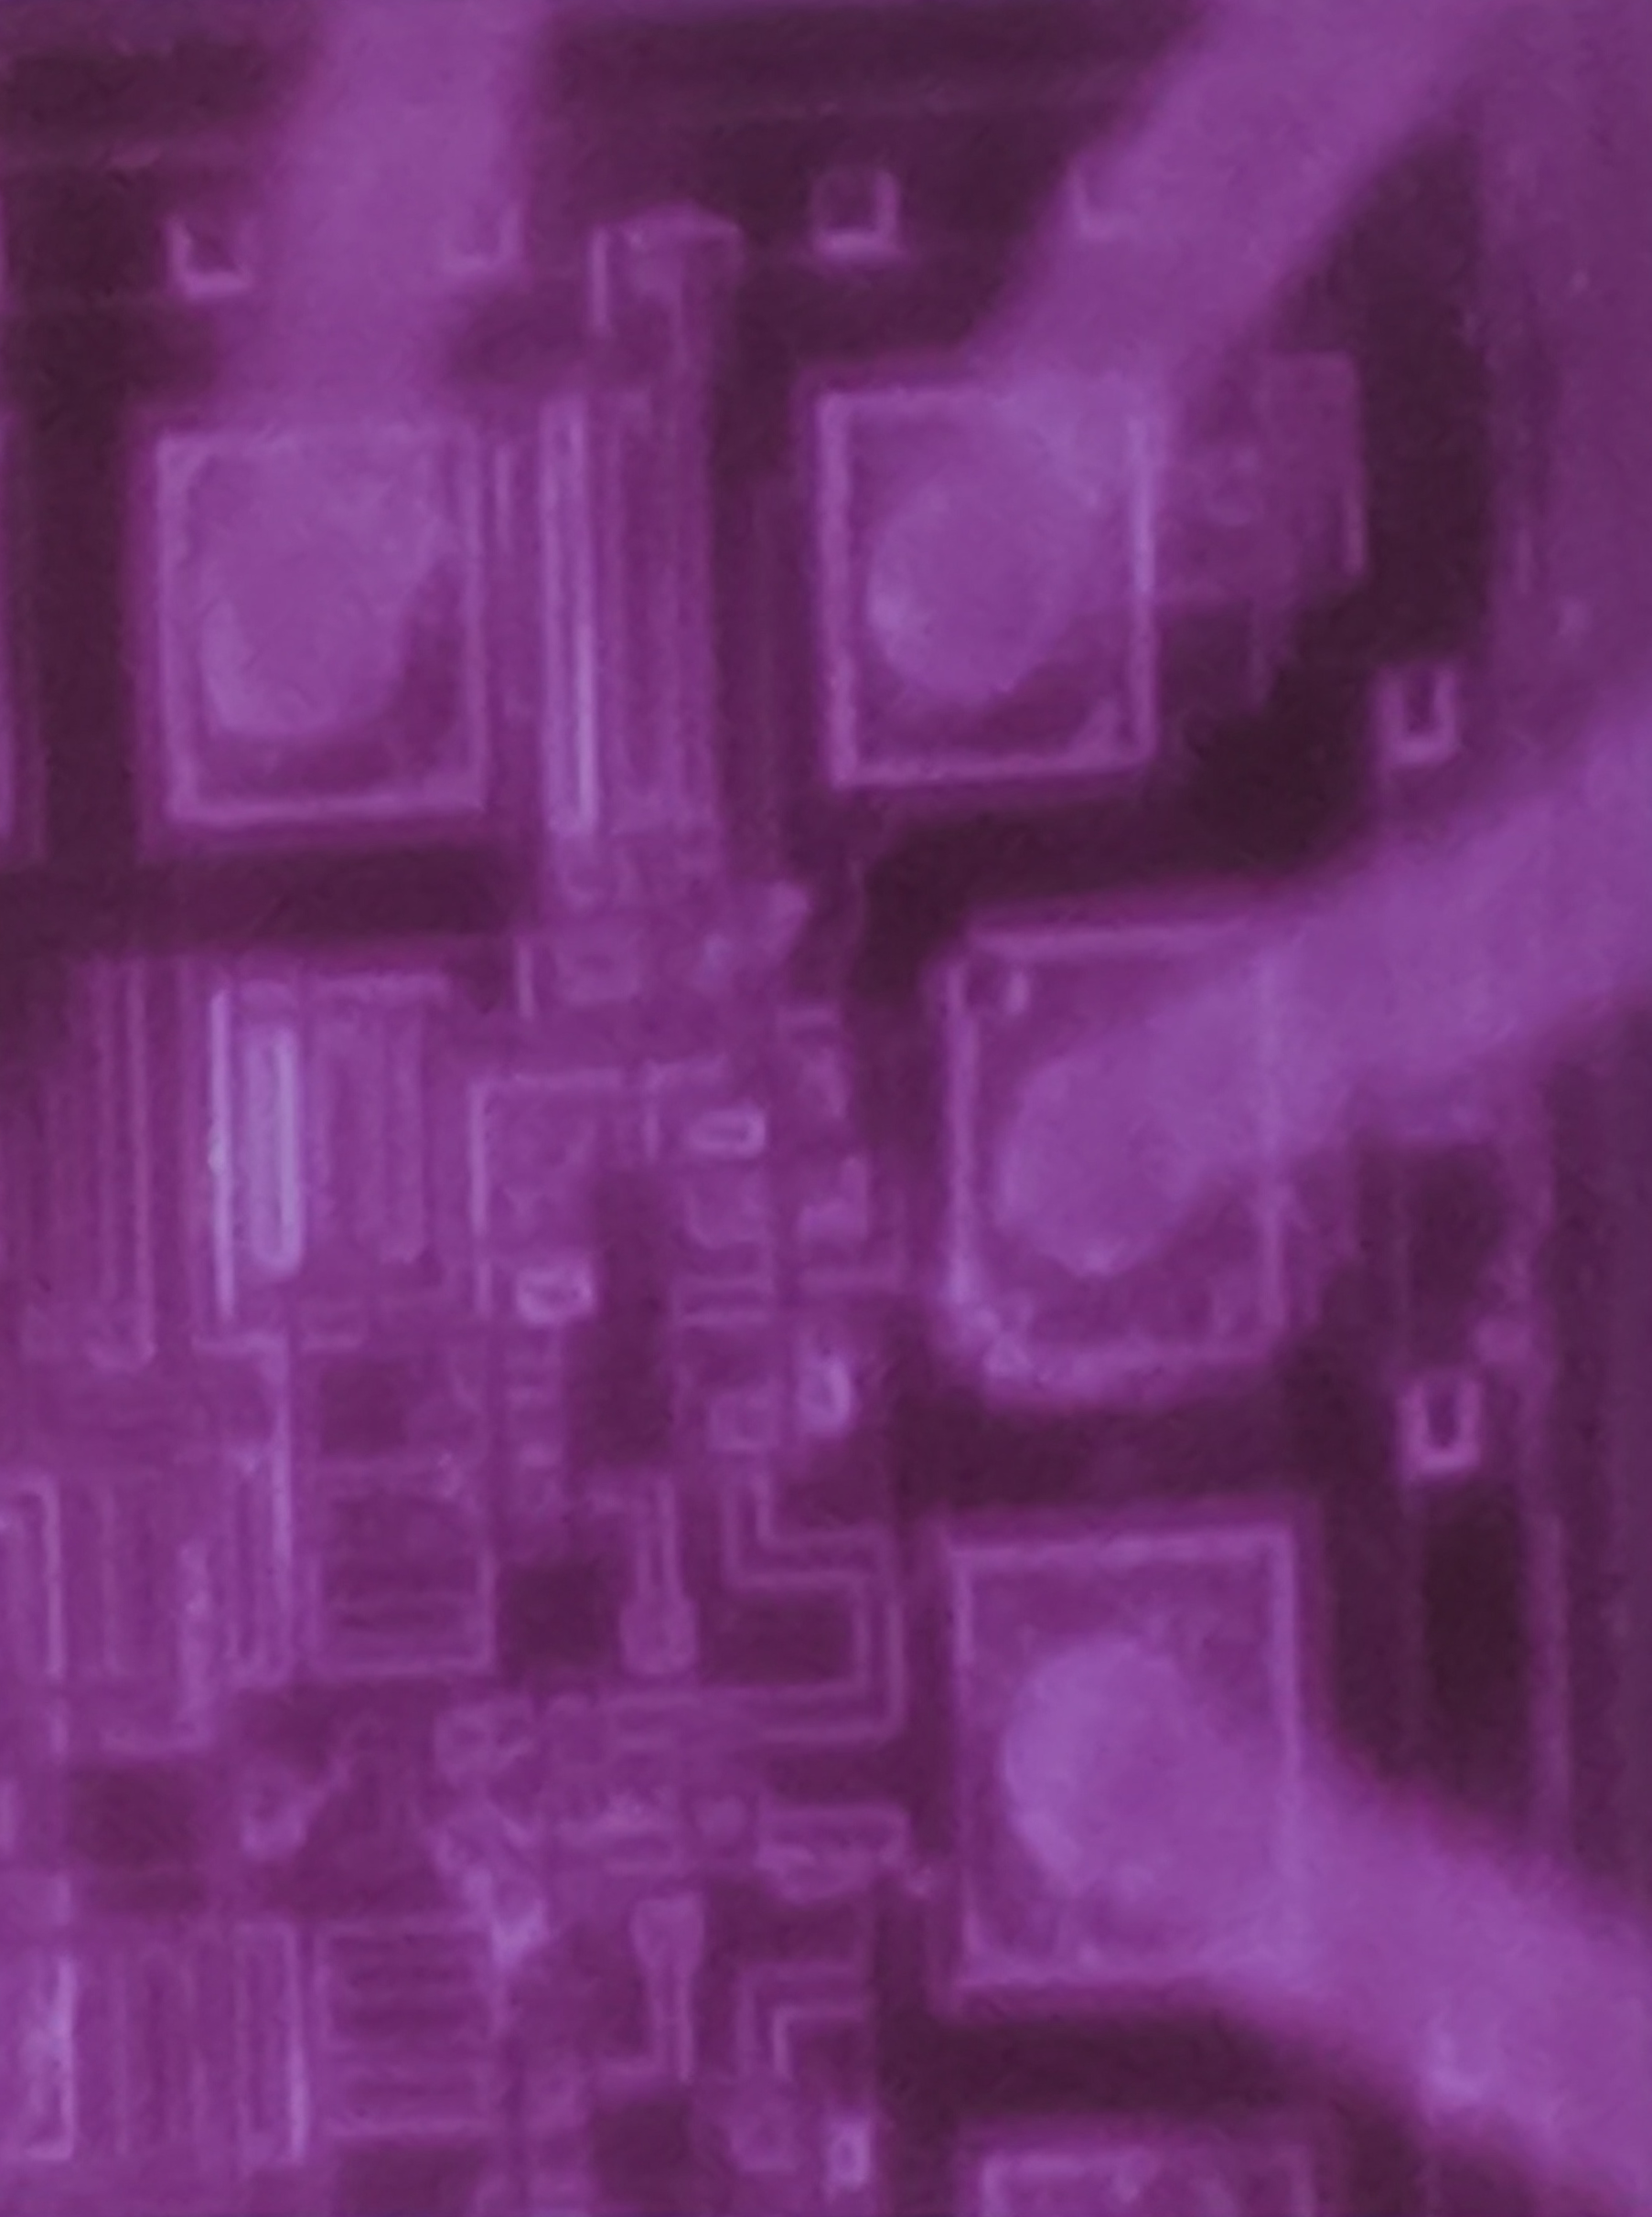
An IC, seen in infrared
There are several tools [John] used for this work, and he actually did a good comparison of different camera technologies used to image infrared photon emissions from integrated circuits. InGaAs cameras are expensive, but they offer high sensitivity. New back-illuminated CMOS cameras and cooled CCDs normally reserved for astrophotography were also tested, and as always, you get what you pay for; the most expensive cameras worked best, but there were ways you could make the cheap ones work.
As with any camera work, preparing the lighting is of utmost importance. This includes an IR pass filter, and using only LED lighting in the lab with no sunlight, incandescent, or halogen light bulbs in the room — you don’t want any IR, after all. A NIR objective in the microscope was sourced from eBay, for about 1/10th the normal cost, because the objective had a small, insignificant scratch. Using this NIR objective made the image twice as bright as any other method. You can successfully image a chip with this, and [John] tested the setup on a resistor inside a CD4050 chip; the resistor glowed a slight purple, the color you would expect with infrared sensors. But can it work with I/O levels in a more modern chip? Also, yes. It needs some Photoshop to process, and stretching the 12-bit or 16-bit color space into an 8-bit color space, but it does work.
Finally, the supreme achievement of doing backside IR analysis. Is that possible with even this minimal setup? This requires some preparation; the silicon substrate in an IC is transparent in IR, but there is attenuation and this is especially important when the substrate is 300 um thick. This needs to be shaved down to about 25 um thick, which surprisingly is best done with fine sandpaper and a finger.
While few IR emissions were observed via backside emissions, the original plan wasn’t to completely analyze the chip, but merely to do some floor planning. For this, it worked. It’s a remarkable amount of work to see the inside of a silicon chip.
The infrared remote control might not hold the seat of honor in the average home theater setup that it once enjoyed, but it’s not quite out to pasture yet. After all, what are you going to use to stop Netflix once the Chromecast invariably disconnects from your phone? As long as there are devices out there that will respond to commands blasted their way via an IR LED, hackers will be looking to get in on the action.
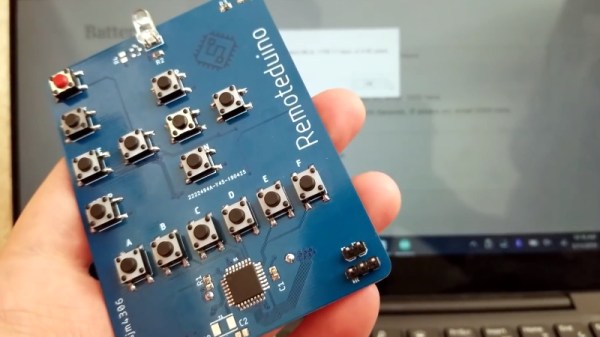
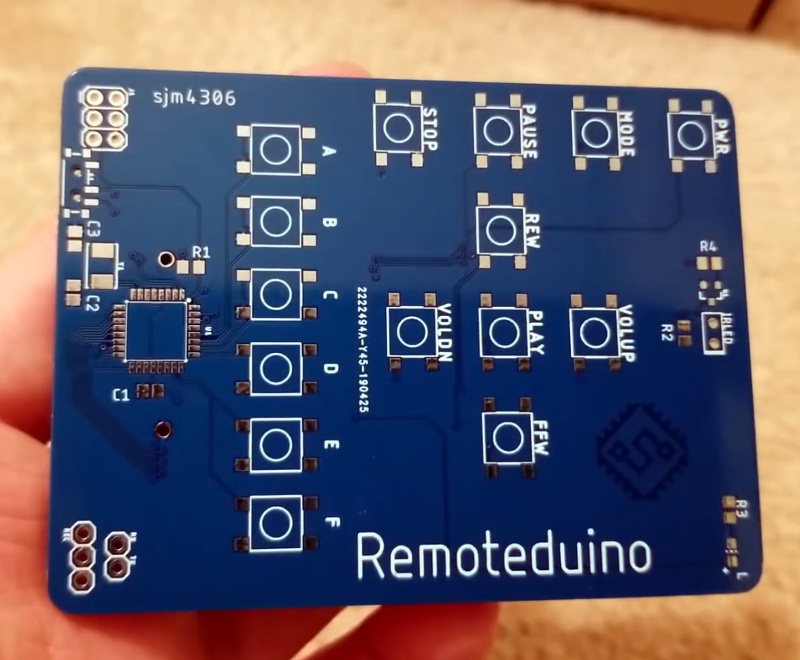
In an effort to make IR remote hacking just a bit easier, [sjm4306] has submitted his Remoteduino for the 2019 Hackaday Prize. With this handy tool in your arsenal, you can focus on developing the software side of your next IR remote project without worry about the hardware. Just upload your code, and get clicking.
As you might imagine, the design is rather simple. On the front edge of the PCB you’ve got the prerequisite IR LED, and a healthy supply of tactile buttons that your code can use as input. The remote features a fairly standard layout on the top half, complete with silkscreened labels for the common functions, but below that [sjm4306] has packed in six general purpose buttons that can be used for whatever you like.
The Remoteduino is powered by an ATmega328P, and the whole thing runs on a CR2032 cell mounted on the backside. [sjm4306] mentions in his write-up on Hackaday.io that battery life was always a consideration during development of the Remoteduino, so he’s made a few energy-saving considerations. Using the internal 8 MHz oscillator instead of an external crystal shaved a bit off the top, and the aggressive sleep routines got him the rest of the way. In testing, he estimates the battery should last a few years even with daily use.
While the era of the TiVo (and frankly, the idea of recording TV broadcasts) has largely come to a close, there are still dedicated users out there who aren’t quite ready to give up on the world’s best known digital video recorder. One such TiVo fanatic is [Gavan McGregor], who recently tried to put a TiVo Series 3 recorder into service, only to find the device was stuck in the family-friendly “KidZone” mode.
Without the code to get it out of this mode, and with TiVo dropping support for this particular recorder years ago, he had to hack his way back into this beloved recorder on his own. The process was made easier by the simplistic nature of the passcode system, which only uses four digits and apparently doesn’t impose any kind of penalty for incorrect entries. With only 10,000 possible combinations for the code and nothing to stop him from trying each one of them in sequence, [Gavan] just needed a way to bang them out.
After doing some research on the TiVo remote control protocol, he came up with some code for the Arduino using the IRLib2 library that would brute force the KidZone passcode by sending the appropriate infrared codes for each digit. He fiddled around with the timing and the delay between sending each digit, and found that the most reliable speed would allow his device to run through all 10,000 combinations in around 12 hours.
The key thing to remember here is that [Gavan] didn’t actually care what the passcode was, he just needed it to be entered correctly to get the TiVo out of the KidZone mode. So he selected the “Exit KidZone” option on the TiVo’s menu, placed his Arduino a few inches away from the DVR, and walked away. When he came back the next day, the TiVo was back into its normal mode. If you actually wanted to recover the code, the easiest way (ironically) would be to record the TV as the gadget works its way through all the possible digits.
FLIR are making some really great miniature thermal cameras these days, designed for applications such as self-driving cars, and tools that help keep firefighters safe. That’s great and all, but these thermal cameras are so cool, you really just want to play with one. That’s what [greg] was thinking when he designed a PCB backpack that captures thermal images from a FLIR Boson and stores it on an SD card. It’s a thermal action cam, and an impressive bit of FPGA development, too.
The FLIR product in question is a Boson 640, an impressive little camera that records in 640×512 resolution, with a 60 Hz update rate. This one’s got the 95° field of view, giving it a very good specification in a very small footprint. This is a huge improvement over FLIR’s Tau camera, for which [greg] built a breakout board with Ethernet and DDR memory a few years ago. Once he found out about the Boson, he figured a backpack PCB for this camera would be possible and a great excuse to teach himself FPGAs with a hands-on project.
With an impressive ability to find the perfect part, [greg] sourced a Lattice iCE40 FPGA in an 8×8 mm package along with an 8 Mbit HyperRAM in a 6×8 package. This combination allows for all the chips to fit behind the Boson camera. Add in an microSD card slot and a few connectors and this breakout board is very close to being a commercial product, for whatever forward looking infrared needs you might have.