Headphone Tube Preamp Kit

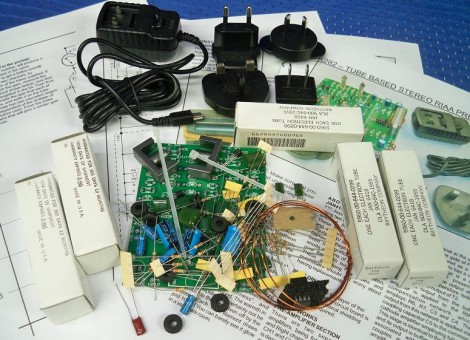
If you’re curious about tube amps but don’t have a firm enough knowledge base to dive right in you might want to try a kit. [Mark Houston] reviewed one such kit and we enjoyed reading about his experiences. It comes with everything you need save soldering tools, an enclosure, and the final connectors ([Mark] used RCA connectors). There is a full schematic available and the assembly instructions take you through tube matching and using that piece of copper coil you see in the picture to wind your own inductor. Consider trying this primer before you jump into building a single tube, multiple tube, or an amplifier of your own design.

[Thanks Gio]

Intense Kit Turns Wacom Tablet Into Cintiq Clone

[Lesa Wright] just started selling enclosure kits used to convert a Wacom tabet into a Cintiq clone. You need to start with your own Wacom tablet, there are kits for four different models. You’ll also need to track down some other parts: a compatible laptop LCD screen, controller kit, and some cable extenders. From there, the kit takes over, with several pieces of laser-cut acrylic needing to be glued together properly, then a surprising number of spacers need to be cut from foam board in order to mount everything..

The kits come in at around $225. That might seem a bit steep since you need to bring your own electronics to the party, but have you checked out the price of the original Cintiq? You can expect to drop about twelve-hundred bones on a ready-to-use model. Before you take the dive, you should watch their collection of assembly videos, it’s quite a process.

RGB Keylock Shield

Hackaday alum [Will O’Brien] cleaned up his messy breadboard with an RGB keylock Arduino shield. You may remember this two-part project from last year. It uses buttons backlit by an RGB LED to operate a door lock.

[Will] is still mulling over what type of kit options he will offer. We’re happy to see if the most important part, a laser-cut key bezel, will be available. This makes for a professional looking finish that made the original project difficult to replicate.

STM8S-Discovery: Microcontrollers Reach A New Low

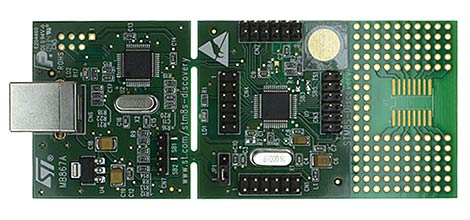
A complete microcontroller development kit for little more than the cost of a bare chip? That’s what STMicroelectronics is promising with their STM8S-Discoveryseven dollars gets you not only a board-mounted 8-bit microcontroller with an decent range of GPIO pins and functions, but the USB programmer/debugger as well.

The STM8S microcontroller is in a similar class as the ATmega328 chip on latest-generation Arduinos: an 8-bit 16 MHz core, 32K flash and 2K RAM, UART, SPI, I2C, 10-bit analog-to-digital inputs, timers and interrupts and all the usual goodness. The Discovery board features a small prototyping area and throws in a touch-sense button for fun as well. The ST-LINK USB programmer/debugger comes attached, but it’s easy to crack one off and use this for future STMicro-compatible projects; clearly a plan of giving away the razor and selling the blades.

The development tools are for Windows only, and novice programmers won’t get the same touchy-feely community of support that surrounds Arduino. But for cost-conscious hackers and for educators needing to equip a whole classroom (or if you’re just looking for a stocking stuffer for your geeky nephew), it’s hard to argue with seven bucks for a full plug-and-play setup.

[thanks Billy]

Drone Lab Brings The Excitement Of Hypnotoad Home

Drone-lab-hypnotoad

[Peter] tipped us off about his new synthesizer kit, Drone Lab. It has the things we look for a synthesizer: knobs, inputs, switches, wacky sounds. You can get your soldering on with the kit version, or buy these pre-built. Peter bills this as an open source kit but we didn’t see board artwork, just a schematic.

What we didn’t expect is its ability to mimic the Hypnotoad. As seen in the video after the break, the glorious sounds of your favorite television show can now be created in your own home. If you’ve never seen an episode of the Hypnotoad (gasp!) we’ve got that covered after the break as well.

ALL GLORY TO THE HYPNOTOAD!

Update: PCB artwork has now been posted just below the schematic.

Continue reading “Drone Lab Brings The Excitement Of Hypnotoad Home”

Adjustable Breadboard Supply

breadboardpowersupply

adafruit industries’ latest product is an adjustable breadboard power supply kit. We’ve seen breadboard supplies before, but like most of adafruit’s kits, this is the best design you’re going to encounter. It uses an MIC2941 voltage regulator instead of the more commonplace LM317. It has a very low dropout which means your output voltage can be much closer to the input voltage. Their example is using 3AAA or a Li-Ion battery for an output of 3.3V. Input can be through a barrel jack or terminal blocks. There is a selection switch for 3.3, 5, and adjustable voltage. Using the adjustment pot you can select an output voltage anywhere from 1.3V to within .5V of the 20V maximum input. The adjusted output voltage will remain the same even if you increase the input voltage. Like all of their kits, you can find schematics, assembly and usage instructions, on their project site.

64 Synchronizing Fireflies

screenshot_007

[Alex] of tinkerlog created a set of 64 RGB fireflies that synchronize to blink all at once. We covered the kit earlier, but he has assembled a set of 64. Each firefly is independently controlled by an ATtiny13 that reads a phototransistor and lights up an RGB LED. The fireflies are programmed to blink a certain rate, but blink faster if they detect other blinks. After a few cycles, the fireflies begin to blink in unison. When the fireflies are arranged in different configurations, different patterns emerge. He is selling kits and has instructions for building your own. Videos of the fireflies after the jump.

Continue reading “64 Synchronizing Fireflies”